KEYPAD MODEL USER MANUAL
Contents SecureDrive Overview 3 Safety Information 3 SecureDrive Features 4 PINs and Procedures 5 User Mode 5 User PINs 5 Unlocking the Drive in User Mode 6 Changing the User PIN 6 Options for User Mode 7 Admin Mode 8 Button Pressing Conventions 9 Admin PINs 9 Options for Admin Mode 11 Managing the Drive 13 Verifying which PINs have Been Set 13 Deleting all Files in Admin Mode 13 Brute Force Hacking Detection 14 Resetting (Deleting) the Drive 15 Creating a User PIN after a Reset (blank Drive) 15 Reformat
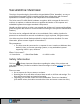
Rev. 20190228A SecureDrive Overview Thank you for purchasing the SecureDrive-Keypad Model (‘Drive’ hereafter), an easy to use hardware encrypted USB 3.0 portable external data storage drive with on-board alphanumeric 11 button keypad for OS-independent user-authentication. The Drive uses XTS-AES 256-bit hardware encryption, which encrypts all data on it in real time. It requires no software drivers nor updates and works on all computer and embedded systems that support standard USB protocol.
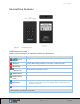
Rev. 20190228A SecureDrive Features Figure 1: The Drive Layout LED INTERPRETATIONS LEDs on the SecureDrive are represented here by colored icons. LED (blink all together once) Meaning Plugged into computer; LED test = Red solid Locked; Momentarily preparing for next input; or failed procedure. = Red blinking1 Locked, ready for input (other than a Setting code).
Rev. 20190228A PINs and Procedures PIN REQUIREMENTS Your User PIN or Admin PIN must: • be between 7-15 digits in length • not contain only repetitive numbers, e.g. (3-3-3-3-3-3-3) • not contain only consecutive numbers, e.g. (1-2-3-4-5-6-7), (7-8-9-0-1-2-3-4), (7-6-5-4-3-2-1) NOTE: Creating words (using the corresponding number key for each letter) can be more memorable than a string of numbers.
Rev. 20190228A Unlocking the Drive in User Mode CAUTION: Possible deletion of data. After ten failed attempts to unlock the Drive, the User PIN and all data on the Drive will be deleted. Refer to Brute Force Hacking Detection on page 14. NOTE: Until the Drive is unlocked it does not show in your computer’s File Manager (Explorer or Finder). 1. 2. 3. 4. Connect the Drive to your computer with the USB cable. Press [ ] Enter the User PIN*. [ ] Press [ ] *The factory PIN for new drives is 11223344.
Rev. 20190228A Options for User Mode The following headings describe enabling options and features requiring only a User PIN. For Administration options see Options for Admin Mode on page 11. This Section: • Enabling Read-Only in User Mode • Enabling Read/Write in User Mode • Setting the Timeout Lock in User Mode • Disabling the Timeout Lock in User Mode Procedures that end with these LEDs [ ], will eventually change to .
Rev. 20190228A If successful, the next time the Drive is unlocked it will be in Read/Write Mode as indicated by a solid green LED. SETTING THE TIMEOUT LOCK IN USER MODE To protect against unauthorized access when the Drive is connected to a host computer and unattended, the Drive can be set to automatically lock after a pre-set amount of idle time (no read or write activity). NOTE: When set in User Mode, the Timeout Lock is only active in User Mode and not Admin Mode.
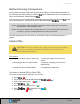
Rev. 20190228A Button Pressing Conventions Many Admin procedures start with pressing and holding a number button down (1 or 7, for example) and while holding it, pressing button: abbreviated in the steps below as: Press and hold down 7-and then press. In some cases, you must hold down the number while pressing and releasing twice: abbreviated as: Press and hold down 1-and then press.
Rev. 20190228A NOTE: If a mistake was made or the procedure not completed, no Admin PIN will be created. CREATING AN ADMIN PIN (USER PIN EXISTS) The Drive must be locked. 1. 2. 3. 4. 5. 6. 7. 8. Press [ ] Enter the User PIN [ ] Press [ ] Wait for , then press and hold down 1-and then pressEnter a new Admin PIN. [ ] Press . [ ] Re-enter your new Admin PIN. [ ] Press . [ ] [ ] NOTE: If a mistake was made or procedure not completed, no Admin PIN will be created.
Rev. 20190228A 5. 6. 7. 8. Enter a new User PIN. [ ] Press [ ] Re-enter the User PIN ] Press [ momentarily, eventually ] If successful, the User PIN is now added or changed. LOCKING THE DRIVE IN ADMIN MODE Locking the Drive without unplugging the USB cable is the same for both modes. Refer to page 6. CHANGING THE ADMIN PIN The Admin PIN cannot be changed from the User mode. Remember that Press and hold down 1-and then pressbutton and press the Key button twice.
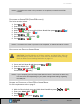
Rev. 20190228A 1. 2. 3. 4. 5. 6. Press and hold down 1-and then press[ Enter the Admin PIN. [ ] Press [ ] Wait for , then press [ ] Press 7,6 (R,O for Read-Only) [ ] Press [ slowly & momentarily, then ] ] If successful, the next time the Drive is unlocked it will be in R-O Mode as indicated by the slow blinking green LED (as well as messages provided by your computer when you try to save or delete a file).
Rev. 20190228A DISABLING THE TIMEOUT LOCK IN ADMIN MODE Follow the same steps for setting the Timeout Lock (above) and enter 00 for the time delay. The Timeout Lock will be disabled. Managing the Drive The following headings discuss important, though less common, actions for managing your Drive. Except where noted, all procedures assume your Drive is connected to a computer and locked (red LED).
Rev. 20190228A 8. Press [ slowly & If unsuccessful [ briefly] momentarily] All data and User settings have now been deleted from the Drive. Brute Force Hacking Detection USER Status: Both Admin and User PINs have been created. If a User enters an incorrect User PIN ten consecutive times, regardless of the time intervals in between attempts, the Drive’s brute force detection will trigger and the User PIN will be deleted.
Rev. 20190228A Resetting (Deleting) the Drive CAUTION: Resetting the Drive will delete all data stored on it including both PINs. After Resetting, the Drive must be formatted (initialized). (See heading Reformatting the Drive after this procedure.) In the event that both the Admin and User PINs have been forgotten, or you want to delete all data stored on the Drive including the PINs, you can perform the following reset function.
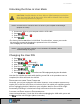
Rev. 20190228A 2. Unlock the drive with either User or Admin PIN. (To create a User PIN if you have not already done so, see Creating a User PIN after a Reset (blank Drive) on page 15.) 3. Open Explorer. 4. Right-click This PC > Left-click Manage. 5. In the Computer Management dialog’s left column, click Storage > Disk Management and wait for it to populate. 6. If the Initialize Disk dialog doesn't popup, R-click the ‘Unknown’ (or ‘Not Initialized’), usually Disk 1, and click Initialize disk.
Rev. 20190228A Figure 3: The SecureDrive is displayed here as “Disk 1.” It is Online but not yet allocated. (Windows 10 shown here.) 8. After Unknown changes to Online, right-click near Unallocated > New Simple Volume. 9. Follow the Wizard prompts. Select a Drive letter (it generally defaults to the next available letter) and then follow the prompts in the Wizard. 10. At the Format Removable Disk dialog, select a Volume Label, and select NTFS. 11. Continue to follow the prompts.
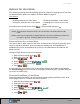
Rev. 20190228A Figure 4: The SecureDrive is displayed here as “Disk 1.” It is Online and allocated (Healthy) and ready for use. 13. Close the Computer Management dialog if it’s still open. When finished the New Volume (usually E) reads Healthy and a second Explorer window opens to display the Drive contents. The SATA blue and Green LED lights. FOR MAC OS 1. Connect to a Mac computer’s USB port. 2. Unlock the drive with either User or Admin PIN.
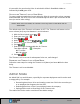
Rev. 20190228A Figure 5: The Disk Utility Dialog. 4. Click Erase. The system begins erasing the external Drive.
Rev. 20190228A Figure 6: SecureDrive displays under the list of External Drives when done (as well as on the desktop). 5. Click Done in the message dialog when available. SecureDrive is now displayed under External in the left column. 6. Close the Disk Utility. Technical Support This section covers contact information and information that SecureData, Inc. may require to quickly assist you. Our website is also a great resource. www.securedrive.
Rev. 20190228A Phone Mailing Address USA: 1-800-875-3230 International: +1-323-944-0822 SecureData, Inc. 3255 Cahuenga Blvd. West #301 Los Angeles, CA 90068-1178 NOTE: Prior to contacting SecureData, Inc., please have the following information ready.
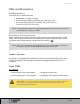
Rev. 20190228A Warranty and RMA information (Returned Merchandise Authorization) TWO YEAR LIMITED WARRANTY As explained below, SecureData, Inc. offers a two-year limited warranty on the SecureDrive™ against defects in materials and workmanship under normal use. The limited warranty period is effective from the date of purchase either directly from SecureData, Inc. or an authorized reseller.
Rev. 20190228A DOCUMENTATION IS PROVIDED AS IS AND ALL EXPRESS OR IMPLIED CONDITIONS, REPRESENTATIONS AND WARRANTIES, INCLUDING ANY IMPLIED WARRANTY OF MERCHANTABILITY, FITNESS FOR A PARTICULAR PURPOSE OR NON-INFRINGEMENT, ARE DISCLAIMED, EXCEPT TO THE EXTENT THAT SUCH DISCLAIMERS ARE HELD TO BE LEGALLY INVALID. SecureDrive is developed and manufactured by SecureData, Inc. and is based on technology licensed from ClevX, LLC.