
Spec Sheet


PN# 500-22700
Page 13 Rev. F, 03/11
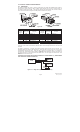
4. Using a #1 Phillips screwdriver, back out the two (2) screws to release the base riser from
the rest of the end mount assembly.
NOTE: These screws should remain in place (in the holes of the spring plunger housing
and end mount) – This will help keep the plunger housing in place for time of
reassembly. (If the PC board and plunger assembly happen to come out of the end
mount, see procedure in step 4 for reassembly).
5. Place the end mount (with the PC board, plunger and screws) aside for reuse.
2 DRILL HOLE IN BASE RISER
1. Determine which side of the base riser to feed the flexible door cord shield into.
2. Scribe and/or center punch the base riser at location shown.
NOTE: Prior to drilling any holes the riser should be secured in a vise or similar
clamping device that will safely hold the part while it is being drilled.
3. Using a drill with a 1/8” diameter bit, create a “pilot” hole at the location shown. Drill
through the internal ribs and into the wire feed-thru channel in the center of the base riser.
4. Using a 3/8” diameter drill bit, follow the pilot hole to open up the holes in the part to 3/8”.
OR
Spring Plunger
Housing
PC Board
End Mount
Base Rise
r
Screws
- Loosen and
leave in place
through holes!