
Installation guide
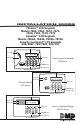


6 LCD Keypad Installation Guide
LCD Keypad Installation Guide 7
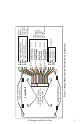
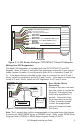
Zone 2 Door Contact with Soft-Shunt™
(7073/7073A/7173, 793 only)
If the door being released by the keypad is protected, you can provide a
programmed shunt time by connecting its contact to Zone 2 (White/Red pair)
on the keypad and enabling the Soft-Shunt feature. See ZONE 2 SHUNT later in
this document. Door contacts may be N/C or N/O.
Note: The Door Strike time is programmable when the keypad is used on an
XR100/XR500 Series, or XR2500F panel. Refer to the XR100 Series Programming
Guide (LT-0896) or XR500 Series Programming Guide (LT-0679).
Zone 3 Request to Exit (7073/7073A/7173, 793 only)
You can also connect a normally open PIR (or other motion sensing device)
or a mechanical switch to Zone 3 (White/Orange pair) on the keypad to
provide a request to exit capability to the system. See ZONE 3 EXIT later
in this document. When Zone 3 shorts, the keypad relay activates for 5
seconds. During this time, the user can open the protected door to start the
programmed Soft-Shunt entry/exit timer. If the door is not opened within 5
seconds, the relay restores the door to its locked state.
Note: A Zone 3 Request to Exit is inhibited for 3 seconds after the keypad reads
a card and a door strike occurs. This is to allow entry to the area and pass
under a Request-to-Exit PIR.
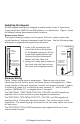
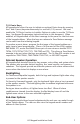
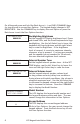
Panic Key Options
2-Button Panic Keys
All keypads offer a Panic key function that allows users to send Panic,
Emergency, or Fire reports to the central station. In order to use the Panic
keys, you must enable the Panic key function in the keypad user menu. See
Keypad Programming Instructions
later in this document when
enabled. Install the supplied icon
labels below the top row of Select
keys as shown in Figure 4.
The user must press and hold the
two Select keys for two seconds until
a beep from the keypad is heard. At the beep, the panel sends the following
zone alarm reports to the central station:
Panic (left two Select keys)—Zone 19 + Device Address
Emergency—non-medical (center two Select keys)—Zone 29 + Device Address
Fire (right two Select keys)—Zone 39 + Device Address
Figure 4: Panic Key Label Placement