CyberEyes User’s Manual Rev.1 / September 2002 CyberEyes User’s Manual Rev.
Copyright Notice The contents of this manual may be revised without prior notification. Companies, names, and data used in examples herein are fictitious unless otherwise noted. No part of this manual may be reproduced or transmitted in any form or by any means, electronic or mechanical, for any purpose, without the prior written permission of GoldenSoft Corporation.
TABLE OF CONTENTS Chapter 0: Quick Starts on using CyberEyes Step 1: Start CyberEyes Step 2: Add Device Step 3: Camera Mode Step 4: System Settings Step 5: Channel Settings Step 6: Motion Detection Step 7: Auto Recording (time-lapse recording) Step 8: Cycle Record Step 9: Database management Step 10: Alarm notification Step 11: Schedule Recording Setting Step 12: Setting Password Step 13: Taking snapshots Step 14: Manual Recording Step 15: Monitor remotely Chapter 1: Introduction System Overview System Fea
Image Playback Video Record Schedule Record Auto Record Manual Record Alarm E-mail Phone Alert Message Motion Detection Select Motion Detection Area Set Motion Sensitivity Web Service Remote Real-time Browse Remote Image Playback Remote Log View User Management Event Viewer Chapter 6: FAQ Chapter 7: Registration Appendix A: Recording Time vs. Recording Storage Reference 2 CyberEyes User’s Manual Rev.
CHAPTER 0: QUICK STARTS ON USING CYBEREYES Please follow the steps below to configure and start using CyberEyes. Step 1: Start CyberEyes Please ensure you have finished installing CyberEyes from Chapter 3: Installation before moving on. Step 2: Add Device You will be prompted that no device has been added and whether or not you want to add when you run CyberEyes for the first time. The device here refers to video inputs or cameras. Please ensure you have cameras connected to the DQP before moving on.
For more information on adding the device, please refer to the Add Device section of Chapter 4: Using CyberEyes. Step 3: Camera Mode After you have added devices to CyberEyes, you must configure the Camera Mode in order to be able to view all four cameras in quad screen view. To do so, please click on the Camera Mode button of the main window and choose 4-screen Display. For more information, please refer to Camera Mode of Chapter 4: Using CyberEyes.
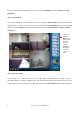
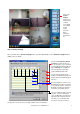
Click on the System Settings button on the Control Bar to configure such settings as recording modes, motion detection, alarm notification mechanisms, etc. Step 5: Channel Settings Once you click on the System Settings button, you will automatically see the Channel Settings window similar to the one below.
The Record function determines your weekly recording schedule (or Schedule Recording), and whether or not you want to have motion detection, alarm notification, etc.. Therefore, you must first activate the Record function and select the time frames before activating any other functions. The Message, Alert, E-mail, and the Phone functions are different alarm notification mechanisms.
motion. You must set the areas and sensitivity parameters for Motion Detection before activating Motion Recording. To do so, while you are still in Channel Settings, please go to the Advanced tab by clicking on it. Then click on the Motion Detection button to configure the motion detection areas and parameters. After you are done, please go to the Alarm tab to activate Motion Recording. CyberEyes User’s Manual Rev.
These highlighted areas are motion detection areas. You can select independent areas or you can select areas that are connected to one another. There is no limit to the number of areas you can select. Simply click on a place with your left mouse button and drag. Click on a place with your right mouse button to remove selected areas. These are parameters that will help CyberEyes determine whether a detected motion is counted as an alarm or not.
To activate Motion Recording, please go to the Storage tab by clicking on it. Then make sure there is a check mark beside Only record motion frames in scheduled-recording mode. CyberEyes, by default, would already have a check mark beside this choice. Click OK to finish configuring motion detection parameters and start Motion Recording. Step 7: Auto Recording (time-lapse recording) In addition to Schedule Recording and Motion Recording is Auto Recording (or time-lapse recording).
Step 8: Cycle Record To avoid overloading your hard drive with recorded images, CyberEyes provides you with a Cycle Record function. Please go to Channel Settings and select the Storage tab by clicking on it. Make sure there is a check mark beside the Enable cycle-record choice. You can enter a numeric value in The Cycle-storaging free disk space should be no less than xx MB.
Step 10: Alarm notification There are various alarm notification mechanisms in CyberEyes: Message (only available if your operating system is Windows 2000 or XP), Alert, E-mail, and Phone. These alarm notification mechanisms will only be activated when a check mark is placed beside each function in Channel Settings. For any of the alarm notification mechanisms to work, you must configure the related settings.
The E-mail alarm notification function allows you to send e-mail notifications to unlimited recipients in the case of a detected alarm. To configure the E-mail alarm notification setting, please go to Channel Settings and choose the Alarm tab by clicking on it. Choose the E-mail tab by clicking on it. The Server address is the mail server for outgoing mails. You may input your own e-mail address as the Return EMail address. You can use either a dial-up modem to send the E-mail alarm notification or a LAN.
The Alert alarm notification function allows you to play a previously recorded sound files on the host computer in the case of a detected alarm. To configure the Alert alarm notification setting, please go to Channel Settings and choose the Alarm tab by clicking on it. Choose the Alert tab by clicking on it. CyberEyes has a default sound file that you can readily use. You can change to another sound file as long as the other sound file is in .WAV file format.
Step 12: Setting Password It is crucial that you allocate different user passwords before allowing other users to access CyberEyes. To configure Password settings, please go to System Settings and choose the Others tab by clicking on it. Allocate different passwords for different user types by selecting the appropriate user type and click the Change Password button.
Step 13: Taking snapshots If you see something that you wish to save on the spot, CyberEyes provides the Camera Snapshot function. You can either take a snapshot of a single channel or a snapshot of the quad screen. Click on the left Camera Snapshot button to take a snapshot of a single channel. You must make sure you have highlighted the particular channel that you wish to take a snapshot of. As this case illustrates, Channel 1 is selected for snapshot purposes.
Step 15: Monitor remotely CyberEyes provides a function that allows you to remotely monitor via a standard web browser, such as Internet Explorer. You do not need to be physically near the host computer, rather, you could monitor at a place that is half the globe away from the host computer. All you need to do is to type in the IP address of the host computer on a standard web browser and you will be able to remotely monitor. This is where you type in the IP address of the host computer.
This is the interface you will see when clicking the Realtime Browse button. This is also the quad view interface you will see when you monitor remotely from a standard web browser. You can select to view each channel at the time or four channels at the same time from the pull down menu of Channel Select. You can choose to save or take a snapshot of the live image during Realtime Browse. This is the single channel view interface you will see when you monitor remotely from a standard web browser.
This is the interface you will see when clicking the Image Playback button. You can play back previously recorded images frame by frame, or in frames, or you can search for images at a specific time. You can select different channel for Image Playback. 18 CyberEyes User’s Manual Rev.
CHAPTER 1: INTRODUCTION System Overview If you have been troubled with the standard CCTV system’s poor video quality, time consuming video retrieval, and the constant need to swap videocassettes, then the combination of CyberEyes and DQP would definitely be one of the solutions to your current dilemma, and more. Since CyberEyes records everything in digital data, video can be copied and played back over and over without losing any of its original quality.
the default hard drive location is set to C:\ drive, you can always allocate other hard drives, including external hard drives and RAID systems, as the hard drive location for the recorded data. In the event of a limited hard drive space, you could 1) configure to record only motion images, 2) adjust different compression quality, and 3) specify external drive for RAID systems or bigger external hard drives.
CHAPTER 2: SYSTEM REQUIREMENTS Hardware Requirements Minimum Computer Requirements for CyberEyes Ÿ CPU: Celeron 300 or higher Ÿ Memory: 128 MB Ÿ Hard disk: 200MB or more (not including disk space to record video) Recommended Computer Requirements for CyberEyes Ÿ CPU: Pentium III 800 or higher Ÿ Memory: 256 MB Ÿ Hard disk: 10GB or more (SCSI is recommended) PC Network adapter: 100 Mbps for LAN/WAN capabilities PC Modem: Voice modem for dial-up DQP hardware (4 video inputs + 1 video output) Camer
CHAPTER 3: INSTALLATION Hardware Installation Ÿ DQP Product Specifications Model PC Interface Video Input RF Video Input Antenna RF Operating Frequencies Video Standard Video Output Software Compression Format Displaying BNC/TV FPS output USB output Recording Speed (total) Average Recording FPS Frame Size Software Interface O/S Support Power Operating Temperature Storage Temperature Dimension DQP-A4 DQP-W1A3 DQP-W2A2 USB Rev.1.
Figure 3-2: DQP-W1A3 Figure 3-3: DQP-W2A2 Ÿ Installing DQP Please refer to the DQP Hardware User’s Manual for more information on how to install the DQP. Software Installation CyberEyes has two parts: the CyberEyes main program and the Web Service program. The CyberEyes main program allows you to monitor and control recording functions of all cameras.
Installing the CyberEyes main program 1. Place the CyberEyes installation CD in the CD-ROM drive. The CD will execute automatically, displaying the main selection menu. In the Autorun window, click System Diagnostics. 2. The System Diagnostics dialog box will appear. If any of the items is not properly installed, simply click the corresponding Install button and follow the installation instructions. 3.
Click Install CyberEyes in the Autorun window. 5. The Welcome dialog box will appear. Click Next to continue. 6. The License Agreement dialog box will appear. After reading and agreeing to the license agreement, click Yes to go on. CyberEyes User’s Manual Rev.
7. The Customer Information dialog box will appear. Enter the appropriate information. Click Next to continue. 8. The Choose Destination Location dialog box will appear. Click Next to install CyberEyes in the default directory. Or click Browse and select another directory to install CyberEyes to. After you are done, click Next to install CyberEyes. 26 CyberEyes User’s Manual Rev.
9. The Select Program Folder dialog box will appear. Setup will add program icons to the program folder. You may type a new folder name or select one from the existing folder list. Click Next to continue. 10. The Start Copying Files dialog box will appear. The system will display some basic information before installing. To change any settings, click Back; otherwise, click Next to continue. CyberEyes User’s Manual Rev.
11. After Setup has finished copying the necessary files, the Install Shield Wizard Complete dialog box will appear. Make sure the “Yes, I want to restart my computer now.” Is selected, and click Finish to complete Setup. Ÿ Please wait while Windows restarts itself Installing the Web Service Click Install Web Service in Autorun, and then follow steps 5 to 11 from the Installing the CyberEyes main program starting page 24.
2. The Please choose system login permission dialog box will appear. Click OK. 3. The ADD Device dialog box will appear. The Device here means video input. For example, if you want to add a device, you must at least have a camera connected to the DQP. Click Yes to add device. Click No to close the dialog box and proceed later. (for details on on how to add devices, please refer to System Setting >> Device tab >> Add Device in Chapter 4) 4.
CHAPTER 4: USING CYBEREYES Recognizing User Interface The main window of CyberEyes consists of three parts: Ÿ Work Area The work area is where you monitor, and each window box corresponds to one video channel. You will be able to see the related channel information, such as channel location, channel name, and recording mode(s) displaying on the window box. Ÿ Control Bar On the topmost part of the control bar, you will see two small round icons. Click the left one to minimize the interface.
Ÿ Channel Status In the channel status area, there are four icons corresponding to four video channels. Different color indicates different channel status. Note: Ÿ There are two hand bars separately attached beside the Control Bar area and above the Channel Status area. Click the hand bars to hide/display the above two areas.
Channel number: will display 1, 2, 3, or 4 Device location: will display the location name; default is Location 1, Location 2, Location 3, and Location 4 Channel status: will display Playing (if this channel is currently running or recording), Stop (if this channel is closed by the Close View function), Work forbidden (if this channel is stopped by the Stop Device function), and No Device Connected (if this channel is removed from the DQP) Alarm Status: will display Motion Alarm Not Occurred (if this chann
Ÿ Image Playback Ÿ Locked System Ÿ Manual Record Ÿ Camera Snapshot Ÿ Quit System Ÿ Camera Mode CyberEyes provides you with two viewing options: full-screen display and 4-screen display. Ÿ Full-screen Display: displaying one video channel in full screen. Ÿ 4-screen Display: displaying 4 video channels simultaneously in full screen. This is the interface for 4-screen display. Note: Ÿ You can set the camera mode in another way: right click on the window box, and then choose Camera Mode.
There are two tabs in the System Settings window: Devices tab and Others tab. Devices tab On the Devices tab, the table under Device List lists the related channel information: channel number, video camera location, and device information. Each channel corresponds to a video input source. Click Channel Settings to set detailed camera operations, such as recording modes, alarm notifications, motion detection, etc.
2. On the Devices tab, select an unoccupied channel number by clicking on it, and then click Add Device. 3. The Start dialog box will appear. Click Next to continue. CyberEyes User’s Manual Rev.
4. The Device Properties dialog box will appear. Select the appropriate video format (NTSC or PAL) from the Select TV Format pull-down menu. You can change the parameters for the camera (brightness, contrast, hue, saturation, and sharpness) based on your own preferences. Note: You can always come back to this dialog box and change camera parameters later. After you have done all the settings, click Next to continue. 5. The Finished dialog box will appear.
To remove device: Ÿ On the Devices tab, click on the channel that you wish to remove, and click Remove Device under the device list table. A prompt will appear. Click Yes to remove the video channel. Click No to close the dialog box and the video input source will not be removed. Device Properties This function allows you to modify appropriate video format (NTSC or PAL) from the Select TV Format pull-down menu.
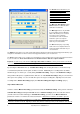
The channel settings dialog box contains four tabs: Ÿ Ÿ Ÿ Ÿ Schedules Alarm Storage Advanced This Record function allows you to set time periods (from Sunday to Saturday of a week to hours and minutes of a day) for Schedule Recording. This Message function allows you to send alarm messages to other computers on LAN in the case of an alarm. This Message function is only available if your Operating System is Windows 2000 or Windows XP.
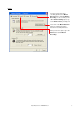
In addition, you can click on the title bar of a day to zoom in on the hours of that particular day. Click on the day title bar again to return to the weekly overview. Alarm tab The Alarm tab has three other tabs (if your operating system is Windows 98, 98 SE, or ME): Ÿ Ÿ Ÿ CyberEyes User’s Manual Rev.
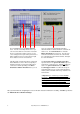
The Alarm tab has four other tabs (if your operating system is Windows 2000, or XP): Ÿ Ÿ Ÿ Ÿ E-mail Message Phone Alert Click on each tab to set their properties. You will find the minimum alarm interval value on the bottom part. The default value is 1 minute. The minimum value is 1 second while the maximum value is 59 minutes and 59 seconds. The minimum alarm interval value is valid for all e-mail, (message, if your operating system is Windows 2000 or XP), phone, and voice alarm notifications.
The above chart illustrates the differences between three different minimum alarm interval values: 30 seconds, 1 minute, and 2 minutes. The red lines indicate the duration of the detected motion, while the blue vertical lines indicate the incidents the alarm notifications are sent (via e-mail, phone, or voice alert (or message to another computer, if your operating system is Windows 2000 or XP)). Let’s assume the 0th minute is the beginning of the first detected motion.
Storage tab The Storage tab allows you to manage data storage and enable data overwrite, time-lapse recording, and motion recording. The Storage tab consists of two operations; Database Location and Save Control. 1. Database Location Disk Information indicates the current disk space used and the available free disk space. Videos on each channel are stored in database paths that are pre-allocated by the software.
You must have at least one database path for storage, otherwise, you will see a prompt similar to the one on the left. It is recommended that you select a disk drive that has a large storage space. 2.
Ÿ Only record motion frames in scheduled recording mode: if a check mark is placed beside this function, CyberEyes will only record motion-detected images during scheduled recording thus saving you hard disk space. It will not record if motion is absent. This motion recording function requires configuring motion detection settings from the Advanced tab. The software highlights the whole camera view for motion detection by default.
Ÿ Motion Detection The Motion Detection function allows you to set desired areas for motion detection, as well as to set motion sensitivity and motion detection control parameters. Ÿ Image Compression Quality The Image Compression Quality function allows you to set different image compression to yield different recording video quality. The more compression quality you set, the more disk space consumed, and better the recording image quality. The default value is 75.
Others tab On the Others tab, you can customize the CyberEyes preferences, assign different passwords for different user types, and set the alarm delay time.
As can be seen from the left, there is a red frame on the viewing window of Channel 1, because a check mark is placed beside the Enable window notification when alarm occurs function. Ÿ Change Password Change Password: this function allows you to assign and change passwords for different users. The Administrator is the only user type that has the right to assign passwords.
detects any movement or motion will have a red frame on the viewing window. (please refer to the image of the Enable window notification when alarm occurs function) Note: If an alarm has occurred before the moment you enabled the alarm delay function, the alarm function will not be activated. Therefore, please ensure CyberEyes does not detect an alarm before the moment you active the alarm delay function.
Ÿ 1. To unlock the system Click Unlock in the System locked window, and a dialog box will appear 2. The user unlocking the system will be required to choose the appropriate user type and the password. If the user unlocking the system has a higher permission than the user locking the system, CyberEyes will be unlocked. 3. After CyberEyes is unlocked, it will automatically login as the user type who unlocks it Note: By default, CyberEyes has three user types: administrator, user, and guest.
3. After you are finished with manual recording, click the left button of the Manual REC. button to end the operation To perform manual recording for all four channels in quad screen at the same time: 1. Click the right button of the Manual REC. button to start recording. 2. Click the right button of the Manual REC. button to stop recording. If you try to manually record single channel in additional to quad screen recording, you will get a prompt that advises you to stop 4-channel recording first.
3. A picture is captured in the Camera Snapshot window. Click Save to save the picture. Otherwise click Cancel to close the window and discard the picture. To take a still picture from all four channels in quad screen: 1. Once you see an image that you would like to take a snapshot of, click the right button of the Camera Snapshot button 2. A picture is captured in the Camera Snapshot window. Click Save to save the picture. Otherwise click Cancel to close the window and discard the picture.
Quit System To quit CyberEyes, click Quit System in the control bar. For security reasons, the administrator is recommended to set password protection for quitting CyberEyes. To do so: 1. Login CyberEyes as an administrator. Click System Setting in the control bar. 2. On the Others tab, place a check mark beside Password confirmation for quitting system to enable this function under Custom Style 3. Click OK to save the operation 4.
CHAPTER 5: SYSTEM FUNCTIONS Video Browse Browsing is the basic function of any surveillance software. CyberEyes provides two methods for browsing video: Ÿ Real-time Browse Ÿ Image Playback Real-time Browse Browse real-time images captured by a camera. You can real-time browse images in the work area in two modes. See Camera Mode in Chapter 4 for details.
The Image Playback interface has three regions: • Image browse region • Image source region • Image retrieval and management region Ÿ Image browse region Ÿ The top left part is the window view. Ÿ Below is a graph of motion pictures. The green lines of the motion pictures represent motionless frames, while the yellow ones represent motion frames. Ÿ The Operating box shows related information, such as image playback, when clicking each button under play control list.
Buttons Function Go to first (the very first frame) Previous frames Previous frame Play Stop Next frame Next frames Go to end (the very last frame) Zoom in Zoom out Ÿ Beside the Play Control buttons is the Play Speed control box. You can drag the slide bar below to control the image playing speed. The box shows the relevant speed value. The default Play Speed is 1X. Play Speed 1X 2X 4X 8X 16X 32X 64X Ÿ 1st, 1st, 1st, 1st, 1st, 1st, 1st, Frames played 2nd, 3rd, 4th, 5th, etc. 3rd, 5th, 7th, 9th, etc.
set Beginning Time, click the Set as current image time button after an image is chosen. The same is true for setting Ending Time. How to Use Image Playback Ÿ To play back images: Ÿ Click Image Playback in the control bar. The Image Playback interface will appear. Ÿ Select image source either from the Choose Channel pull-down list or by clicking the Open existing file button in the Image Source region. After a valid source is selected, the related image will appear in the window view.
This prompt will appear if you have not selected the time frames (defined between the Beginning Time and the Ending Time) Ÿ Click Search, and the search will begin. If necessary, place a check mark beside Only Search Motion Image to go directly to the first motion frame within the selected time frame. The motion frame here refers to any frame that is represented by a yellow vertical line. Green vertical lines do not count toward motion frames. Ÿ Saving images: Ÿ Click the Save tab.
Note: To save a single image, just click on the image browse region, and click Set as current image time, and select Save as BMP file, or Save as JPG file from the pop-up menu. Video Record This function allows you to set and choose different recording modes based on your own preference.
Here is how to understand the above comparison chart: Ÿ A stands for Auto Recording (or time-lapse recording). CyberEyes will record 1 frame per second (if you set the recording frame rate to 1 frame per second) disregarding whether motion is present or absent. Ÿ S stands for Schedule Recording. CyberEyes will record 12 frames per second disregarding whether motion is present or absent. Ÿ M stands for Motion Recording. CyberEyes will record 12 frames per second only when motion is present.
3. Ensure a check mark is placed beside the Record option on the right side of the Schedules tab. Click and drag to select the time frames for schedule recording. (Right click and drag to remove selections.) 4. Click OK when done. Ÿ You may also configure CyberEyes to record only motion frames during scheduled-recording mode. Ÿ To set motion record: Ÿ Follow the above three steps in schedule record.
Ÿ Input the frame value in the "Auto record xx images every" box. The minimum value is 1, while the maximum value is 15. Ÿ CyberEyes will then record in time lapse according to your setting. Manual Record Manually record images captured by a chosen camera or all four cameras in quad screen. For details on Manual Record, please refer to Manual Record in Chapter 4.
CyberEyes provides four warning mechanisms (if your operating system is Windows 2000 or XP): Ÿ Ÿ Ÿ Ÿ E-mail Message Phone Alert E-mail When motion is detected, CyberEyes will automatically send E-mails over LAN or the Internet to designated e-mail addresses. Unlimited number of E-mail addresses can be configured to receive the motion image or warning message. Ÿ To set alarm notification by E-mail: Ÿ Click System Setting in the control bar.
Enable E-mail alarm function by placing a check mark beside E-mail from the right side of the Schedule tab. Click and drag to select the time areas (Right click and drag to remove the selections). In order for alarm notifications to take effect, you must ensure that the time areas selected for E-mail notification overlap the time areas selected for Schedule Record. Ÿ Click the Alarm tab.
Ÿ If you plan to send E-mails over the Internet and your computer is connected to the Internet, follow the above steps to set E-mail properties. If your computer is not connected to the Internet, please first do the following before setting E-mail properties: Ÿ Ensure a modem is installed, and the dial out connection is set up. • • Place a check mark beside the Set dial-out before sent option, and choose the correct dial-up connection from the pull-down menu.
Enable Phone by placing a check mark beside Phone from the right side of the Schedules tab. Click and drag to select the time areas (Right click and drag to remove the selections). You must ensure that the time areas selected for Phone notification overlap the time areas selected for Schedule Record in order for alarm notifications to take effect. Ÿ On the Alarm tab, click Phone, and you are able to set the Phone properties. Choose the voice data modem from the pull-down menu.
Ÿ When you are done, click OK. Voice alert will be sent out once an alarm occurs. Alert When motion is detected, CyberEyes will automatically play a voice alert on the host computer (the computer with the DQP connected and CyberEyes installed). You can set different voice alert for different cameras. Ÿ To set voice alert: Ÿ Click System Setting in the control bar. Ÿ Choose and click on the desired channel under Device List, and click Channel Settings.
On the Alarm tab, click the Alert tab, and you will be able to set the voice alert properties. The software has a default audio file that you could readily use, or you may use your own audio files. To do so, input wave file name or browse for a different audio file (should be in .WAV format), and then input the number of times the audio file should be played when alarm occurs. Ÿ Click OK when done, and the voice alert will be played on the host computer once an alarm has occurred.
Enable voice alert by placing a check mark beside Message from the right side of the Schedules tab. Click and drag to select the time areas (Right click and drag to remove the selections) You must ensure that the time areas selected for Message notification overlap the time areas selected for Schedule Record in order for alarm notification to take effect. On the Alarm tab, click the Message tab, and you will be able to set the message alert properties.
Motion Detection CyberEyes provides motion detection functions that allow you to monitor specific areas for motion. You can select multiple areas for motion detection and motion sensitivity to minimize false alarms from occurring. Ÿ To set motion detection: Ÿ Click System Setting in the control bar. Ÿ Choose and click on the desired channel under Device List, and click Channel Settings. Ÿ On the Advanced tab, click Motion Detection. The Motion Detection interface will appear.
+ Select all Clear up Apply Click the button to reduce the grid density for convenient definition of large areas. Click the button to increase the grid density for convenient definition of small areas. Click the button to select the whole area Click the button to clear up all selections Click the button to save the changes you make Note: To select part of the whole area, click Clear up first so it would be easier for you to make selections.
threshold. Here you must pay attention to keep an average level suitable for your environment, for an extra high sensitivity (the red horizontal line is too low) will result in fairly frequent false alarms even though there is not any detected motion. Ÿ If the alarm sensitivity is too high (the red horizontal line is too low), increase the noise or motion threshold.
In the Homepage, you are allowed to perform the following functions: Ÿ Remote Real-time Browse Ÿ Remote Image Playback Ÿ Remote Log View (including alarm events and log search) Remote Real-time Browse By accessing LAN or the Internet, you can remotely view live images using a standard web browser. You can choose to view each camera individually or all four cameras in a quad screen. Ÿ To remotely browse real-time images: 1. In the web service Homepage, click Realtime Browse .
This is the interface for All Channel view. 2. Select the desired channel from the pull-down menu of Channel Select. From the pull-down menu of Download Speed, you may choose the appropriate downloading speed according to your Internet connection. 3. Click the Play button to view live images over LAN or the Internet. 4.
You will get a prompt similar to the one on the left asking you whether you want to allow ActiveX controls to run. Click Yes to continue. After CyberEyes has finished downloading data, you will be able to select the camera location and the specific time for playback. 2. Select the desired channel number from the pull-down menu of Channel Select. 3. Input the image time into the Image time box. 4. Click the search button beside Image time box. CyberEyes will begin to search images from the time you set. 5.
Ÿ To remotely view system events: Click Log Search and a table will appear. The table will list the system events. Click Next below the table to go to the next log page, Previous to go to the previous log page, First to go to the first log page, and Lastest to go to the last log page. Ÿ To remote view alarm events: Click Alarm Events and a table will appear. The table will list alarm events.
User Management CyberEyes has three user types: Administrator, User, and Guest. For security reasons, it is recommended that you provide a security password just when you are using CyberEyes for the first time or before browsing data remotely from a web browser. By default, user passwords are empty and permissions are varied: Ÿ Administrator: Owns the highest permission and full control of CyberEyes settings.
3. From the Logs menu, click System to view the related information about the system events. Click Alarm to view the related information about the alarm events. CyberEyes User’s Manual Rev.
CHAPTER 6: FAQ 1: Why can’t I send out the Call-out alarm? Please ensure the modem is correctly installed with voice function. 2: Why isn’t there any sound when receiving the call-out alarm? Please check to see if: Ÿ The sound file exists. Ÿ The Modem is provided with voice function. If the above are true, please do the following: Ÿ Point to Device Manager, point to Sound, Video and Game Controllers. Ÿ Check if the Modem sound card driver is installed.
higher version to enable this function. 8: Why does the player prompt "download fail..." when I want to remotely browse the channel images? Please: Ÿ Ensure the local browse of the channels is in progress. Ÿ Ensure the security settings of the browser are correct. If you are using Internet Explorer 5.0 or a higher version, please follow the steps below to set the Internet browser: Ÿ On the Tools menu, click Internet Options.
Please follow the steps below disregard of which operating system (Windows 98, 98 SE, 2000, ME, or XP) you have. a. When you are in Windows, click the Start button b. Choose Programs c. Choose the MS-DOS mode and click on it Once you are in C:\ prompt, type in ipconfig and hit the Enter key and you will see your IP address along with other associated information. For example, you should see C:\ipconfig after you type in ipconfig.
61.219.203.81 to 61.219.203.86 are allowed to access to that DQP. The remote PC user can type http://xxx.xx.xx.xxx to access to that DQP, where the xxx.xx.xx.xxx is the real IP of VPN. Note: This port setup opens a port for possible hackers to hack your DQP hosting PC server (but not the company server if a hacker does not know how to break the Firewall.). To protect your DQP hosting PC server from hackers, it is recommended that you install personal Firewall software to that DQP PC server.
Since CyberEyes uses TCP Port 80 as the protocol for transmission over the Internet or LAN, therefore, you must make sure that this Port 80 is enabled on your host PC (the PC with the DQP connected and CyberEyes installed). Some ISP’s (Internet Service Providers) disable Port 80 when they provide their services, so you may not be able to connect to your host PC over the Internet or LAN. To resolve this, please do the following from your host PC: Go to C:\Program Files\Web Service for CyberEyes 1.
CHAPTER 7: REGISTRATION Registration ensures that you receive product support, product update information, and other benefits. The process takes only a few minutes to complete. 1. The Please Enter Serial Number dialog box will appear when you run CyberEyes for the first time. 2. Input the serial number and user name, and click OK to finish registration. CyberEyes User’s Manual Rev.
APPENDIX A: RECORDING TIME VS. RECORDING STORAGE REFERENCE Compression Quality Compression Rate Image Quality Frame Size Recording Time Frame Rate per second 5 FPS 1 FPS ** Only record motion frames & alarm interval 0% * Recording all frames (still and motion) for all four cameras 25% 50% 75% 100% Highest Mid-High Medium Low No Compression Poorest 3K Poor 7K Fair 9K Decent 11K Highest 53K 24 hours 24 hours 24 hours 24 hours 24 hours 492.4 MB per channel 233.
(5) Do not record all four cameras at the maximum performance continuously. Individually set cameras to record or stay idle, and further settings of schedule, frame rate per second, auto time-lapse record, compression quality, only record motion frames, and alarm interval. (6) Use large hard disks. (7) Use external storage devices such as RAID, NAS, etc. CyberEyes User’s Manual Rev.