
User's Manual


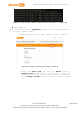


Table Of Contents
- 1. Introduction
- 2. Development Environment
- 2.1. Operating Systems
- 2.2. OpenWrt Introduction
- 2.3. Network Environment
- 2.4. System Configuration
- 2.4.1. Accessing Web UI
- 2.4.2. Accessing System Console
- 2.4.3. Using SSH (Secure Socket Shell)
- 2.4.4. Using Serial to USB Cable
- 2.4.5. Upgrading Firmware
- 2.4.6. Upgrading bootloader
- 2.4.7. Wi-Fi Reset
- 2.4.8. Factory Reset
- 2.4.9. Connecting LinkIt Smart 7688 To a network with Wi-Fi Access Point
- 2.4.10. Open a system console and enter the following commands to change LinkIt Smart 7688 to station mode ( For more information on system console, please see 2.4.1 “Accessing Web UI
- 2.4.11. Viewing System Information from the Web UI
- 2.5. Accessing the USB drive and the SD card

MediaTek LinkIt™ Smart 7688 User Manual
Figure 13 LinkIt Smart 7688 Web UI Sign In
5) Click on the Password field and set a password using at
least 6 alphanumeric characters.
Note: You must set a password before using SSH to access system console.
1) Accessing System Console” ):
In this example, the following AP is used:
AP SSID: MyAP
Encryption type: PSK2
Password: 12345678
# uci set wireless.sta.ssid=MyAP
# uci set wireless.sta.encryption=psk2
# uci set wireless.sta.key=12345678
# uci set wireless.sta.disabled=0
# uci commit
# wifi down
# wifi up
2) Now check if you’ve established network connection by typing
the following command in the terminal window:
# ping www.mediatek.com
If you see a screen similar to Figure 19, congratulations, you’ve
connected to the Wi-Fi network’s AP.
© 2015, 2016 MediaTek Inc.
Page 32 of 38
This document contains information that is proprietary to MediaTek Inc.
Unauthorized reproduction or disclosure of this information in whole or in part is strictly prohibited.