
User Guide


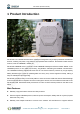
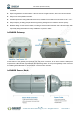

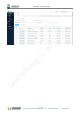
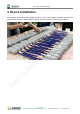

Table Of Contents
- Table of Contents
- 1 Product Introduction
- 2 Quick Start
- 3 Device Installation
- 4 Network Configuration
- 5 SenseCAP Portal
- 6 SenseCAP App Instructions
- 7 API Instruction

User Guide (Tech Document)
© 2008-2019 Seeed Technology Co., Ltd. All rights reserved. www.seeed.cc
8 / 50
2 Quick Start
The main steps are listed for quick use. Please refer to the following section for more details.
1. Checklist.
Unpack the package, check the list of devices, and check whether there are any omissions.
2. Assemble the gateway.
1) Install LoRa and 4G antennas.
2) Connect to the Internet (use Ethernet or install 4G card).
3) Connect the power supply.
3. Power on the gateway.
1) The LED indicator light will turn off after 2 seconds and the gateway will start normally.
2) Wait for about 1 minute, LED indicator light starts flashing, indicating that the device is trying to
connect to the Internet.
3) The LED indicator light is always on, indicating that the gateway is connected to the Internet
successfully.
4. Creating Groups and binding devices.
1) Register SenseCAP Portal accounts and create Node Groups: station-1, station-2, station-3…
2) Bind the Gateway and Sensor Node by scanning QR code or manually entering EUI through
SenseCAP App, and bind the nodes to specific Node Groups.
3) Switch ON the Sensor Node, turn on the sensor probe, turn on the power switch to the "ON", and
the LED light will flicker once, indicating that power on successfully. Wait for about 10s, and the
LED light flashes quickly for 2s, indicating that the device is connected to the network successfully.
4) Repeat steps 2) ~ 3) put all sensors into the network.
5) Check the data on the SenseCAP Portal, confirm that all sensors are online and upload the data
normally.
5. Install devices.
1) Determine the actual installation location of devices.
2) Install poles, brackets and other accessories.
3) Install the gateway and sensor to the corresponding monitoring station.