SVR-632/664 Quick Installation Guide 32/64-CH Network Video Recorder with Local Display Version 1.0.
SVR-‐632/664 Quick Installation Guide Table of Contents Preliminary .............................................................................. 3 System Overview ..................................................................... 6 Front View .................................................................................... 6 Rear View ..................................................................................... 6 LED Definition ..........................
SVR-‐632/664 Quick Installation Guide 3 Preliminary Copyrights & Trademarks Copyright 2011 SEEnergy Corp All Rights Reserved Trademarks SEEnergy SVR-632/664 Network Video Recorder (NVR) is a registered trademark of SEEnergy Corp. Microsoft and Windows are registered trademarks of Microsoft Corporation. All other trademarks mentioned in this document are trademarks of their respective owners.
SVR-‐632/664 Quick Installation Guide Operating System Microsoft® Windows® 2000 Professional, Windows® XP Professional (32 bit) or Windows® Server 2003 (32 bit) Browser Microsoft Internet Explorer 7 or above CPU Minimum Intel® Pentium® 4 2.4 GHz or higher (Dual Core is recommended) RAM Minimum 1 GB of RAM, 2GB or above is recommended Network Minimum 10/100 Ethernet (Gigabit Ethernet is recommended) Graphics Adapter AGP or PCI-Express, minimum 1024×768, 16 bit colors.
SVR-‐632/664 Quick Installation Guide 5 Product Description The NVR is designed for use within a surveillance system, and performs recordings and playbacks pictures from network cameras in the system. It is a 32-channel/64-channel network video recorder (NVR) for enterprise applications. It provides uninterrupted recording also in full frame rate 1.3Mp resolution for up to 32 connected cameras. Up to 64 cameras can be connected via a network and it is possible to record their camera pictures.
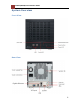
SVR-‐632/664 Quick Installation Guide System Overview Front View Rear View 6
SVR-‐632/664 Quick Installation Guide 7 LED Definition 7
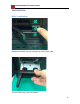
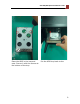
SVR-‐632/664 Quick Installation Guide Installation HDD Installation Release the HDD tray by pulling the lock to the right. Pull the HDD tray out of the case.
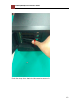
SVR-‐632/664 Quick Installation Guide 9 Place the HDD in the tray and case. Secure it with the screws at the bottom of the tray.
SVR-‐632/664 Quick Installation Guide Push the tray door back to the case to secure it.
SVR-‐632/664 Quick Installation Guide 11 Connect to the NVR There are various ways you can connect to the NVR and below are the suggested methods for different network setup: • The NVR is placed in a network with a DHCP server: Connect to the NVR by using “SEEnergy Device Search” Utility • The NVR is placed in a network without DHCP server (or you are connecting to it directly): Access the NVR with its default IP Use SEEnergy Device Search Utility If the NVR is placed in a corporate network or
SVR-‐632/664 Quick Installation Guide To begin, launch the “SEEnergy Deivce Search” utility from the CD and proceed with the installation: 12
SVR-‐632/664 Quick Installation Guide 13 Once the installation is complete, check the “Launch the Search AP” option and click “Finish”. The search should start automatically and its status should be displayed.
SVR-‐632/664 Quick Installation Guide The NVR should be located and its IP address should be displayed. Double-click on an NVR and the search program should automati- cally access the NVR’s web administration page from your default browser.
SVR-‐632/664 Quick Installation Guide 15 You should be prompted for the NVR’s username and password.
SVR-‐632/664 Quick Installation Guide Access the NVR with its default IP address The NVR comes with a pre-configured static IP “192.168.101.50”. However, it is only used when there is no DHCP server presented in the network. The NVR will turn on its DHCP server function and act as the DHCP server in the network. To connect to the NVR, use a PC that is on the same network over a switch or hub, or connect the PC directly to the NVR using a crossover CAT5 Ethernet cable.
SVR-‐632/664 Quick Installation Guide 17 Again, you should be prompted for the username and password.
SVR-‐632/664 Quick Installation Guide The default login username and password is admin/admin. To change the password of the admin account, go to “Setup” --> “System Configurations” --> “User Account”, click on the “admin” account in the account list then press the “edit” button to change its password. Finally, click “Apply” to save the change. Camera Installation Add a Camera -- Automatic Search Click the “Search” button to perform the camera search.
SVR-‐632/664 Quick Installation Guide 19 You should be prompted to install Active Control component in order for the search to function properly.
SVR-‐632/664 Quick Installation Guide Its corresponding information should be displayed in the “Camera Information” section. Enter its username and password and select the channel ID and name the camera. Click on “Detect” to establish connection between the recorder and the camera. If connection establishes successfully, camera’s detailed information should be polled and displayed as below. Adjust its video format, frame rate, resolution or bitrate...
SVR-‐632/664 Quick Installation Guide 21 Add a camera manually Simply follow the instruction described above but instead of using the “Search” function, enter the camera’s IP address and credential in the “Camera Information” manually.