SICHERHEITSHINWEISE Stromversorgung Dieses Gerät wurde für den Betrieb mit einer 230 Volt, 50 Hz Netzstromversorgung entwickelt. Bitte prüfen Sie, dass auf dem Typenschild des Gerätes 230V AC steht, bevor Sie das Gerät das erste Mal einstecken. SYMBOLE Dieses Gerät ist zweifach isoliert und eine Masseverbindung ist nicht erforderlich. Im Inneren dieses Gerätes gibt es gefährliche Spannung, die elektrischen Schock verursachen kann.
haben, wenn es auf irgendeine Weise beschädigt ist oder wenn es nicht normal funktioniert. Stecken Sie das Gerät sofort aus und holen Sie fachmännischen Rat ein. Ziehen Sie den Netzstecker während eines Gewitters aus der Wandsteckdose. Dies Gerät ist nur für den häuslichen Gebrauch entwickelt worden. Jede andere Verwendung kann die Garantie ungültig machen und gefährlich sein. BELÜFTUNG Platzieren Sie das Gerät auf einer harten, ebenen Oberfläche, keinem direkten Sonnenlicht oder Wärmequellen ausgesetzt.
Polarität (+/-) ein. Ein Versäumen der richtigen Ausrichtung der Batteriepolarität kann Personenschäden und/oder Beschädigungen bewirken. Das Batteriefach befindet sich an der Unterseite des Gerätes. ENTSORGUNG Als verantwortungsvoller Händler sorgen wir uns um die Umwelt. Daher fordern wir Sie auf, der richtigen Entsorgung Ihres Produktes, der Batterien und der Verpackung nachzukommen.
Kleinteile! Lassen Sie keine kleinen Kinder mit dem Gerät spielen Es sind Sicherheitshinweise an der Unterseite des Gerätes markiert. LASERPRODUKT KLASSE 1 Das Produkt beinhaltet ein Niedrigenergie- Lasergerät. Unsichtbare Laserstrahlung, wenn geöffnet und Verriegelungen umgangen sind. Vermeiden Sie es, der Strahlung ausgesetzt zu sein. WARNUNG: Der Netzstecker ist das Gerät zum Trennen der Verbindung und sollte jederzeit frei zugänglich sein.
2. Versuchen Sie nicht, das Loch in der Mitte der CD zu erweitern. Das würde zur Beschädigung der Disc führen. 3. Schreiben Sie nicht mit einem Kugelschreiber oder Stift auf die Oberfläche der Disc. 1. Verwenden Sie keine Chemikalien wie Schallplattensprays, antistatische Sprays oder Flüssigkeiten, Benzin oder Verdünner, um CDs zu reinigen. Solche Chemikalien würden die Plastikoberfläche der Disc irreparabel beschädigen. 2.
BEDIENELEMENTE DE-6
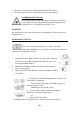
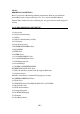
MS 921 BEDIENUNGSANLEITUNG Bitte lessen Sie diese Bedienungsanleitung aufmerksam durch,um sich mit Ihrem neuen Hifi-System vertraut zu machen, bevor Sie es zum ersten Mal in Betrieb nehmen. Bitte bewahren Sie diese Anleitung auf, um spatter jederzeit nachschlagen zu können. LAGE DER BEDIENUNGSELEMENTE 1. Lautsprecher 2. Lautsperecherabdeckung 3. CD-Fach 4. CD-Fach- Öffnen/Schliessen-Ecke 5. LCD Display 6. Fernbedienungssensor 7. ID3/FMMONO/STEREO-Taste 8. EQUALIZER9. SLEEP-Taste 10. TIMER- Taste 11.
NETZANSCHLUSS Bevor Sie das Gerät einschalten, vergewissern Sie sich, daß Ihre örtliche Netzspannung mit der auf dem Typenschild angegebenen Spannung übereinstimmt. Zu Ihrer eigenen Sicherheit lessen Sie die folgende Bedienungsanleitung sorgfältig durch, bevor Sie das Gerät ans Netz anschließen NETZBETRIEB(AC) Dieses Gerät funktioniert nur mit einer Spannung von AC 230V50Hz. Wird das Gerät an andere Stromquellen angeschlossen, könnte es Schaden nehmen.
NETZ-HAUPTSCHALTER (28) Wählen Sie ON mit dem Netz-Haupschalterander Rückseite des Geräts, um das Geräteinzuschalten. Wählen Sie OFF mit dem Netz-Haupschalter, um das Gerät auszuschalten FERNBEDIENUNG 1. 2. 3. 4. 5. 6. 7. STANDBY/ON -Taste ID3/MONO/STEREO-Taste TIMER Taste FUNKTION-Taste MEM/C-ADJ. Taste SLEEP Taste Radio:Abstimmtaste Abwärts/CD: Sprungtaste Rückwärts 8. INTRO Taste 9. EQ Taste 10. REPEAT Taste 11. MUTE Taste 12. LAUTSTÄRKE auf Taste 13. LAUTSTÄRKE ab Taste 14. RANDOM Taste 15.
Lesen Sie auch die Sicherheitsanweisungen zum Umgang mit Batterien ERSETZENDER BATTERIEN Wenn die Batterien zu schwach werd, warden die Reichweite der Fernbedienung bedeutend verringert und Sie müssen die Batterien ersetzen. Hinweise: Um die Genauigkeit und eine lange Betriebsdauer des Senders beizubehalten, drücken Sie niemals zwei oder mehr Tasten gleichzeitig. Wenn Sie die Fernbedienung längere Zeit nicht benutzen, entfernen Sie die Batterien, um dem Auslaufen von Säure vorzubeugen.
1. Nachdem Sie die Zeit geregelt haben, drücken Sie die Taste TIMER auf dem Gerät (16)oder auf die Fernbedienung (3) einige Sekunden lang. "ON" und "00:00" warden auf das Display erscheinen und die Ziffer der Stunde wird auf dem Display blinken.(F1) 2. Drücken Sie SKIP/TUNESEARCH(vorwärts oder rückwärts)(19,17),um zu regeln. 3. Nochmals die Taste TIMER drücken, die Ziffer der MINUTEN wird auf dem Display blinken. Drücken Sie (SKIP/TUNE SEARCH (vorwärts oder rückwärts) (19,17), um zu regeln. 4.
SLEEP-FUNKTION (MITTEL SFERNBEDIENUNG) 1. Wenn Sie sich mit der Musik einschläfern wollen,die Taste SLEEP drücken. 2. Sie können zwischen TUNER, CD/MP3, USB, SD/MMC, oder AUX, in der Modalität Funktion Sleep wählen, um die Musikfür 90, 80, 70 bis zu 10 Minuten zu hören, bevor das Gerät sich automatisch ausschaltet. FUNKTIONWAHL 1. Die Taste FUNKTION auf dem Gerät (22) oder auf der Fernbedienung (4) drücken, um die gewünschte Funktion zu wählen.
• Drücken Sie die ABSTIMM- Taste aufwärts oder abwärts (16,14) mehrmals, bis die genaue Frequenz erreicht ist. AUTOMATISCHESABSTIMMEN • Vergewissern Sie sich, daß die UKW- Antenne (25) ganz ausgestreckt ist. • Halten Sie die ABSTIMM- Taste aufwärts oder abwärts ungefähr eine Sekunde lang gedrückt. Das Radio beginnt automatisch das Suchen nach starken Radiosignalen. Das TUNER- Display zeigt die Frequenzen in MHz für UKW an. • Wenn ein starkes Signal gefunden wird, stoppt der Tuner den Suchlauf.
das Programm in Stereo empfangen. Die (((ST.))) Anzeige leuchtet in dem Display auf. Bei schwachen Stereo- Signalen und einem geräuschvollen Empfang ist es oft vorzuziehen, das Programm in Mono zu empfangen. Stellen Sieden ID3 /FMMONO-STEREO (7) auf Mono. Der Empfang erfolgt mit weniger Störgeräuschen. ANTENNE Für den UKW- Empfang befindet sich auf der Rückseite des Gerätes ein UKWAntennenkabel (25). Für optimer Empfang, stricken Sie es aus.
Gesamtspielzeit Hinweise: Nach dem Schließen des CD-Fachs könnte die Disc-Information nicht auf dem Display erscheinen. Das bedeutet ,daß die Disc nicht richtig eingelegt worden ist (oft falsch herum). Kontrollieren Sie, indem Sie das CD-Fach erneut öffnen und die CD wieder einlegen. DISC-WIEDERGABE Drücken Sie die CD-Fach-Ecke(4), um das Disc-Fach zu öffnen, und legen Sie eine CD ein. Schließen Sie das Disc-Fach, durch Drücken der CD-Fach-Ecke.
2. 3. 4. 5. 6. Drücken Sie die Taste PLAY/PAUSE(20), die Wiedergabe fängt mit dem ersten Stück an (F5). Das Display zeigt der Nummer des aktuellen Stücks und der Ablesezeit. Um die Wiedergabe zu unterbrechen, drücken Sie PLAY/PAUSE (F6).Die abgelaufene Zeit blinkt. Die Tasten SKIP/TUNER SEARCH (vorwärts oder rückwärts) (19,17) einmal drücken, um die Nummer des Stücks zu ändern. Drücken und halten Sie die Tasten SKIP/TUNER SEARCH (vorwärts oder rückwärts), um die Stücke zu springen.
„KÜNSTLERNAME“und„ALBUMNAME“auf dem Display angezeigt. 3. Drücken Sie die ID3-Taste erneut, um zur normalen Wiedergabe zurückzukehren. USB/SD CARD-FUNKTION ImStandby-Modus 1. Den USB- oder SD/MMC CARD-Vorrichtung einstecken, dann die Taste STANDBY auf dem Gerät oder auf der Fernbedienung drücken, um das Gerät einzuschalten. 2. Die Taste FUNKTION auf dem Gerät oder auf der Fernbedienung drücken, um den USB oder SD/MMC-Modus zuwählen.
Wiedergabe der ganzen Flash-Disc 1. Die Wiedergabe beginnt durch Drücken der PLAY/PAUSE. Die Wiedergabe beginnt vom ersten Stück. Das Display zeigt die Nummer des aktuellen Stücks und die abgelaufene Zeit. (F10) 2. Um die Wiedergabe momentan zu unterbrechen, drücken Sie PLAY/PAUSE Die abgelaufene Zeit blinkt. (F 11) 3. Um mit der Wiedergabe fortzusetzen, drücken Sie PLAY/PAUSE erneut. 4.
der Anfang des letzten Titels erreicht ist, kehrt der Spieler zu Titel 1 zurück. ZURÜCKSPRINGEN ZUMVORHERIGEN TITELAUF EINESFILES Um an den Anfang des vorherigen Titels zurückzuspringen: Drücken Sie die SKIP/TUNER SEARCH-Taste Rückwärts zweimal. Die Disc-Wiedergabe wird vom Anfang des vorherigen Titels fortgesetzt. Der Spieler springt jedesmal einen Titel zurück, wenn die SKIP/TUNER SEARCH-Taste Rückwärts gedrückt wird.
MP3/WMA 1. Drücken Sie dieREPEAT-Taste einmal,REPEAT erscheint auf der Anzeige.Der Titelwird dann kontinuierlich wiedergegeben.(F14) 2. Drücken Sie die REPEAT-Taste zweimal, REPEAT ALL erscheint auf der Anzeige. Die Disc wird dann bis zum Ende des letzten Titels wiedergegeben.(F15) 3. Drücken Sie die REPEAT-Taste dreimal, REPEAT ALBUM erscheint . DasGerät wird alle Titel des aktuellen Albums kontinuierlich wiedergeben.(F16) 4. Drücken Sie die REPEAT-Taste nochmals, um die REPEAT-Funktion zu löschen.
PROGRAMMIERTE DISC-WIEDERGABE Man kann bis zu 32 Stücken im CD-Modus oder 64 Stücke im MP3 /WMA/ USB/SD CARD Modus programmieren, in irgendeiner Reihenfolge. Es ist nicht möglich, Programme während der Disc-Wiedergabe einzugeben. Drücken Sie zuerst die STOP-Taste auf dem Gerät (21) oder auf der Fernbedienung (19) und befolgen Sie dann die untenstehenden Anweisungen. MITCD 1) Die Taste MEM/C-ADJ. auf dem Gerät (16) oder auf der Fernbedienung (5) drücken, um das PROGRAMMIERUNG-Modus zu aktivieren.
Drücken Sie PLAY/PAUSE, wird die Wiedergabe seit dem ersten Stück im Programm anfangen. Wenn das ganze Stück gelesen wird, wird das Gerät die Nummer der Stücken und die Ablese-Zeit der Stücke anzeigen. LÖSCHENDES PROGRAMMSPEICHERS 1. Drücken Sie STOP einmal, oder die CD-Fach öffnen und wieder ihn nochmals schließen, um den Speicher zu löschen. 2. Ein neues Programm einstellen, jenes bestehende wird gelöscht sein. Hinweis : Während der Programmm-Modus. 1. Drücken Sie REPEAT einmal, REPEAT erscheint.
DieKopfhörer sollten einen 3.5mm-Stereo-Stecker und eine Impedanz von 8-32Ohmhaben.Wenn die Kopfhörer angeschlossen werden (18), werden die Lautsprecher automatsich abgeschaltet. LCD DISPLAY A. SLEEPANZEIGE D. STEREO ANZEIGE B. TIMERANZEIGE E. LAUSTÄRKEHOCH/TIEFANZEIGE C.ALBUM/RADIOSPEICHERNUMMER F.LEID/NUMMER/ZEITANZEIGE TECHNISCHEDATEN Stromversorgung AC: 230V – 50Hz Batterie: 1x CR2032, für die Fernbedienung Radio-Frequenzbereich UKW: 87.
SAFETY INFORMATION MAINS SUPPLY This product is designed to operate from a 230 Volt, 50Hz AC mains supply. Other power sources may damage it. check that the rating label of the product states 230V AC before you plug it in for the first time. SYMBOLS This apparatus is double insulted and an earth connection is not required.
VENTILATION Place the apparatus on the a hard flat surface away from direct sunlight and heat sources. If it is in a cabinet, allow at least a 10cm gap all around. Don’t obstruct the ventilation slots, including those underneath, with soft furnishings. Overheating will shorten the life of the apparatus and increase the risk of fire. CLEANING Disconnect from the mains supply and use only a lightly dampened soft cloth. Do not use chemical solvents or strong detergents are these may damage the cosmetic finish.
You must dispose of this product and its packaging according to local law and regulation. Because this product contains electronic components and batteries, the product and its accessories must be disposed of separately form household waste when the product reaches its end of life. Contact your local authority to learn about disposal and recycling. The product and if applicable, its batteries should be taken to your local collection point fro recycling. Some collection points accept products free of charge.
temperatures. 3. Do not bend the disc. 1. Serious scratches should cause the laser pickup to skip. 2. Do not attempt to widen the center hole in the disc. It will result in damage to the disc. 3. Do not writ anything with a ballpoint pen pencil on the disc surface. 1. Never use chemical such as record sprays, antistatic sprays or fluid, benzine or thinner to clean compact discs. Such chemicals would irreparably damage the disc’s plastic surface. 2. If a disc is suddenly removed from a cold to hot area.
UK-5
MS 921 INSTRUCTIONMANUAL Please this instruction manual carefully and familiarize yourself you’re your new HiFi System before using it for the first time. Please retain this manual for future reference. LOCATION OF CONTROLS 1. 2. 3. 4. 5. 6. 7. 8. 9. 10. 11. 12. 13. 14. 15. 16. 17. 18. 19. 20. 21. 22. 23. 24. 25. 26. 27. 28. 20. 21. 22. SPEAKER SPEAKER COVER CD DOOR OPEN/CLOSE LCD DISPLAY IR SENSOR ID3/FM MONO/ST.
23. 24. 25. 26. 27. 28. STANDBY/ON BUTTON FM ANTENNA SPEAKER TERMINALS LINE IN JACK AC CORD AC POWER MAIN SWITCH CONNECTING TO THE POWER Before switching on make sure that the voltage of your electricity supply is the same as that indicated on the rating plate. For your own safety read the following instruction carefully before attempting to connect this unit to the mains. MAINS(AC) OPERATION This unit is designed to operate on AC 230V 50Hz current only.
AC power operation – Main switch Select ON with the main power switch (28) to power the unit. Select OFF with the main power switch (28) to switch off power. Disconnect the power cord from the mains if the unit is not going to be used for some time. REMOTE COTROL 1. STANDBY/ON BUTTON 2. ID3/MO./ST. BUTTON 3. TIMER BUTTON 4. FUNCTION BUTTON 5. MEM/C-ADJ. BUTTON 6. SLEEP BUTTON 7. SKIP/TUNE SEARCH DOWN BUTTON 8. INTRO BUTTON 9. EQ BUTTON 10. REPEAT BUTTON 11. MUTE BUTTON 12. VOLUME DOWN BUTTON 13.
BATTERY REPLACEMENT When the battery become too weak, the operating distance of the remote controller is greatly reduced and you will need to replace the battery Notes: To maintain the accuracy and long life of the transmitter, do not press two or more buttons simultaneously If the remote control is not to be used for a long time, remove the batteries to prevent possible damage through leaking batteries.
control (3) for a few seconds, "ON" and "00:00” appears on the display and the HOUR digit flashes.(F1) 2. Press the SKIP/TUNE SEARCH (UP or DOWN) button (19,17) to adjust it. 3. Press the TIMER button again, the MINUTE digit will start flashing, adjust it by pressing the SKIP/TUNE SEARCH (UP or DOWN) button. 4. Press the TIMER button once more to confirm and order TIMER ON time. 5. After adjusting "TIMER ON", "OFF" appears on the display and the HOUR digit flashes.(F2) 6.
1. If you want to fall asleep to music, press the SLEEP button. 2. You may select the TUNER,CD/MP3,USB,SD/MMC,or AUX mode in sleep function to play from 90, 80, 70 up to 10 minutes of music before shutting itself off automatically FUNCTION SELECT Press the FUNCTION button (22) on the unit or on the remote control(4) to select the desired. Display changes as below: RADIO OPERATION Operation 1. Select ON with the Main Power Switch (28) on the rear of the unit. 2.
The radio will start automatically scanning for strong radio signals. The TUNER Display shows the frequency in MHz for FM, The tuner will stop scanning when it finds a strong signal. Repeat this process until the desired station is found. Notes: As automatic tuning depends on the signal strength of the transmitters, weak transmitters are sometimes skipped. In such a case, tuner manually to find the weaker transmitters.
Select ON with the Main Power Switch (28) on the rear of the unit. Press the STANDBY Button on the unit (23)or the remote control(1)to turn the unit on. Select the CD function with the Function Button on the unit (22) or on the remote control (4). Press the CD door open/close button (4) to open the CD compartment. When the disc compartment has opened, remove a disc from its case and place it carefully in the compartment with the label side facing up.
This compact disc player has built-in error compensation circuits to correct for minor defects in a disc. There are limits, however, to the amount of corrections possible. In some cases, the CD player may skip some tracks, or parts of tracks, on a disc during disc play. This problem may be caused by defects (such as scratches) in the disc being played, which are too large for the error compensation circuits to handle.
3. Press the PLAY/PAUSE button once again, the time elapsed indicator will flash.(F8) 4. To change Track NO., Press SKIP/TUNE SEARCH(UP or DOWN) button once. Press and hold the SKIP/TUNE SEARCH(UP or DOWN)button once to skip fast forward or backward each song. 5. To resume playback, press the PLAY/PAUSE button once more again. 6. To change the ALBUM NO., press the PRESET/FOLDER UP or PRESET/FOLDER DN once. 7.
a. During the unit in the MP3 or WMA playing, press the ID3/MONO/STEREO button once. The display will shows a "ID3 ON", and then it will automatically search more than 64 letters for "TITLE NAME", "ARTIST NAME" or "ALBUM NAME" which move from the right corner to the left corner on the display continuously. b. Press the ID3/MONO/STEREO button once again. The display will shows a "ID3 OFF", and then the main unit will play normally. Note: 1. The main unit can play MP3 and WMA only in this mode. 2.
remote control to select the desired track. The number of the selected track will be shown on the display. Press the Play/Pause button to start play. To skip to the next track To skip ahead to the beginning of the next track. Press the SKIP/TUNER SEARCH UP (19) on the unit or (17) on the remote control once. Play will resume at the beginning of the next track. The player will skip ahead to the next track each time the SKIP/TUNER SEARCH (UP) button is pressed.
play the current track repeatedly. (F12) 2. Press the REPEAT button twice, REPEAT ALL is displayed. The unit will play all tracks repeatedly. (F13) 3. Press the REPEAT button thrice, the REPEAT function will be off. MP3/WMA 1. Press the REPEAT button once on the remote, REPEAT is displayed. The unit will play the current track repeatedly. (F14) 2. Press the REPEAT button twice, REPEAT ALL is displayed. The unit will play all tracks repeatedly. (F15) 3.
PROGRAMMED DISCPLAY User can make the program up to 32 tracks in CD mode or 64 tracks in MP3/WMA/USB/SDCARD mode in any desired order. Program mode is activated while in stop mode. Press the STOP button (21) on the unit or (19) on the remote control first, then follow the instructions below. CD 1. Press the MEM/C-ADJ. button (16) on the unit or on the remote control(5) to shift to PROGRAM mode. (F19) 2. Press the SKIP/TUNER SEARCH (UP or DOWN) button, the track number will be changed. 3.
will show the number of tracks and the playing time of the CD/MP3/WMA tracks. 2. CANCEL PROGRAM 1. Press the STOP button once, or open the CD tray door and close it again then the memory will be erased. 2. Set a new program, the existing one will be cleared. Note: During the program mode. 1. Press the "REPEAT" button once, the "REPEAT" indicator will light on the display. Then the main unit will repeat the current track. 2. Press the "REPEAT" button twice, the "REPEAT ALL" will light on the display.
LCD DISPLAY WINDOW A. LEEP INDICATOR B. TIMER INDICATOR C. ALBUM / RADIO MEMORY NUMBER INDICATOR D.STEREO INDICATOR E. VOLUME HIGH / LOW INDICATOR F.TRACK/NUMBER/TIME INDICATOR SPECIFICATIONS PowerSupply AC: 230V~50Hz Battery: 1Xcr203, 3V for remote control Radio Frequency Coverage FM: 87.5-108MHz CD Player Pick Up: 3-Beam, Semi conductor Laser D/A Converter: 16-Bit Linear 2x Oversampling General Headphones: 3.5 mm stereo jack plug, 8-32Ohm Output Power: 2x4.
Informations de sécurité PRISE SECTEUR Cet appareil requiert une alimentation électrique 230 volts, 50 Hz CA. Toute autre source électrique risque de l'endommager. Vérifiez que le secteur fournit une électricité avec les caractéristiques indiquées sur l'étiquette de spécifications collée sur votre appareil avant de brancher ce dernier pour la première fois. SYMBOLES Cet appareil est doublement isolé, aussi une prise reliée à la terre n'est-elle pas nécessaire.
qualifié. Retirez le cordon d'alimentation de la prise secteur par temps orageux. Cet appareil est destiné à un usage domestique uniquement. Toute autre application peut annuler la garantie et s'avérer dangereuse. AÉRATION Posez l'appareil sur une surface plate et stable, éloignée des rayons directs du soleil et de toute source de chaleur. Pour une installation à l'intérieur d'un meuble, prévoyez un espace libre d'au moins 10 cm tout autour de l'appareil.
MISE AU REBUT En tant que revendeur, nous nous préoccupons de l'environnement. Aidez-nous en observant toutes les instructions et réglementations de mise au rebut de vos appareils, piles et emballages. Nous devons tous oeuvrer pour la protection des ressources naturelles et la conservation de notre environnement. Votre appareil fonctionne avec une pile Lithium (CR2032). Pour retirer la pile, procédez à l'inverse de son installation .
AVERTISSEMENT : La fiche de prise de courant sert de dispositif de sectionnement pour couper l’alimentation générale de l’appareil et celle-ci doit être aisément accessible. La prise secteur sur laquelle votre appareil est branché doit donc être accessible à tout moment pour vous permettre de débrancher l’appareil. Manipulation des disques CD Votre appareil a été conçu pour lire les disques compacts portant le logo d'identification illustré sur la gauche.
1. N'employez aucun produit chimique (pulvérisateur, produit ou fluide antistatique, essence, diluant, etc.) pour nettoyer vos disques. Vous risquez d'endommager irrémédiablement la surface en plastique. 2. Le passage brusque d'un disque d'un endroit froid à un endroit chaud crée une certaine humidité sur la surface du disque. Si cela se produit, essuyez simplement la surface avec un chiffon doux. N'utilisez surtout pas de sèche-cheveux.
ÉLÉMENTS DE COMMANDE ET FONCTIONS FR-6
MS 921 MODE D’EMPLOI Veuillezlireattentivementcemoded’emploi,afindefamiliariseravecvotrenouvelappareila vantdel’utiliserpourlapremièrefois.Veuillezs’ilvousplaîtgardercemoded’emploicomme référencepourlefutur. POSITIONNEMENT DES COMMANDES 1. 2. 3. 4. 5. 6. 7. 8. 9. 10. 11. 12. 13. 14. 15. 16. 17. 18. 19. 20. 21. 22. 23. 24. 25. 26. 27. 28.
BRANCHEMENT ALASOURCE D’ALIMENTATION Avantl’utilisation,verifier que la tension électrique de votre source d’alimentation corresponde à celle indiquée sur la plaque des caractéristiques techniques de l’appareil. Avant de brancher l’appareil au réseau, il faut lire attentivement les instructions suivantes pour des raisons desécurité. UTILISATION DU RESEAU (CC) L’appareil est conçu pour fonctionner sur une tension de CA 230V, 50Hz seulement.
Sélectionner ON avec l’interrupteur principale d’alimentation(28) place à l’arrierede l’appareil pour alimenter l’appareil. Débrancher le cordon d’alimentation de la prise murale en cas d’inutilisation prolongée. TELECOMMANDE 1. 2. 3. 4. 5. 6. 7. Touche de STANDBY ON Touche de ID3/MO./STEREO Touche de TIMER Touche de FONCTION Touche de MEM/CLOCK-ADJ. BUTTON Touche de SLEEP BUTTON Radio: Touche d’Accord en Arrière / CD: Touche de Saut en Arrière 8. Touche de INTRO 9. Touche de EGALIATEUR 10.
REMPLACEMENT DESPILES Quand la pile deviant trop faible, la portée de la télécommande diminue considérablement et il faut remplacer la pile. Remarques: Pour bien garder la télécommande, et en prolonger sa durée, ne pas appuyer sur deux ou plus de deux Touches en meme temps.
REGLAGETIMER(MINUTERIE) En mode ATTENTE (STAND-BY) OFF/ON: 1. Après avoir réglé l'heure, presser la touché TIMER sur l’appareil (10)ou sur la télécommande (18) pour quelques secondes "ON" et "00:00" apparaîtront sur le display, et le chiffre de l'heure clignotera sur l’afficheur.(F1) 2. Presser SKIP/TUNE SEARCH, haut ou bas(19,17), pour régler. 3. Presser la touche TIMER de nouveau, le chiffre de la MINUTE clignotera sur l’afficheur, presser SKIP/TUNE SEARCH, haut ou bas (19,17),pour régler. 4.
CONTRÔLE EQ EQ montre la tonaité du son actuel. Quand on presse la touche EQ, la tonalité du son changera comme dessous: FONCTION SLEEP (PAR TELECOMMANDE) 1. Si vous voulez vous endormir avec la musique, presser la touche SLEEP 2. Vous pouvez sélectionner entre les modes de TUNER,CD/MP3,USB,SD/MMC, AUX, dans la modalité Fonction Sleep pour écouter lamusique pour 90, 80, 70 jusqu'à 10 minutes avant qu'il s'éteigne automatiquement.
RECHERCHE MANUELLE DELASTATION Il est très utile de rechercher les stations manuellement, si vous connaissez déjà la fréquence de la station émettrice. Brancher l’antenne FM à l’arrière. Pour changer de fréquence, appuyer plusieurs fois sur les touches Fréquences, jusqu’à ce que la fréquence precise ait été atteinte. RECHERCHE AUTOMATIQUE DESSTATIONS Appuyer sur la Touche de Recherche Fréquence en avant ou en arrière et la maintenir enfoncée pendant une seconde environ.
RECEPTIONFMENSTEREOPHONIEETMONOPHONIE Quand un signal FM-Stéréo est intercepté, en positionnant le Sélecteur de Bande sur FM, la transmission sera reçue en stéréophonie. L’indicateur ((( ST. ))) s’allumera. Lorsque les stations FM sont faibles et dérangées, en sélectionnant FM Mono avec la touche ID3/FM MONO-STEREO (7), l’écoute peut être améliorée. La réception sera en Mono. ANTENNE Pour la réception en FM il y a une antenne à fil (24) placée au dos de l’appareil.
DANGER N’introduire que des disques compacts dans le compartiment. La présence d’objets étrangers endommage le mécanisme. En cas d’inutilisation, fermer le compartiment des disques pour éviter que de la saleté ou de la poussière entrent dans le mécanisme. Ne jamais placer plus qu’un disque à la fois dans le compartiment.
Ecouter un nouveau disque. Si le lecteur CD fonctionne normalement, le problème de saut est sans doute imputable au disque défectueux. A) Mode CD 1. Cet appareil peut lire des disques CD, CD-R, CD-RW. 2. Si il n’est pas possible de lire le sommaire, NO DISC apparaîtra.(F4) Lecture de CD/MP3 1. Insérer un CD dans le compartiment CD, l’appareil lira le numéro total des albums et des passages du disque. 2. La lecture commence en pressant la touche PLAY/PAUSE (20).
4. Presser SKIP/TUNE SEARCH (haut ou bas), une fois pour changer le numéro de passage, presser et tenir la touche SKIP/TUNE SEARCH (haut ou bas), une fois pour sauter les passages. 5. Pour reprendre la lecture du disque presser la touche PLAY/PAUSE de nouveau. 6. Pour arrêter la lecture du disque, presser la touche STOP(21) (8). 6. Pour changer le numéro de l’album, presser PRESET/FOLDER haut ou PRESET/ FOLDER bas une fois. 7. Pour arrêter la lecture du disque, presser la touche STOP(21) (8).
3. Si la mémoire USB a plus qu'un album. a. Presser PRESET/FOLDER, haut ou bas, pour sélectionner chaque album. b. Presser SKIP/TUNE SEARCH, haut ou bas, pour sélectionner le passage actuel dans l'album désiré. 4. Si les MP3 et WMA sont enrégistrés avec "ID3." a. Pendant que le poste est en lecture de MP3 ou WMA. presser la touche ID3/MONO/ STEREO une fois.
SAUTERDESPISTES COMMENCERLALECTUREDUDISQUEPARLEDEBUTD’UNEPISTEPARTI CULIERE Appuyer sur les touches de SKIP/TUNE SEARCH, haut (19,17) ou bas (17,7) sur l’appareil sur la télécommande pour sélectionner la piste souhaitée. Le numéro de la piste sélectionnée apparaît sur l’afficheur du lecteur. Appuyer sur la touche de PLAY/PAUSE pour commencer la lecture. SAUTERALAPISTESUIVANTE Pour sauter en avant au début de la piste suivante. Appuyer une fois sur la touche de SKIP/TUNE SEARCH, vers le haut.
première, ’exploration s’arrête. LECTUREREPETEE(CD/MP3/USB/CARD) Utiliser la touche de REPEAT (10) sur la télécommande pour lire en continu toutes les pistes du disque entier ou une seule piste. 1. Appuyer une fois sur la touche de Répétition (10), REPEAT sera affiché. La lecture de la piste actuelle sera lue à maintes reprises.(F12) 2. Appuyer deux fois sur la touche de Répétition, “REPEAT ALL” sera affiché. La lecture de toutes les pistes seront lues continuellement.(F13) 3.
LECTUREALEATOIRE(RANDOM) Appuyer sur la Touche de Lecture Aléatoire RANDOM (14) sur la télécommade avec le CD arrêté. L’indication “RANDOM” sera affichée. (F17) Appuyer sur la touche de Lecture/Attente. Le lecteur CD sélectionnera une piste au hasard et la lecture commence. A la fin de cette pistelà, l’appareil commence la lecture d’une autre piste sélectionnée au hasard. Quand toutes les pistes ont été écoutées dans cet ordre aléatoire, le lecteur CD s’arrête.
En MP3/WMA/USB/SDCARD 1. Appuyer sur la touche de MEM/C-ADJ. sur l’appareil (13) sur la télécommande (17) pour passer à la modalité PROGRAMMATION. Le numéro d’album clignote.(F20) 2. Appuyer sur PRESET/FOLDER (haut ou bas), le numéro d’album changera. 3. Appuyer sur MEMORY/CLOCK-ADJ. le numéro de piste clignotera.(F21) 4. Appuyer sur SKIP/TUNE SEARCH (haut ou bas), le numéro de piste changera. 5. Appuyer sur MEMORY/CLOCK-ADJ. pour confirmer le numéro de piste. 2.
LINE IN. 1. Pour sélectionner la fonction AUX IN, presser plusieurs fois la touche FONCTION sur l’appareil ou sur la télécommande tant que AUX apparaît sur l’afficheur. 2. Presser la touche VOLUME, haut ou bas, pour régler le niveau de sortie. Note: Le câble LINE IN n'est pas inclus dans l'emballage. MUTE(DELA TELECOMMANDE) 1. Pousser la touche MUTE 1 12) sur la télécommande pour annuler instantannément le volume, le niveau du volume clignotera.(F22) 2.
CARACTERISTIQUES TECHNIQUES ALIMENTATIONÉLECTRIQUE CA: Piles: télécommande 230V - 50 Hz 1 x CR2032, 3V pour la LIMITESD’AUDIBILITÉFRÉQUENCES RADIO FM: 87,5 - 108 MHz LECTEURCD Dispositif de lecture laser (pickup): Convertisseur D/A: x Laser 3 faisceaux à Semi-conducteur 16 bit linéaires, suréchantillonage 2 GÉNÉRAL Casques: 8-32 ohms Sortie Fiche stéréo 3,5 mm de diamètre, 2 x 4.5 Watt Caractéristiques sujettes à modifications sans avis préalable.
INFORMAZIONI DI SICUREZZA Alimentazione elettrica Questo apparecchio è progettato per funzionare con una fornitura di corrente di 230 Volt, 50Hz CA. Altre fonti di alimentazione possono danneggiarlo. Quando si collega l’apparecchio per la prima volta, controllare che la targhetta riporti l’indicazione 230V CA. SIMBOLI Questo apparecchio è dotato di doppio isolamento e non è necessario il collegamento a terra.
Togliere la spina di corrente dalla presa a muro durante i temporali. Questo prodotto è progettato esclusivamente per uso domestico, qualsiasi altro utilizzo potrebbe invalidare la garanzia e risultare pericoloso. VENTILAZIONE Posizionare l'apparecchio su una superficie piana e solida lontano dalla luce diretta del sole e dalle fonti di calore. Se si installa l'apparecchio in un armadietto, lasciare almeno uno spazio di 10 cm tutto intorno.
Ciò consente di conservare le risorse naturali e di fare in modo che quanto sopra sia riciclato con modalità che proteggono la salute e l’ambiente. Questo prodotto utilizza una batteria al litio (CR2032). Per rimuovere la batteria per uno smaltimento sicuro, eseguire il processo di montaggio all’inverso (pagina 8). Questo prodotto e il suo imballaggio devono essere smaltiti in conformità alle leggi e ai regolamenti locali.
1. Aprire la custodia di un disco tenendo i lati destro e sinistro della parte inferiore con la mano destra e sollevare il coperchio con la mano sinistra. 2. Premere il centro della custodia e sollevare il disco con cautela. 3. Tenere il disco dai bordi senza toccare la superficie di registrazione. (Il lato con l’effetto dei colori dell’arcobaleno è la parte da riprodurre). 1.
CARATTERISTICHE E COMANDI IT-5
MS 921 INTRODUZIONE MANUALE Raccomandiamo la lettura accurate di questo manuale per potervi familiarizzare con il vostro nuovo Sistema Hifi prima di utilizzarlo per la prima volta. Raccomandiamo di conser-vare questo manuale per future riferimenti LOCALIZZAZIONE DEI CONTROLLI 1. Altoparlante 2. Coperturaaltoparlante 3. Compartimento CD 4. Angolo apertura/chiusura Compartimento CD 5. Display LCD 6. Sensore telecomando 7. Tasto ID3/FMMONO/STEREO 8. Tasto EQUALIZZATORE 9. Tasto SLEEP 10. Tasto TIMER 11.
COLLEGAMENTO ALLA FONTE DI ALIMENTAZIONE Prima di accendere l’apparecchio assicurarsi che ilvoltaggio locale sia lo stesso di quello indicato sulla targhetta dei dati di funzionamento. Per la propria sicurezza leggere leseguenti istruzioni accuratamente prima di collegare questo apparecchio alla presa dicorrente. FUNZIONAMENTO A CA Questo apparecchio è stato progettato per funzionare solo con una fonte di alimentazione di AC 230V 50Hz.
Selezionare ON con l’interuttore principale posto sul retro dell’apparecchio(28). Scollegare il cavoa limentazione dalla presa di corrente se l’apparecchio non verrà utilizzato per un lungo periodo di tempo. TELECOMANDO 1. Tasto STANDBY/ON 2. Tasto ID3/MO./STEREO 3. Tasto TIMER 4. Tasto FUNZIONE 5. Tasto MEM/C-ADJ. 6. Tasto SLEEP 7. Tasto Radio Sintonia Giù/CD Salto Indietro 8. Tasto INTRO 9. Tasto EQ 10. Tasto REPEAT 11. Tasto MUTE 12. Tasto VOLUME SU 13. Tasto VOLUME GIU 14. Tasto RANDOM 15.
molto ridotto dunque si dovrà sostituire le batterie. Note: Per mantenere la precisione e una lunga vita del trasmettitore, non premere più di due tasti contemporaneamente. Se il telecomando non verrà usato per un lungo periodo di tempo, rimuovere la batteria per prevenire possibili Danni causati dalla fuoriuscita d’acido. USO CORRETTODEL TELECOMANDO Puntare il telecomando verso il sensore de lTelecomando (6).
premere SKIP/TUNE SEARCH (UP o DOWN)(19,17)per regolare. 4. Premere il tasto TIMER ancora una volta per confermare l’orario e impostare l’orario di accensione (TIMER ON). 5. Dopo averregolato "TIMER ON", "OFF" appare sul display la cifra dell’ORA lampeggerà.(F2) 6. Ripetere I passi 2 e 3 sopra, poi premere il tasto TIMER ancora una volta per confermare l’orario e impostare l’orario di spegnimento (TIMER OFF) 7.
SELEZIONEDELLAFUNZIONE 1. Premere il tasto FUNCTION (22) sull’apparecchio o sul telecomando (9) per selezionare la funzione desiderata. Il display mostrerà il seguente: UTILIZZO RADIO Funzionamento • Selezionare ON con l’interuttore principale posto sul retro dell’apparecchio (28). • Premere il Tasto Accensione/Standby (23) per accendere l’apparecchio. • Premere il Tasto FUNZIONE (22) sull’apparecchio o sul telecomando (9) per selezionare la funzione Radio (TUNER).
• La radio fermerà la scansione quando troverà un segnale forte. • Ripetere questa procedura fino a quando la stazione radio desiderata verrà trovata. Note: Come la sintonia automatica dipende dall’intensità del segnale della trasmittente, le trasmittenti dal segnale debole alcune volte vengono saltate. In casi del genere, usare la sintonia manuale per trovare le trasmittenti deboli.
Premere il tasto STANDBY (23) per accendere l’apparecchio. Premere il tasto FUNZIONE (22) per selezionare la funzione CD. Premere l’angolo di Apertura Compartimento CD (4) per aprire il compartimento CD. Quando il compartimento CD sarà aperto, rimuovere un disco dalla sua custodia e posizionarlo accuratamente nel compartimento con il lato dell’etichetta rivolto verso l’alto. Posizionare i dischi più piccoli di 3” sul perno centrale del compartimento.
compartimento CD. Premere il tasto PLAY/PAUSE (20). La lettura del disco inizierà dal primo brano del disco. Nota: Se il disco è profondamente graffiato o molto sporco, la lettura del disco potrebbe non iniziare. Se un disco centrato in modo errato viene letto, si possono ascoltare rumori nel meccanismo. L’uso di dischi di questo tipo deve essere evitato. Errori del Disco Il lettore compact disco possiede incorporati circuiti per la compensazione degli errori per correggere i difetti minori di un disco.
per saltare i brani. 5. Per riprendere la lettura del disco, premere il tasto PLAY/PAUSE nuovamente. 6. Per fermare la lettura del disco, premere il tasto STOP (21). C) MP3/WMA 1. Inserire un disco MP3/WMA nel compartimento CD, l’apparecchio leggerà il numero totale degli album e dei brani del disco. 2. La lettura inizia premendo il tasto PLAY/PAUSE (20). La lettura inizia dal primo brano (F7) 3. Per fermare temporaneamente la lettura del disco (modalità di pausa), premere il tasto PLAY/PAUSE.(F8) 4.
FUNZIONE USB/SD CARD Inmodalità Standby 1. Inserire il dispositivo USB o SD/MMC CARD, poi premere il tasto STANDBY sull’apparecchio o sul telecomando per accendere l’apparecchio. 2. Premere il tasto FUNZIONE sull’apparecchio o sul telecomando per selezionare la modalità USB o SD/MMC. L’apparecchio leggerà il numero totale degli album e dei brani del disco. (F9) 3. Se la memoria USB ha più di un album: a. Premere PRESET/FOLDER (SU o GIÙ) per selezionare ogni album. b.
PLAY/PAUSE. L’indicatore del tempo trascorso lampeggerà. (F 11) 3. Per riprendere la lettura del disco, premere il tasto PLAY/ PAUSE nuovamente. 4. Per fermare la lettura del disco, premere di nuovo il tasto STOP. Nota : In tutti momenti, il dispositivo USB o SD CARD deve essere ben fissato all’apparecchio, e in modalità STANDBY, per evitare danni sia al dispositivo USB o alla SD CARD.
indietro brano per brano tutto il disco. Una volta che verrà raggiunto l’inizio del primo brano, il lettore tornerà all’ultimo brano. Ricerca Manuale Durante la lettura, mantenendo premuti i tasti SKIP/TUNER SEARCH(SU oGIÙ) causerà che il lettore scandisca il brano corrente. Alla fine di un brano il lettore andrà al brano successivo e continuerà la scansione. All’inizio di un brano il lettore andrà al brano precedente e continuerà la scansione.
3. PremereiltastoREPEATunaterzavolta, verràvisualizzatoREPEAT ALBUM. IlCDriprodurrà tutti i brani dell’album attuale ripetutamente.(F16) 4. Premere il tasto REPEAT una quarta volta per annullare la funzione di ripetizione. LETTURACASUALE(RANDOM) • Premere il Tasto Lettura Casuale RANDOM (14) sul telecomando. L’indicatore di lettura casuale “RANDOM” verrà visualizzato. (F17) • Il lettore CD selezionerà un brano casualmente e inizierà la lettura.
4) Ripetere le operazioni indicate sopra per programmare altri brani. Si possono programmare al massimo 32 brani in CD o 64 brani in MP3/WMA/USB/SD CARD. CONMP3/WMA/USB/SDCARD 1. Premere il tasto MEM/C-ADJ. per passare allamodalità PROGRAMMAZIONE. Il numero di album lampeggia. (F20) 2. Premere PRESET/FOLDER (SU o GIÙ), il numero di album cambierà. 3. Premere MEMORY/CLOCK-ADJ, il numero di brano lampeggerà.(F21) 4. Premere SKIP/TUNER SEARCH (SU o GIÙ), il numero di brano cambierà. 5.
stereo da 3.5mm per collegare l’apparecchio audio esterno all’ingresso LINE IN. 1. Per selezionare la funzione AUX IN, premere ripetutamente il tasto FUNZIONE sull’apparecchio o sul telecomando finché appare AUX sul display. 2. Premere il tasto VOLUME (SU o GIU) per regolare il livello di uscita. Nota: Il cavo LINE IN non è incluso nella confezione. MUTE (DAL TELECOMANDO) 1. 2. Premere il tasto MUTE (11) sul telecomando per abbassare immediatamente il volume del suono, il livello del volume lampeggerà.
E. INDICATOREVOLUMEHIGH/LOW F. INDICATOREBRANO/NUMERO/TEMPO SPECIFICHE TECNICHE Fonte Alimentazione AC: Batterie: 230V-50Hz 1 CR 2032 UM-4 per il telecomando Gamma Frequenze Radio FM: 87.5 - 108 MHZ LettoreCD Fonorivelatore: Convertitore D/A: Semiconduttore Laser 3- Raggi d’azione 16-Bit Lineari, sovracampionatura 2x Generale Cuffie: Spina jack stereo di 3.5 mm, 8-32 Ohm Uscita 2 x 4.
Herstellergarantie Wir freuen uns, dass Sie sich für den Kauf eines modernen Gerätes unseres Hauses entschieden haben und wünschen Ihnen viel Spaß mit diesem Produkt. Die Fertigung von solchen Geräten ist ein komplexer Vorgang, den wir durch ständige Qualitätskontrollen begleiten. Dadurch können wir die hohe Qualität unserer Produkte gewährleisten.
6. Die Retourenkarte füllen Sie bitte wie folgt aus: Im Feld „Absender“ tragen Sie bitte Ihren kompletten Namen mit Anschrift und Postleitzahl ein. Die Empfängeranschrift ist schon auf dem Retourenaufkleber vorgedruckt. Kleben Sie den Retourenaufkleber gut sichtbar auf dem Paket auf. Das verpackte Gerät übergeben Sie bitte einem Paketzusteller “Deutsche Post” bzw. einer Abgabestelle “Deutsche Post”. Um das Produkt auf dem Transport optimal zu schützen, sollten Sie möglichst die Originalverpackung nutzen.
Herstellergarantie Wir freuen uns, dass Sie sich für den Kauf eines modernen Gerätes unseres Hauses entschieden haben und wünschen Ihnen viel Spaß mit diesem Produkt. Die Fertigung von solchen Geräten ist ein komplexer Vorgang, den wir durch ständige Qualitätskontrollen begleiten. Dadurch können wir die hohe Qualität unserer Produkte gewährleisten.
7. Bitte erbringen Sie den Kaufnachweis. Hierzu genügt das Original des Kassenzettels, welches Sie dem Gerät bei der Einsendung beifügen. Ohne Kaufnachweis können wir leider keine kostenlosen Garantieleistungen erbringen. Geht uns ein Gerät ohne Kaufnachweis zu, erhalten Sie von uns einen Kostenvoranschlag für die Reparatur. Entscheiden Sie sich gegen eine Reparatur, so liefern wir das Gerät an Sie zurück.
Herstellergarantie Wir freuen uns, dass Sie sich für den Kauf eines modernen Gerätes unseres Hauses entschieden haben und wünschen Ihnen viel Spaß mit diesem Produkt. Die Fertigung von solchen Geräten ist ein komplexer Vorgang, den wir durch ständige Qualitätskontrollen begleiten. Dadurch können wir die hohe Qualität unserer Produkte gewährleisten.
6. Die Retourenkarte füllen Sie bitte wie folgt aus: Im Feld „Absender“ tragen Sie bitte Ihren kompletten Namen mit Anschrift und Postleitzahl ein. Die Empfängeranschrift ist schon auf dem Retourenaufkleber vorgedruckt. Kleben Sie den Retourenaufkleber gut sichtbar auf dem Paket auf. Das verpackte Gerät übergeben Sie bitte einem Paketzusteller “Deutsche Post” bzw. einer Abgabestelle “Deutsche Post”. Um das Produkt auf dem Transport optimal zu schützen, sollten Sie möglichst die Originalverpackung nutzen.
Garantie du fabricant Nous vous remercions d'avoir acheté cet appareil particulièrement moderne et espérons qu'il vous donnera entière satisfaction. La fabrication de tels appareils fait appel à un processus complexe soumis à des contrôles réguliers de qualité. Nous garantissons ainsi la fabrication de produits de haute qualité. Toutefois, en cas de problème justifié, nous vous offrons une garantie de 2 ans à compter de la date d'achat, aux conditions suivantes : 1.
7. Ayez toujours votre preuve d'achat à portée de main. Si vous nous retournez l'appareil, joignez-y le ticket d'achat correspondant. Nous ne serons malheureusement pas en mesure de vous offrir de services de garantie gratuits si aucun ticket d'achat n'accompagne l'appareil. Dans ce cas, nous vous enverrons un devis de réparation. Si vous décidez de ne pas faire réparer l'appareil, il vous sera retourné.
Garanzia del produttore Grazie per aver acquistato questo prodotto moderno! Tramite esso, speriamo di poterVi offrire ore e ore d’intrattenimento! La produzione di questo dispositivo avviene con un processo complesso che noi monitoriamo attentamente con costanti controlli di qualità. Questi controlli ci consentono di garantire l’alta qualità dei nostri prodotti. In ogni caso, in presenza di malfunzionamenti, offriamo una garanzia della durata di 2 anni dalla data d’acquisto, alle seguenti condizioni: 1.
7. Tenere a portata di mano una prova d’acquisto. Sarà sufficiente accludere al dispositivo la prova d’acquisto al momento della spedizione. Purtroppo, senza una prova d’acquisto non sarà possibile eseguire alcun servizio gratuito in garanzia. Nel caso in cui il dispositivo venga spedito senza questa prova, la riparazione avverrà a pagamento. In questo caso, se si dovesse decidere di non far riparare il dispositivo, l’apparecchio verrà restituito al mittente.