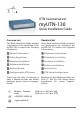
UTN Scannerserver myUTN-130 Quick Installation Guide Overview [en] Überblick [de] This Quick Installation Guide provides a description of the installation of the myUTN-130. It contains the following information: Dieser Quick Installation Guide beinhaltet eine Beschreibung der Installation des myUTN-130.
Date of Manufacture The serial number includes the date of manufacture. The serial number can be found on the type plate.
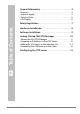
2 General Information . . . . . . . . . . . . . . . . . . . . . . . . . . . . . . 4 Purpose . . . . . . . . . . . . . . . . . . . . . . . . . . . . . . . . . . . . . . . . . . . . . . . . . .4 Scope of Supply . . . . . . . . . . . . . . . . . . . . . . . . . . . . . . . . . . . . . . . . . .4 Technical Data . . . . . . . . . . . . . . . . . . . . . . . . . . . . . . . . . . . . . . . . . . .5 LED Display . . . . . . . . . . . . . . . . . . . . . . . . . . . . . . . . . . . . . . . . . . . . . .
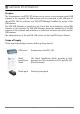
General Information Purpose The Scannerserver 'myUTN-130' allows you to access a non-network-ready USB scanner in the network. The USB scanner will be connected to the USB port of the myUTN-130. The software tool ‘SEH UTN Manager‘ handles the access of the USB scanner. The SEH UTN Manager is installed on all clients that are intended to access USB scanners in the network.
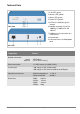
Technical Data 1) Link LED (green) 2) Activity LED (yellow) 3) Status LED (green) 4) Power LED (yellow) 5) LED for the USB port (green/ orange) Front view 6) Network connector (RJ-45) for 1000BaseT, 100BaseTX and 10BaseT 7) USB port for the connection of a USB scanner 8) Reset button 9) Connector for the included power pack Rear view Properties Values Network connection logical: physical: - IEEE 802.3 - RJ-45 (S/UTP Cat. 5) Device connection - 1 x USB scanner (via USB 2.
LED Display The LEDs of the UTN server provide information about its status. LED Action Color Description permanently on green There is a connection to the network. permanently off - There is no connection to the network. Activity blinks at irregular intervals yellow Indicates the exchange of network data packets. Status permanently off - If the activity LED blinks periodically at the same time, the BIOS mode is signalized.
Safety Regulations UTN server are network devices for use in office environments. The myUTN-130 is designed for the integration of USB scanners into TCP/IP networks. Before starting the initial setup procedure and during the operation of the UTN server, please note the following safety regulations. Their purpose is to protect yourself and others from personal injuries, and avoid damage to the equipment. Read the documentation and make sure that your system meets the requirements listed therein.
Hardware Installation You can directly connect one USB scanner to the UTN server (myUTN-130). Proceed as follows: 1. Connect the UTN server and the USB scanner with the USB data cable. 2. Connect the network cable (RJ-45) to the UTN server. 3. Connect the power cord to the UTN server.
Software Installation The software tool SEH UTN Manager organizes the access of the USB scanner. The SEH UTN Manager is available in two versions: Complete version Minimal version (only command-line interface) The complete version has a graphical user interface and offers additional features. A detailed description can be found in the myUTN User Manual. The SEH UTN Manager is installed on all clients that are intended to access USB scanners in the network.
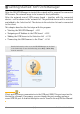
Getting Started: SEH UTN Manager After the SEH UTN Manager is started, the network will be scanned for connected UTN servers. The network range to be scanned is freely definable. After the network scan all UTN servers found – together with the connected devices – will be shown in the 'network list'. The preferred devices will be selected and added to the 'selection list'. The devices in the selection list can be connected to the client. This chapter describes the first steps with the program.
Starting the SEH UTN Manager Windows Start the SEH UTN Manager on your client via the Windows start menu. (Start J All Programs J SEH Computertechnik GmbH J SEH UTN Manager) In some cases the Windows user account control requires a confirmation if the SEH UTN Manager is to be run. Mac To start the program, double-click the 'SEH UTN Manager.app' file. (Applications J SEH UTN Manager.app) During the initial configuration, client and UTN server must be assigned to the same local network segment.
Assigning an IP Address to the UTN Server Once the UTN server is connected to the network, it checks whether an IP address can be obtained from the boot protocols BOOTP or DHCP. If this is not the case, the UTN server assigns itself an IP address via ZeroConf from the address range (169.254.0.0/16) which is reserved for ZeroConf. The UTN servers found by the program will be displayed in the network list. You can change the TCP/IP parameters of the UTN server. Proceed as follows: 1.
Adding the UTN Server to the Selection List In order to connect a UTN server to a client, you must assign the UTN server to the selection list. Put together a selection list with your preferred UTN servers. 1. 2. 3. 4. Proceed as follows: Select Selection List – Edit from the menu bar. The Edit Selection List dialog appears. Select the UTN server from the network list. Click Add. (Repeat steps 2 and 3, if necessary.) Click OK. The UTN servers are shown in the selection list.
Connecting the USB Scanner to the Client The USB scanners in the selection list can be connected to the client. Make sure that: - All provisions (driver installation, etc.) necessary to operate the device locally (i.e. connected directly to the client) have been met on the client. Ideally, the device has been connected and operated on the client locally according to the instructions of the manufacturer. - The device is not connected to another client.
Configuring the UTN server The UTN server can be configured and monitored via the myUTN Control Center. The myUTN Control Center is stored in the UTN server and can be launched by means of an Internet browser (Internet Explorer, Firefox, Safari). Proceed as follows: 1. Open your browser. 2. Enter the IP address of the UTN server as the URL. The myUTN Control Center will be displayed in the browser. If the myUTN Control Center is not displayed, check the proxy settings of your browser.
[en] Quick Installation Guide
2 Allgemeine Information . . . . . . . . . . . . . . . . . . . . . . . . . 18 Verwendungszweck . . . . . . . . . . . . . . . . . . . . . . . . . . . . . . . . . . . . Lieferumfang . . . . . . . . . . . . . . . . . . . . . . . . . . . . . . . . . . . . . . . . . . . Technische Daten . . . . . . . . . . . . . . . . . . . . . . . . . . . . . . . . . . . . . . LED-Anzeige . . . . . . . . . . . . . . . . . . . . . . . . . . . . . . . . . . . . . . . . . . .
Allgemeine Information Verwendungszweck Der Scannerserver 'myUTN-130' erlaubt das Bereitstellen von einem nichtnetzwerkfähigen USB-Scanner für mehrere Netzwerkteilnehmer. Dazu wird der USB-Scanner an den USB-Port des myUTN-130 angeschlossen. Die Zugriffsverteilung erfolgt über das Software-Tool 'SEH UTN Manager'. Der SEH UTN Manager wird auf alle Clients installiert, die auf im Netzwerk bereitgestellte USB-Scanner zugreifen sollen.
Technische Daten 1) Link-LED (grün) 2) Activity-LED (gelb) 3) Status-LED (grün) 4) Power-LED (gelb) 5) LED für den USB-Port (grün/ orange) Vorderansicht 6) Netzwerkanschluss (RJ-45) für 1000BaseT, 100BaseTX und 10BaseT 7) USB-Port für den Anschluss des USB-Scanners 8) Reset-Taster 9) Anschluss für die Stromversorgung über das mitgelieferte Netzteil Rückansicht Eigenschaften Werte Netzwerkanschluss Logisch: Physisch: - IEEE 802.3 - RJ-45 (S/UTP Cat. 5) Geräteanschluss - 1 x USB-Scanner (über USB 2.
LED-Anzeige Durch die Interpretation des LED-Leuchtverhaltens kann der Zustand des UTNServers ermittelt werden. LED Aktion Farbe Beschreibung Dauer-An grün Eine Verbindung zum Netzwerk ist vorhanden. Dauer-Aus - Es besteht keine Verbindung zum Netzwerk. Activity unregelmäßiges Blinken gelb Signalisiert den Austausch von NetzwerkDatenpaketen. Status Dauer-Aus - Bei gleichzeitigem zyklischen Blinken der ActivityLED wird der BIOS-Modus signalisiert.
Sicherheitsvorschriften UTN-Server sind Netzwerkgeräte für den Gebrauch in Büroumgebungen. Der myUTN-130 dient dem Einbinden von USB-Scannern in TCP/IP-Netzwerken. Beachten Sie vor Inbetriebnahme und beim Betrieb des UTN-Servers die folgenden Sicherheitsvorschriften, um sich und andere vor Personenschäden zu schützen sowie Beschädigungen am Gerät zu vermeiden. Lesen Sie die Dokumentation und stellen Sie sicher, dass Ihr System den aufgeführten Anforderungen entspricht.
Hardware-Installation Am UTN-Server (myUTN-130) kann ein USB-Scanner direkt angeschlossen werden. Gehen Sie wie folgt vor: 1. Verbinden Sie den UTN-Server und den USB-Scanner mit dem USB-Datenkabel. 2. Verbinden Sie das Netzwerkkabel (RJ-45) mit dem UTN-Server. 3. Verbinden Sie das Netzkabel mit dem UTN-Server.
Software-Installation Die Zugriffsverteilung des USB-Scanners wird über das Software-Tool SEH UTN Manager organisiert. Der SEH UTN Manager ist in zwei Varianten verfügbar: Vollständige Variante Minimal-Variante (reine Kommandozeilen-Version) Die vollständige Variante verfügt über eine grafische Bedienoberfläche und bietet zusätzliche Funktionen. Detaillierte Beschreibungen finden Sie in der myUTN-Benutzerdokumentation.
Erste Schritte mit dem SEH UTN Manager Nach dem Start des SEH UTN Managers wird das Netzwerk nach angeschlossenen UTN-Servern gescannt. Der zu scannende Netzwerkbereich ist frei definierbar. Nach dem Netzwerkscan werden alle gefundenen UTN-Server und deren angeschlossene Geräte in der 'Netzwerkliste' angezeigt. Die benötigten Geräte werden ausgewählt und der 'Auswahlliste' hinzugefügt. Die in der Auswahlliste aufgeführten Geräte können dann mit dem Client verbunden werden.
SEH UTN Manager starten Windows Starten Sie auf Ihrem Client den SEH UTN Manager über das WindowsStartmenü. (Start J Alle Programme J SEH Computertechnik GmbH J SEH UTN Manager) In einigen Fällen verlangt die Windows-Benutzerkontensteuerung eine Bestätigung, wenn der SEH UTN Manager ausgeführt werden soll. Mac Zum Starten des Programms doppelklicken Sie auf die Datei 'SEH UTN Manager.app'. (Programme J SEH UTN Manager.
UTN-Server eine IP-Adresse zuweisen Nachdem der UTN-Server an das Netzwerk angeschlossen ist, überprüft der UTNServer, ob er eine IP-Adresse über die Bootprotokolle BOOTP oder DHCP erhält. Ist das nicht der Fall, gibt sich der UTN-Server über ZeroConf selbst eine IP-Adresse aus dem für ZeroConf reservierten Adressbereich (169.254.0.0/16). Die vom Programm gefundenen UTN-Server werden in der Netzwerkliste angezeigt. Sie haben die Möglichkeit, die TCP/IP-Parameter am UTN-Server zu ändern.
UTN-Server der Auswahlliste hinzufügen Um einen UTN-Server mit dem Client zu verbinden, muss der UTN-Server der Auswahlliste zugeordnet werden. Stellen Sie die Auswahlliste mit Ihren bevorzugt genutzten UTN-Servern zusammen. 1. 2. 3. 4. Gehen Sie wie folgt vor: Wählen Sie im Menü Auswahlliste den Befehl Bearbeiten. Der Dialog Auswahlliste bearbeiten erscheint. Markieren Sie den UTN-Server in der Netzwerkliste. Wählen Sie die Schaltfläche Hinzufügen an. (Wiederholen Sie die Schritte 2-3 nach Bedarf.
USB-Scanner mit Client verbinden Die in der Auswahlliste aufgeführten USB-Scanner können mit dem Client verbunden werden. Stellen Sie folgende Punkte sicher: - Auf dem Client sind alle Vorbereitungen (Treiberinstallation usw.) getroffen worden, die notwendig wären, um das Gerät lokal (also direkt am Client angeschlossen) zu betreiben. Idealerweise ist das Gerät zuvor lokal am Client nach der Anleitung des Herstellers angeschlossen und betrieben worden.
UTN-Server konfigurieren Über das myUTN Control Center kann der UTN-Server konfiguriert und überwacht werden. Das myUTN Control Center ist in dem UTN-Server gespeichert und kann mit einem Internet-Browser (Internet Explorer, Firefox, Safari) aufgerufen werden. Gehen Sie wie folgt vor: 1. Öffnen Sie Ihren Browser. 2. Geben Sie als URL die IP-Adresse des UTN-Servers ein. Das myUTN Control Center wird im Browser dargestellt.
The latest version of the EC declaration of conformity can be downloaded from the homepage of SEH Computertechnik GmbH: http://www.seh-technology.com/services/ce-notification.
Quick Installation Guide 31
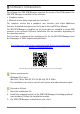
Manufactured by: SEH Computertechnik GmbH Suedring 11 Scan this QR code (meCard) using your smart phone. 33647 Bielefeld Germany Phone: +49 (0)521 94226-29 Fax: +49 (0)521 94226-99 Support: +49 (0)521 94226-44 Email: info@seh.de Web: http://www.seh.de Document: Type: Quick Installation Guide Title: myUTN-130 Version: 1.2 Order number: MHAB-QI-myUTN130 Online Links to important Internet Resources: Support Contacts and Information: Sales Contacts and Information: Downloads: http://www.seh-technology.