MODEL:SC-1200AU6DS
CONTENTS General Safety 4 Product Overview 8 Getting Started 10 Starting a Wash Program 13 Instructions 14 Loading the upper basket 15 Loading the lower basket 16 Detergents 18 Adding Detergents 19 Rinse Aid Dispenser 20 Starting the Dishwasher 22 FAQs 23 Useful Information 24 Specifications 27 Customer Helpline 28
GENERAL SAFETY IMPORTANT INFORMATION Read this manual thoroughly before you start using the Stainless Steel Dishwasher. The safety precautions instructions reduces the risk of fire, electric shock and injury when correctly complied to. Please follow all instructions and take notice of all warnings. Pay close attention to messages that follow this safety alert symbol or the words DANGER, WARNING or CAUTION. These words will be used to alert you of potential hazards that and injure you and others.
GENERAL SAFETY INSTRUCTIONS (Cont.) To reduce risk of fire, electric shock or injury, always follow these basic precautions and accident prevention measures when using this appliance, including the below: NOTE: This appliance should be installed by an authorised technician else warranty will be void. INSTALLATION • The product is heavy, be careful when moving it. To avoid back or other injury, have 2 people lift or mechanical aid when installing.
GENERAL SAFETY INSTRUCTIONS (Cont.) USAGE CONDITIONS AND RESTRICTIONS • Supervision over children is to ensure that they do not play with the appliance. Never allow them to use, play with or crawl inside the appliance. Cleaning and maintenance must not be done by children.
GENERAL SAFETY INSTRUCTIONS (Cont.) CLEANING AND MAINTENANCE • Service: Never try to repair, modify or replace any part of the appliance, unless this manual says you can do so. All other servicing is to be done by a qualified technician, or contact our support centre on 1300 296 699 for advice.
PRODUCT OVERVIEW 5 1 2 6 3 7 4 1. Upper Basked 2. Inner Pipe 3. Lower Basket 4. Dispenser 5. Cup Shelf 6. Spray Arms 7. Filter Assembly 8. Inlet Pipe Connector 9.
PRODUCT OVERVIEW (Cont.) CONTROL PANEL 4 5 678 1 2 3 12 13 9 10 11 1. On/Off Button: Turn on/off the power supply 2. Delay button: Press button to add delay time. 3. Extra Drying Button: Extra Drying function to only be used with Intensive, Heavy, ECO, Glass and 90min functions. 4. Power Indicator: Indicate when power is on. 5. Delay Indicators: Show the delay time options. 6. Extra Drying Indicators: Will highlight when in Extra Drying Mode. 7.
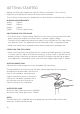
GETTING STARTED Before installing your appliance, read all safety instructions in this manual, especially the sections on electrical safety and installation. The minimum measurements needed for this dishwasher installation are as below: MINIMUM MEASUREMENTS Width: 598mm Depth: 610mm Height: 845mm Depth: 1175mm (open Door) POSITIONING THE APPLIANCE • This dishwasher is freestanding. Position it close to an existing water inlet and drain connection and be sure that there is a power supply nearby.
GETTING STARTED (Cont.) DRAIN HOSE CONNECTION The drain pipe hose can go into a drain pipe with a diameter of 40mm (Option B), or let it run into the sink. Make sure to avoid bending or crimping the hose (Option A). The top of the hose is not to exceed 1000mm. ELECTRICAL CONNECTION To connect the dishwasher, insert the plug into a correctly earthed power socket.
GETTING STARTED (Cont.) EARTHING This dishwasher must be earthed. In the unlikely event of malfunction or breakdown, earthing will reduce risk of electric shock by providing a path of least resistance for the electric current. WARNING: • Make sure the outlet is properly earthed to the ground. Please consult a qualified electrician or a service representitive if you are not sure.
INSTRUCTIONS LOADING THE DISHWASHER For best performance, follow bellow guidelines: ATTENTION: BEFORE LOADING BASKETS Its not necessary to rinse all dishes before putting into dishwasher, though we suggest you scrape off any large amounts of leftover food and soften remnants of burnt food in pots and pans to ensure cleaning efficiency. Place objects in the dishwasher in the following way: • Hollow items such as cups, glasses and pots should be upside down when placed into the dishwasher.
INSTRUCTIONS (Cont.) LOADING THE UPPER BASKET The upper basket is designed to hold more delicate and lighter dishware such as glasses, coffee and tea cups and saucers, as well as plates, small bowls and shallow pans. (position the dishes and cookware so that they will not get moved by the spray of water) ADJUSTING THE UPPER BASKET The height of the upper basket can be adjusted in order to create more space for large utensils both for the upper/lower basket.
INSTRUCTIONS (Cont.) LOADING THE LOWER BASKET Larger items such as pots, pans, lids, serving dishes and bowls should be placed into the lower basket of the dishwasher. (example of just pots below) FOLDING THE SPIKES OF LOWER BASKET For better stackins of pots and pans, fold down all the spikes which are used to stacking plates and bowls down. Allowing more room to place pots if need be.
INSTRUCTIONS (Cont.) CUTLERY BASKET All cutlery should be placed in the cutlery basket with the handles at the bottom. If the rack has side baskets, the spoons should be loaded seperately into the appropriate slots, especially long utensils should be placed in the horizontal position at the front of the upper basket as shown in the picture. WARNING • Do not let any items extend through the bottom. • Always load sharp utensils with the sharp point down.
INSTRUCTIONS (Cont.) DISHWASHER DETERGENT WARNING: • Only use detergent that are meant to be used for dishwashers • Only add the detergent just before starting the dishwasher so it doesnt become damp, if becomes damp this will stop it from dissolving properly. • Be sure to always supervise and that no children can reach detergent when door is open. Best when adding detergent, make sure its just before you start dishwasher and you close the door straight away.
INSTRUCTIONS (Cont.) ADDING DETERGENT A: For main wash detergent B: For Pre-Wash detergent Fill the detergent dispenser with detergent. The marking indicates the dosing levels as illustrated on the right Please observe the manufacturers dosing and storage recommendations as stated on the detergent packaging. Be sure to close the lid and press until it locks in place. If the dishes are heavily soiled, place an additional detergent dose in the pre-wash detergent chamber.
INSTRUCTIONS (Cont.) RINSE AID DISPENSER The rinse aid is released during the final rinse to prevent water from forming droplets on your dishes, which can leave spots and streaks. It also improves drying by allowing water to roll off the dishes. Your dishwasher is designed to use liquid rinse aids. The rinse aid dispenser is located inside the door next to the detergent dispenser. To fill the dispenser, open the cap and pour the rinse aid into the dispenser until the level indator turns completely black.
INSTRUCTIONS (Cont.) WHEN TO REFILL RINSE AID DISPENSER Fill the rinse aid dispenser when the light on the control panel comes on. When the rinse indicator is full, the whole indicator will be dark. As the rinse aid is used, the size of the dark dot decreases as indicated below. ADJUSTING THE RINSE AID DISPENSER The rinse aid has 6 settings, always start with the dispenser set on “4”.
INSTRUCTIONS (Cont.) STARTING THE DISHWASHER • Open the dishwasher and draw out the lower and upper basket and load in the dishes. Push them back in. • When you finished loading the dishes, open up the detergent dispenser and add in your detergent. Refer to pages 19 & 20 for more information of adding detergent and Rinse aid dispensers. • Once you have added your detergent and loaded the dishwasher. Close the door and be sure that it clicks in so that its closed correctly.
FAQs Problem Possible Cause The fuse is blown Replace the fuse or reset circuit breaker. or circuit breaker Remove any other appliances sharing the same circuit with the dishwasher. is activated The dishwasher The power supply is not does not run turned on. Make sure the dishwasher is powered on and the door is closed securely. Make sure the power cord is properly plugged into the wall socket. Water Pressure is Check that the water supply is connected low properly and the water is turned on.
USEFUL INFORMATION ERROR CODES When some malfunctions occur, the appliance will display error codes to warn you: CODES MEANINGS CAUSES The Rapid Light will Flicker Longer inlet time Tap is not open enough, or water intake is restricted. The Rapid and 90min light flicker Not reaching the setting temperature Malfunction in the heating element. The glass light is flickering Overflow Some element of dishwasher leaks.
USEFUL INFORMATION (Cont.) REMOVING THE FILTER SYSTEM To remove the filter assmebly to clean please follow the below instructions: STEP 1 Turn the filter anti-clockwise direction. STEP 2 Lift the filter up NOTES By unscrewing the coarse filter, you can remove the filter system. Remove any food remnants and clean the filters under running water. CAUTION • When cleaning the filters take care not to damage or distort the shape of it. • Never use the dishwasher without the filters.
SPECIFICATIONS Height 845mm Width 598mm Depth 610mm Water Pressure 0.04-1.
CUSTOMER HELPLINE: 1300 296 699 DISTRIBUTED BY: Ayonz Pty Ltd 28