SE421TT
TABLE OF CONTENTS I M P O R TA N T INFORMATION 2 2 PREFACE 4 3 SAFETY PRECAUTIONS 4 4 IN THE CARTON 6 5 FRONT/BACK CONNECTIONS OF LCD TV 7 6 7 8 9 10 TV INSTALLATI ON DRAWINGS REMOTE CONTROL MENU OPERATION Power Cord Connection 8 Antenna Connection 8 AV Connection 9 YPbPr (c omponent ) Connection 9 VGA ( PC ) Connection 10 COAX Connection 10 HDMI Connection 11 Service Port Function 11 Remote control instructions in TV mode 12 Remote control setup 13 Setup Wizard 14
IMPORTANT INFORMATION English The lightning flash with arrowhead symbol, within an equilateral triangle, is intended to alert the user to the presence of un-insulated dangerous voltage within the products enclosure that may be of sufficient magnitude to constitute a risk of electric to persons. The exclamation point within an equilateral triangle is interded to aler the user to the presence of important operating and maintenance (servicing) instruction the literature accompanying the appliance.
IMPORTANT INFORMATION 10.Protect the power cord from being walked on or pinched particularly at plugs, convenience receptacles, and the point where they exit from the apparatus. 11.Only use attachments / accessories specified by the manufacturer. 12.Use only with the cart, stand, tripod, bracket, or table specified by the manufacturer, or sold with the apparatus. When a cart is used, use caution when moving the cart / apparatus combination to avoid injury from tip-over. English 13.
PREFACE 2. PREFACE Thank you for buying this TV! Please read this manual thoroughly before operating the TV. Make sure the TV was not damaged in transit. Should the TV be damaged, do not install it and contact your dealer. Check that you have all the accessories according to the model. English 3. SAFETY PRECAUTIONS Put the TV on a stable surface. Do not place any material on the TV.
SAFETY PRECAUTIONS Keep the TV dry and away from humidity. English Keep the TV away from heat sources . Unplug the TV before cleaning it. Do not use solvent or liquid to clean the TV. Only clean the TV with a soft and dry cloth. In case of troubleshooting, do not use spare parts other than those suggested by the manufacturer. Using inadequate spare parts can lead to electric shocks, short-circuits , fire or other incidents. Unplug the TV during lightning storms or when unused for long periods of time.
INPUT 1 2 3 4 5 6 7 8 9 0 PICTURE SOUND SLEEP DISPLAY CH+ VOL+ MUTE CH- VOLEXIT MENU OK ENTER CC HDMI cable MTS ASPECT FAV
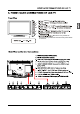
INPUT Blue when TV is powered on. Red when TV is powered off. No color when power switch is turned off.
POWER
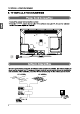
TV INSTALL ATION DRAWINGS AV Connection Connect the VIDEO and AUDIO output jack of the DVD or VCR to the VIDEO jacks on the set using the RCA cable. Match the jack colors: Video is yellow, Audio left is white, and Audio right is red. Select the AV input source using the SOURCE button on the remote control. English TV Back Video Cable AUDIO cable VIDEO R L DVD or VCR Back DVD or VCR YPbPr (Component) Connection Connect the YPbPr output of the DVD or VCR to the YPbPr input on the set.
TV INSTALL ATION DRAWINGS VGA(PC) Connection English Connect the RGB output of the PC to the VGA(PC) jack on the set. Connect the AUDIO output of The PC to the PC AUDIO jack on the set . Select the RGB input source with using SOURCE button on the remote control. TV Back Audio Cable VGA Cable AUDIO RGB-PC OUTPUT COAX Connection Connect to Audio Amplifier device to the COAX output jack on the TV.
TV INSTALL ATION DRAWINGS HDMI Connection HDMI plug which replaces the HDMI connection allows transfer of all audio/video/control signals through one cable only. These signals are transferred in digital. English TV Back HDMI Cable DVD Back Service Port Function Service port: (For factory uses only.
INPUT INPUT INPUT 1 2 3 4 5 6 7 8 9 0 PICTURE SOUND SLEEP DISPLAY PICTURE Select the picture mode CH+ VOL+ MUTE SOUND Select the sound mode CH- VOL- SLEEP Set the Sleep Timer.
MENU OPERATION 8.Menu Operation SETUP WIZARD English Select Language Select the language you want. Select Language Welcome to the SEIKI HDTV Setup Wizard.Follow this guide to help setup your HDTV for scanning channels or accessing your external devices for Antenna,Set-top Box, Blu-ray, DVD, Games and other player.
Stop Auto Channel Search Skip Stop Auto Channel Search Skip
INPUT
MENU OPERATION PICTURE MENU PICTURE Picture Settings Screen Size English Wide PC Settings Color Temperature Normal Advanced Picture Settings MENU :Return :Move ENTER :Go to Next Menu Picture Settings 1.Press ENTER when the Picture Settings item is highlighted. Then you will go to the sub-menu as following. 2.Press ▼/▲ to select the desired menu item. Press ENTER to proceed if necessary. 3.Press ◄/► to the desired level. 4.
MENU OPERATION Color 27 Color Press ▼/▲ button to select Color, then press ◄/► button to adjust. English Sharpness 27 Sharpness Press ▼/▲ button to select Sharpness, then press ◄/► button to adjust. Tint 27 Tint Press ▼/▲ button to select Tint, then press ◄/► button to adjust. Screen Settings Screen Size Press ▼/▲ button to select Screen Size, then press ◄/► button to adjust. Available Screen Size: Standard, Wide, Wide Zoom, Zoom.
MENU OPERATION Dynamic Contrast Dynamic Contrast Press▼/▲button to select the ◄/► button to adjust. It can adjust the contrast corresponding to the input signal in order to improve the picture quality displayed. Available Mode: On/Off. Off English Film Mode Press ▼/▲ button to select the item Film Mode, then press ◄/► button to adjust. It handles 3:2 pull down and 2:2 pull down. Available Film Mode: On/Off.
MENU OPERATION SOUND SETTING Sound Mode User Bass Treble Balance English MENU :Return :Move ENTER :Change Setting Sound Mode Press ▼/▲button to select the item Sound Mode, then press ◄/► button to adjust. Only in the User mode, the detail optionsas following can be adjusted. Available Sound Mode: User, Dynamic, Standard, Soft. Bass Press ▼/▲ button to select the item Bass, then press ◄/► button to adjust. Treble Press ▼/▲ button to select the item Treble, then press ◄/► button to adjust.
MENU OPERATION AVL Press ▼/▲ button to select the item AVL, then press ◄/► button to select ON or OFF. Auto Volume Level can set the volume automatically adjust corresponding to the input audio. Analog Sound Digital Sound Press ▼/▲ button to select the item Preferred Digital Sound , then press ◄/► button to select the prefer audio when switching to a digital channel. Available Digital Sound: English, French, Spanish.
MENU OPERATION Channel List Press ▼/▲ button to select Channel List, then press OK button to scan the Channel List. If you select the option “In Channel List” On, the channel label will display in the list. Page 1/1 English Channel List A4 A11 A14 A63 MENU :Return :Page :Move ENTER :Select Favorite List Press ▼/▲ button to select Favorite List, then press OK button to scan the Favorite Channel List.
MENU OPERATION V-CHIP US V-Chip Canada V-Chip Block UnRated Show English Downloadable Rating Clear Downloadable Date MENU :Return :Move ENTER :Go to Next Menu US V-CHIP Press ▼/▲ button to select US V-CHIP, then press OK button to adjust. A sub menu will appear as below. USA Movie Rating TV Rating MENU :Return :Move Movie Rating Press ▼/▲ button to select Movie Rating, then press OK button to adjust. A sub menu will appear as below.
MENU OPERATION TV Rating Press ▼/▲ button to select TV Rating, then press OK button to adjust. A sub menu will appear as below. TV Rating D L S V FV English TV-Y TV-Y7 TV-G TV-PG TV-14 TV-MA MENU :Return :Select ENTER :Lock/Unlock Press ▼/▲/◄/►button to select Rating, then press OK button to lock. CANADA V-CHIP Press ▼/▲ button to select US V-CHIP, then press OK button to adjust. A sub menu will appear as below.
MENU OPERATION English Block UnRated Show Press ◄/► button to select Block UnRated Show, then press OK button to set the rating locked. Downloadable Rating Press ▼ / ▲ button to select Downloadable Rating, then press OK button to set the rating. If the DTV program doesn’t have this rating information, this option will be in gray. Clear Downloadable Date Press ▼ / ▲ button to select Clear Downloadable Data, then press OK button to set the rating.
MENU OPERATION Source Lock Press ▼/▲ button to select Source Lock, then press OK button to enter the sub menu. Press ▼/▲ button to select Source, then press OK button to set the Source Lock . You can’t enter the locked source if you set the Source lock.
MENU OPERATION Caption Display Press ▼/▲ button to select Caption Display, then press ◄/► button to select ON or OFF. Analog Caption Type Press ▼/▲ button to select Analog Caption Type, then press ◄/► button to select the type. Available type: CC1, CC2, CC3, CC4, TEXT1, TEXT2, TEXT3, TEXT4. English Digital Caption Type Press ▼/▲ button to select Digital Caption Type, then press ◄/► button to select the type. Available type: Service1~6.
MENU OPERATION Clock Press ▼/▲ button to select the Clock, then press OK to edit. CLOCK Alaska English Time Zone Auto Clock Setup Time 2009-10-21 20:00:00 Day Of Week Wed Daylight Saving Time MENU :Return :Move :Change Setting Time Zone Press ▼/▲ button to select Timer Zone, then press ◄/► button to set. Available Size: Central, Mountain, Pacific, Alaska, Hawaii, Samoa, Newfoundland, Atlantic, Eastern.
MENU OPERATION No Signal Power Off Press▼/▲ button to select No Signal Power Off, then press OK button to select it On or Off. When set it On and there is no signal input by 10 minutes, it will turns off the panel and the LED light turns amber. No Operation Power Off English Press ▼/▲ button to select No Operation Power Off, then press OK button to select it On or Off. When set it On and there is no operation input by 3 hours, it will turns off the panel and the LED light turns red.
MENU OPERATION Picture Settings PICTURE SETTINGS Picture Mode User Brightness Contrast Color Tint Sharpness MENU :Return :Move ENTER :Go to Next Menu Picture Mode Press ▼/▲ button to select Picture Mode, then press◄/►button to adjust. Available picture mode: Dynamic, Standard, Movie, User. Brightness Press ▼/▲ button to select Brightness, then press ◄/► button to adjust. Contrast Press ▼/▲ button to select Contrast, then press ◄/► button to adjust.
MENU OPERATION Screen Size English 1.Press ENTER when the Screen Size item is highlighted. Then you will go to the sub-menu as following. 2.Press▼/▲ to select the desired menu item. Press ENTER to proceed if necessary. 3.Press ◄/► to adjust the item to the desired level. 4.When you have changed the size, you can exit from the menu by pressing MENU.
MENU OPERATION Auto Adjust Press ▼/▲ button to select Auto Adjust, then press OK button to start auto adjusting. Horizontal Position Horizontal Position 0 English Press ▼/▲ button to select Horizontal Position, then press ◄/► button to adjust. Vertical Position Press ▼/▲ button to select Vertical Position, then press ◄/► button toadjust. Vertical Position 0 Clock Press ▼/▲ button to select Clock, then press ◄/► button to adjust.
TROUBLESHOOTING 9. Troubleshooting Please check if you can solve problems by troubleshooting yourself . English Troubleshooting No signal No color shades Stain on the screen Double or multiple display image 34 Control Please check that all cables are correctly plugged in. Adjust the contrast, the color and the brightness. May be the result from a lighting signal from car, motor, neon light and other electrical devices or appliances.
42 120 1022*56*631 mm 1302*325*855 mm M6*15 15.5 17.
SE421TT
TABLE DES MATIÈRES INFORMATIONS IMPORTANTES 2 PREFACE 3 PRECAUTIONS DE SECURITE 4 DANS LA CAISSE 5 Français 1 CONNEXIONS FRONT/ARRIERE DU TELEVISEUR LED Connexion du cordon d'alimentation Connexion de l'antenne 6 DES SI NS A L' INSTALLA TI ON DE TV Connexion AV Connexion YPbPr(composante) Connexion VGA(PC) Connexion COAX Connexion HDMI Fonction Port Service 7 TELECOMMANDE Instructions de la télécommande dans la mode TV Configuration de la télécommande Configuration Wizard 8 MENU D'OPÉR
INFORMATIONS IMPORTANTES Avertissement Risque de choc électrique Ne pas ouvrir ! Français Le symbole de l'éclair fléché dans un triangle équilatéral, est destiné à alerter l'utilisateur de la présence de « tension» dangereuse non-isolée dans le boîtier du produit qui peut être d'une ampleur suffisante pour constituer un risque d'électrocution.
INFORMATIONS IMPORTANTES 10.Assurez vous que le cordon d'alimentation ne soit pas écrasé ou pincé, particulièrement au niveau des prises de commodité, et le point où ils sortent de l'appareil. 11.Utilisez uniquement les fixations / accessoires spécifiés par le fabricant. 12.Utilisez uniquement le chariot, trépied, console ou table spécifiée par le fabricant ou vendu avec l'appareil.
PREFACE 2. PREFACE Merci d'avoir acheté ce téléviseur! S'il vous plaît lisez attentivement ce manuel avant de faire fonctionner le téléviseur. Assurez-vous que la télévision n'a pas été endommagée pendant le transport. Si le téléviseur est endommagé, ne l'installez pas, et contactez votre revendeur. Vérifiez que vous avez tous les accessoires selon le modèle. Français 3. PRECAUTIONS DE SECURITE Placer le téléviseur sur une surface stable. Ne pas placer de matériels sur le téléviseur.
PRECAUTIONS DE SECURITE Garder le téléviseur dans une condition sèche et éloignée de l'humidité. Français Garder le téléviseur loin de toute source de chaleur . Débrancher le téléviseur avant de le nettoyer. Ne pas utiliser de solvants ou de liquides pour nettoyer le téléviseur. Il faut nettoyer le téléviseur avec un chiffon doux et sec. En cas de dépannage, ne pas utiliser les pièces de rechange autre que celles suggérées par le fabricant.
INPUT 1 2 3 4 5 6 7 8 9 0 PICTURE SOUND SLEEP DISPLAY CH+ VOL+ MUTE CH- VOLEXIT MENU OK ENTER CC HDMI CÂBLE MTS ASPECT FAV
1.Appuyer sur "ENTRÉE" pour sélectionner la source d'entrée. 2.Appuyer sur "MENU" pour afficher le menu principal sur l'écran. 3.Appuyer sur "CH " ou "CH " pour parcourir les chaînes. 4.Appuyer sur "VOL+" ou "VOL-" pour augmenter ou diminuer le volume. 5.Appuyer sur le bouton "puissance " pour ouvrir ou éteinder le téléviseur. 6.Capteur à distance: capteur infrarouge pour la télécommande. 7.Indicateur de puissance:Blue lorsque le téléviseur est allumé. Rouge lorsque le téléviseur est éteint.
DESSINS A L'INSTALLATION DE TV Connexion AV Connecter la prise de sortie VIDEO et AUDIO du DVD ou du VCR aux prises VIDEO du téléviseur en utilisant le câble RCA. Faites correspondre les couleurs de prise: La vidéo est jaune, l'audio gauche est blanc, et l'audio est bien rouge. Sélectionnez la source d'entrée AV en utilisant la touche SOURCE sur la télécommande.
DESSINS A L'INSTALLATION DE TV Connexion VGA(PC) Connectez la sortie RGB du PC à la prise VGA (PC) sur le téléviseur. Reliez la sortie audio de PC à la prise AUDIO PC sur le téléviseur. Sélectionnez la source d'entrée RGB avec l'aide du bouton SOURCE sur la télécommande. Français Arrière de TV Câble Audio Câble VGA AUDIO RGB-PC OUTPUT Connexion COAX Connecter l'amplificateur audio à la prise de sortie COAX sur le téléviseur.
DESSINS A L'INSTALLATION DE TV Connexion HDMI La prise HDMI qui remplace la connexion HDMI permet de transférer tous les signaux audio / vidéo / commande via un seul câble. Ces signaux sont transmis en numérique. Français Arrière de TV Câble HDMI Arrière de DVD Fonction de Port Service Port service: (Pour l'utilisation exclusive en usine.
PUISSANCE Mettre le TV LCD marche/arrêt. ENTRÉE Appuyer sur ENTRÉE pour l'affichage de source OSD. INPUT 1 2 3 4 5 6 7 8 Appuyer pour sélectionner la source d'ENTRÉE, et après appuyer sur le bouton OK pour confirmer. Bouton de nombres Appuyer sur les boutons 0-9 pour changer directement la chaîne du téléviseur. Appuyer sur ce bouton à entrer le numéro de programme pour le canal de programme multiple tels que 2-1, etc.
MENU D'OPÉRATION 8.Menu d'Opération CONFIGURATION WIZARD Sélectionner laLangue Sélectionnez la langue que vous voulez. Français Select Language Welcome to the SEIKI HDTV Setup Wizard.Follow this guide to help setup your HDTV for scanning channels or accessing your external devices for Antenna,Set-top Box, Blu-ray, DVD, Games and other player.
Stop Auto Channel Search Skip Stop Auto Channel Search Skip
INPUT
MENU D'OPÉRATION MENU D'IMAGE PICTURE Picture Settings Screen Size Wide PC Settings Color Temperature Normal Français Advanced Picture Settings MENU :Return :Move ENTER :Go to Next Menu Réglage d'image 1. Appuyez sur ENTRER lorsque l'élément de Réglage d'Image est mis en surbrillance. Puis vous irez à la sous-menu comme suit. 2. Appuyez ▼ / ▲ pour sélectionner la rubrique souhaitée. Appuyez sur ENTRER pour procéder si nécessaire. 3. Appuyez ◄ / ► pour le niveau souhaité. 4.
MENU D'OPÉRATION Couleur Color 27 Appuyez sur la touche ▼ / ▲ pour sélectionner la couleur, puis appuyez sur la touche◄ / ► pour ajuster. Netteté Sharpness 27 Appuyez sur ▼ / ▲ pour sélectionner la netteté, puis appuyez sur la touche◄ / ► pour ajuster. Français Teinte Appuyez sur ▼ / ▲ pour sélectionner la Teinte, puis appuyez sur la touche◄ / ► pour ajuster.
MENU D'OPÉRATION Contraste Dynamique Appuyez sur la touche ▼ / ▲ pour sélectionner la touche ◄ / ► pour ajuster. Il est possible de régler le contraste correspondant au signal d'entrée afin d'améliorer la qualité de l'image affichée. Mode Libre: Marche / Arrêt. Dynamic Contrast Off Film Mode Appuyez sur la touche ▼ / ▲ pour sélectionner l'élément de Mode Film, puis appuyez sur la touche ◄ / ► pour ajuster. Il traite de mouvement 3:2 et 2:2. Mode Film disponible: Marche / Arrêt.
MENU D'OPÉRATION SOUND SETTING Sound Mode User Bass Treble Balance Français MENU :Return :Move ENTER :Change Setting Mode Son Appuyez sur la touche ▼ / ▲ pour sélectionner l'élément de Mode Son, puis appuyez sur la touche ◄ / ► pour ajuster. Ce n'est que dans le mode utilisateur, les options de détail suivantes peuvent être ajustées. Mode Son disponible: Utilisateur, Dynamique, Standard, Doux.
MENU D'OPÉRATION AVL Appuyez sur la touche ▼ / ▲ pour sélectionner l'élément AVL, puis appuyez sur ◄ / ► pour sélectionnerMarche ou ARRET. Le Niveau de Volume Auto. Peut régler le volume automatiquement en correspondant à l'audio d'entrée. Son Analogique Appuyez sur la touche ▼ / ▲ pour sélectionner l'élément de Son analogique préféré, puis appuyez sur la touche ◄ / ► pour sélectionner l'audio préféré lors du passage à une chaîne analogique. Son Analogique Disponible: SAP, Stéréo, Mono.
MENU D'OPÉRATION Liste des Chaînes Appuyez sur la touche ▼ / ▲ pour sélectionner la liste de chaîne, puis appuyez sur la touche OK pour numériser la liste de chaînes. Si vous sélectionnez l'élément “Dans la liste de chaînes” MARCHE, l'étiquette de chaîne sera affichée dans la liste.
MENU D'OPÉRATION V-CHIP US V-Chip Canada V-Chip Block UnRated Show Downloadable Rating Clear Downloadable Date Français MENU :Return :Move ENTER :Go to Next Menu V-CHIP US Appuyez sur la touche ▼ / ▲ pour sélectionner V-Chip US, puis appuyez sur la touche OK pour régler. Un sous-menu apparaîtra comme suit. USA Movie Rating TV Rating MENU :Return :Move Rating Film Appuyez sur la touche ▼ / ▲ pour sélectionner le Rating Film, puis appuyez sur la touche OK pour régler.
MENU D'OPÉRATION Rating TV Appuyez sur la touche ▼ / ▲ pour sélectionner le Rating TV, puis appuyez sur la touche OK pour régler. Un sous-menu apparaîtra comme suit. TV Rating D L S V FV TV-Y TV-Y7 Français TV-G TV-PG TV-14 TV-MA MENU :Return :Select ENTER :Lock/Unlock Appuyez sur les touches▼/▲/◄/► pour sélectionner le Rating,puis appuyez sur la touche OK pour verrouiller. V-CHIP CANADIEN Appuyez sur la touche ▼ / ▲ pour sélectionner US V-CHIP, puis appuyez sur la touche OK pour régler.
MENU D'OPÉRATION Information Système de rating de Motion Picture Association of America (MPAA) Grade Définition G Audiences Convenant à tous les âges. Certains documents peuvent être inappropriés pour les enfants. PG Surveillance Parentale Recommandée PG-13 Fortement Prévenu Par Parents R Restreinte NC-17 Nul enfant de 17 ans X Film dur Même que NC-17 NONE Aucun MPAA non évalué Certains documents seraient inappropriés pour les enfants de moins de 13 ans.
MENU D'OPÉRATION Verrouillage de Source Appuyer sur la touche ▼/▲ pour sélectionner le Verrouillage de Source, puis appuyez sur la touche OK pour entrer dans le sous-menu. Appuyer sur la touche ▼/▲ pour sélectionner la Source, ensuite appuyez sur la touche OK pour définir le Verrouillage de Source, vous ne pouvez pas entrer la source verrouillée si vous avez défini le Verrouillage de Source.
MENU D'OPÉRATION Affichage de Sous-titrage PAppuyez sur la touche ▼ / ▲ pour sélectionner l'Affichage de Sous-titrage, puis appuyez sur la touche ◄ / ► pour sélectionner MARCHE ou ARRET. Type de Sous-titrage Analogique Appuyez sur la touche ▼ / ▲ pour sélectionner le Type de Sous-titrage Analogique, puis appuyez sur la touche ◄ / ► pour sélectionner le type. Type Disponible: CC1, CC2, CC3, CC4, texte1, texte2, Text3, TEXT4.
MENU D'OPÉRATION Menu Langue Appuyez sur la touche ▼ / ▲ pour sélectionner l'élément de Menu Langue, puis appuyez sur la touche ◄ / ► pour ajuster. Disponible Langue: Anglais, français, espagnol. Horloge Appuyez sur la touche ▼ / ▲ pour sélectionner l'horloge, puis appuyez sur OK pour modifier.
MENU D'OPÉRATION Fond Bleu Appuyez sur la touche ▼ / ▲ pour sélectionner le Fond bleu, puis appuyez sur la touche OK pour sélectionner, lorsqu'il n'y a pas de signal, que ce soit le réglage le fond en bleu ou non. Pas de Signal Arrêt Appuyez sur la touche ▼ / ▲ pour sélectionner l'élement de Pas de Signal Arrêt, puis appuyez sur la touche OK pour sélectionner Marche ou Arrêt.
MENU D'OPÉRATION Régalge d'Image 1. Appuyez ENTRER lorsque l'élément de Réglage d'image est mis en surbrillance. Puis vous irez à la sous-menu suivant. 2. Appuyez ▼ / ▲ pour sélectionner la rubrique souhaitée. Appuyez sur la touche ENTRER pour procéder si nécessaire. 3. Appuyez ◄ / ► pour régler l'élément au niveau désiré. 4. Lorsque vous avez modifié le réglage, vous pouvez quitter le menu en appuyant sur MENU.
MENU D'OPÉRATION Réglage d'Ecran 1. Appuyez ENTRER lorsque l'élément de Réglage d'Ecran est mis en surbrillance. Puis vous irez à la sous-menu suivant. 2. Appuyez ▼ / ▲ pour sélectionner la rubrique souhaitée. Appuyez sur la touche ENTRER pour procéder si nécessaire. 3. Appuyez ◄ / ► pour régler l'élément au niveau désiré. 4. Lorsque vous avez modifié le réglage, vous pouvez quitter le menu en appuyant sur MENU.
MENU D'OPÉRATION Réglage Auto. Appuyez sur la touche ▼ / ▲ pour sélectionner le Réglage Auto., puis appuyez sur la touche OK pour commencer le réglage auto. Position Horizontale Appuyez sur la touche ▼ / ▲ pour sélectionner la Position Horizontale, puis appuyez sur la touche ◄ / ► pour ajuster. Horizontal Position 25 Position Verticale Vertical Position 25 Français Appuyez sur la touche ▼ / ▲ pour sélectionner la Position Verticale, puis appuyez sur la touche ◄ / ► pour ajuster.
DÉPANNAGE 9. Dépannage Vérifiez si vous pouvez résoudre les problèmes à travers le dépannage par vous-même. Dépannage Français Aucun signal Vérifiez que tous les câbles sont correctement branchés. Aucun nuances de couleurs Réglez le contraste, la couleur et la luminosité. Teinté à l'écran Il peut être le résultat d'un éclairage de la signalisation de la voiture, moteur, lampe au néon et d'autres dispositifs ou appareils électriques.
42 1920x1080 120W 1022*56*631 mm 1302*325*855 mm M6*15 15.5 17.
Imprimé en Chine
SE421TT
TABLA DE CONTENIDO INFORMACIÓN IMPORTANTE 2 PROLÓGO 3 PRECAUCIONES Y SEGURIDAD 4 EN EL CARTON 5 CONEXIÓN FRONTAL/ TRASERA DE LCD TV Español 1 Conexión del cable de alimentación Conexión de antena Conexión de AV 6 DIBUJO DE Conexión Ypbpr( componente) INSTALA CIÓN DE TV Conexión VGA (PC) Conexión COAX Conexión HDMI Servicio de función de puerto 7 MANDO A DISTANCIA Instrucciones del mando a distancia distancia en TV modo Configuración de mando Asistente de configuración 8 MENÚ DE FUNCION
INFORMACIÓN IMPORTANTE PRECAUCIÓN RIESGO DE DESCARGA ELÉCTRICA NO ABRIR Español El símbolo del rayo con punta de flecha dentro de un triángulo equilátero alerta al usuario de la presencia de un-"voltaje peligroso" dentro del gabinete del producto, que puede tener la magnitud suficiente para constituir un peligro de descarga eléctrica.
INFORMACIÓN IMPORTANTE 10.Proteja el cable de alimentación de ser pisado o pinchado, especialmente los enchufes, tomas de corriente y el punto en donde salen del aparato. 11.Utilice sólo los accesorios especificados por el fabricante. 12.Utilice únicamente la carretilla, plataforma, trípode, soporte o mesa especificados por el fabricante, o suministrados juntos con el aparato. Cuando utilice un carro, tenga cuidado al mover la combinación carro / aparato para evitar lesiones por vuelco. Español 13.
PRÓLOGO 2. PRÓLOGO Gracias por comprar este TV. Por favor, lea este manual atentamente antes de hacer las operaciones. Asegúrese de que este TV no ha recibido ningún daño en el transporte. Si este TV ha sido dañado, deje de instalarlo y consulte a su comerciante. Compruebe que tiene todos los accesorios de acuerdo con el modelo. 3. PRECAUCIONES Y SEGURIDAD Español Ponga el TV en una superficie estable. No ponga ningún material arriba del TV.
PRECAUCIONES Y SEGURIDAD Mantega el TV seco y lejos de la humedad. Español Mantenga el TV lejos de un calentador . Desenchufe el TV antes de limpiarlo. No utilice el solvente O líquido para limpiarlo. Sólo limpie el TV con un paño seco y limpio. En caso de solución de problemas, no utilice las piezas de respuestos que no sean sugeridas por el fabricante. Utilizando las piezas de respuestos no adecuadas pueden dar lugar a descargas eléctricas, cortos circuitos, incendio u otros accidentes.
INPUT 1 2 3 4 5 6 7 8 9 0 PICTURE SOUND SLEEP DISPLAY CH+ VOL+ MUTE CH- VOLEXIT MENU OK ENTER CC HDMI CABLE MTS ASPECT FAV
Encendido/ apagado LED 1. Pulse INPUT para seleccionar la fuente de entrada. 2. Pulse el "menú" para que aparezca el menú principal en la pantalla. 3. Pulse"CH "o"CH "para seleccionar los canales. 4. Pulse "VOL+ "o "VOL-" para aumentar o bajar el volumen. 5. Pulse el botón "POWER para encender o apagar el TV. 6. Remote sensor:Cuando TV se conecta con la alimentación de energía, la luz azul se enciende. Cuando TV se desconecta con la alimentación de energía, la luz roja se enciende.
DIBUJOS DE INSTALACIÓN DE TV CONEXIÓN DE AV Conecta la toma de salida de VIDEO y AUDIO de DVD o VCR con la toma de VIDEO en el set utilizando el cable RCA. Coincide color con la toma: Video es amarillo, audio izquierdo es blanco y audio derecho es rojo. Selecciona la fuente de entrada de AV utilizando el botón de SOURCE en el mando a distancia.
DIBUJOS DE INSTALACIÓN DE TV CONEXIÓN VGA(PC) Conecta la salida de RGB de PC con la toma VGA(PC) en el set. Conecta la salida de audio de PC con la toma AUDIO PC en el set. Seleccione la fuente de entrada RGB utilizando el botón SOURCE en el mando a distancia. Español Parte atras de TV Audio Cable VGA Cable AUDIO RGB-PC OUTPUT CONEXIÓN COAX Conecta el dispositivo amplificador de audio con la toma de salida COAX en el TV.
DIBUJOS DE INSTALACIÓN DE TV CONECIÓN HDMI Conector HDMI, que sustituye la conexión HDMI permite la transferencia de audio / vídeo / señales de control a través de cable. estas señales se transmiten en formato digital.
POTENCIA Encender o apagar el LCD TV. ENTRADA Pulse INPUT para demostrar el fuente de entrada de OSD. Pulse para seleccionar un fuente de entrada y luego pulse OK para confirmar.. INPUT 1 2 3 4 5 6 7 8 TECLADO ALFANUMÉRICO Pulse directamente 0-9 para cambiar los canales. Presione este boton para entrar en un programa de canal con un número múltiple, tales como 2-1, etc. 9 0 PICTURE SOUND SLEEP DISPLAY Volver al canal visto anteriormente.
OPERACIÓN MENÚ 8.Operación Menú Asistente de configuración Seleccione el idioma Selecciona el idioma que quieres. Select Language Welcome to the SEIKI HDTV Setup Wizard.Follow this guide to help setup your HDTV for scanning channels or accessing your external devices for Antenna,Set-top Box, Blu-ray, DVD, Games Español and other player.
Stop Auto Channel Search Skip Stop Auto Channel Search Skip
INPUT
OPERACIÓN MENÚ Menú de imagen PICTURE Picture Settings Screen Size Wide PC Settings Color Temperature Normal Advanced Picture Settings :Return :Move ENTER Español MENU :Go to Next Menu Configuración de imagen 1.Pulse ENTER cuando la configuración de imagen está marcada. Despúes puedes ir al submenú como lo siguiente. 2.Pulse el botón ▼/▲ para seleccionar el menú deseado. Pulse ENTER para proceder si es necesario. 3.Pulse el botón ◄/► para seleccionar el nivel deseado. 4.
OPERACIÓN MENÚ Color Color 27 Pulse el botón ▼/▲ para seleccionar el color, despúes pulse el botón, ◄/► para ajustarlo. Nitidez Sharpness 27 Pulse el botón ▼/▲ para seleccionar el nitidez, despúes pulse el botón ◄/► para ajustarlo. Tinte Español Tint 27 Pulse el botón ▼/▲ para seleccionar el tinte, despúes pulse el botón ◄/► para ajustarlo. Configuración de pantalla Tamaño de pantalla Pulse el botón ▼/▲ para seleccionar el tamaño de pantalla, despúes pulse el botón ◄/► para ajustarlo.
OPERACIÓN MENÚ Contraste dinámico Pulse el botón ▼/▲ para seleccionar el botón◄/►para ajustarlo. puede ajustar el contraste correspondiente a la señal de entrada con el fin de mejorar la calidad de imagen mostrada. Modo disponible: encendido/ apagado. Dynamic Contrast Off Modo película Pulse el botón ▼/▲ para seleccionar el modo Película. despúes pulse el botón◄/► para ajustarlo. manejan la tracción 3:2 y 2:2. Modo película disponible: encendido/ apagado.
OPERACIÓN MENÚ SOUND SETTING Sound Mode User Bass Treble Balance MENU :Return :Move ENTER :Change Setting Español Modo de sonido Pulse el botón ▼/▲para seleccionar el modo de sonido. despúes pulse el botón ◄/► para ajustarlo.sólo en el modo de usuario, la operación de detalles como lo siguiente puede ser ajustada.modo de sonido disponible: usuario, dinámico, estándar, suave. BASS Pulse el botón ▼/▲ para seleccionar BASS, despúes pulse el botón ◄/► para ajustarlo.
OPERACIÓN MENÚ AVL Pulse el botón ▼/▲ para seleccionar AVL, despúes pulse el botón ◄/► para seleccionar encendido o apagado. nivel de auto volumen puede ajustar el volumen automáticamente correspondiente a la entrada de audio. Sonido analógico Pulse el botón ▼/▲ para seleccionar el sonido analógico preferido. Despúes pulse el botón ◄/► para seleccionar el audio preferido al cambiar a un canal analógico Sonido analógico disponible: SAP, Estéreo, Mono.
OPERACIÓN MENÚ Lista de canal Pulse el botón▼/▲ para seleccionar la lista de canal, y pulse OK para explorar la lista de canales. si seleccione la opción ¨in channel list¨, la etiqueta de canal aparecerá en la lista. Page 1/1 Channel List A4 A11 A14 A63 Español MENU :Return :Page :Move ENTER :Select Lista favorita Pulse el botón ▼/▲ para seleccionar la lista favorita, y pulse el botón OK para explorar la lista favorita de canales.
OPERACIÓN MENÚ V-CHIP US V-Chip Canada V-Chip Block UnRated Show Downloadable Rating Clear Downloadable Date MENU :Return :Move ENTER :Go to Next Menu Español US V-CHIP Pulse el botón ▼/▲ para seleccionar US V-CHIP, y pulse el botón OK para ajustarlo. un submenú aparecerá como lo siguiente. USA Movie Rating TV Rating :Return MENU :Move Clasificación de cine Pulse el botón ▼/▲ para seleccionar clasificación de cine, y pulse el botón OK para ajustarlo. un submenú aparecerá como lo siguiente.
OPERACIÓN MENÚ Clasificación de TV Pulse el botón ▼/▲ para seleccionar clasificación de cine, y pulse el botón OK para ajustarlo. Un submenú aparecerá como lo siguiente. TV Rating D L S V FV TV-Y TV-Y7 TV-G TV-PG TV-14 Español TV-MA MENU :Return :Select ENTER :Lock/Unlock Pulse ▼/▲/◄/► para seleccionar la clasificación, y pulse el botón OK para bloquearlo. CANADA V-CHIP Pulse el botón ▼/▲ para seleccionar US V-CHIP, y pulse el botón OK para ajustarlo. un submenú aparecerá como lo siguiente.
OPERACIÓN MENÚ Fuente bloqueda Pulse el botón ▼/▲ para seleccionar fuente bloqueada y pulse el botón OK para entrar en el submenu. Pulse el botón ▼/▲ para seleccionar la fuente, y pulse el botón OK para establecer el bloqueo de fuente. Usted no puede entrar en la fuente bloqueada si establece la fuente bloqueada.
OPERACIÓN MENÚ Pantalla de título Pulse el botón ▼/▲ para seleccionar pantalla de subtítulo, despúes pulse el botón ◄/► para seleccionar encendido o apagado. Tipo de título analógico Pulse el botón ▼/▲ para seleccionar tipo de título analógico, despúes pulse el botón ◄/► para seleccionar el tipo.Tipo disponible: CC1,CC2,CC3,CC4,TEXT1, TEXT2, TEXT3, TEXT4.
OPERACIÓN MENÚ Ldioma del menú Pulse el botón ▼/▲ para seleccionar idioma del menú, despúes pulse el botón ◄/► para ajustarlo. Idioma disponible: inglés, francés, español. RELOJ Pulse el botón ▼/▲ para seleccionar el reloj, y pulse OK para editarlo.
OPERACIÓN MENÚ Fondo azul Pulse el botón ▼/▲ para seleccionar fondo azul, despúes pulse el botón OK para seleccionar. Cuando no hay señal, si definir el fondo en azul o no. Apagar la energía sin señal Pulse el botón▼/▲ para seleccionar apagar la energía sin señal, despúes pulse el botón OK para seleccionar encenderlo o apagarlo.cuando se puso encendido y no hay señal de entrada por 10 minutos, se apaga el panel y la luz LED se ilumina en ámbar.
OPERACIÓN MENÚ Configuración de imagen 1.Pulse ENTER cuando la configuración de imagen está marcada, y puede ir a la sub-menú como lo siguiente. 2.Pulse ▼/▲ para seleccionar el menú deseado. Pulse ENTER para proceder si es necesario. 3.Pulse◄/► para ajustarlo al nivel deseado. 4.Cuando se haya cambiado la configuración, puede salir del menú pulsando MENÚ.
OPERACIÓN MENÚ CONFIGURACIÓN DE LA PANTALLA 1.Pulse ENTER cuando la configuración de la pantalla está marcada, y luego irá a la sub-menú como lo siguiente. 2.Pulse▼/▲ para seleccionar el menú deseado. Pulse ENTER para proceder si es necesario. 3.Pulse ◄/► para ajustarlo al nivel deseado. 4.Cuando se haya cambiado la configuración, puede salir del menú pulsando MENÚ.
OPERACIÓN MENÚ Ajuste automático Pulse ▼/▲ para seleccionar el ajuste automático, pulse OK para empezar el ajuste automático. Posici ón horizontal Pulse el botón ▼/▲ para seleccionar la posición horizontal, Pulse el botón ◄/► para ajustarlo. Horizontal Position 25 Posición vertical Vertical Position 25 Español Pulse el botón ▼/▲para seleccionar la posición vertical, Pulse el botón ◄/► para ajustarlo. Reloj Pulse el botón ▼/▲ para seleccionar el reloj, Pulse el botón ◄/► para ajustarlo.
RESOLUCIÓN DE PROBLEMAS 9. Resolución de problemas compruebe si pueda solucionar los problemas por sí mismo. Resolución de probelmas Control Sin señal Por favor, compruebe que todos los cables están correctamente conectados. Español Sin matices de color Ajuste de contraste, color y brillo. Mancha en la pantalla Tal vez el resultado de una señal de iluminación del coche, motor, luz de neón y otros dispositivos eléctricos o aparatos.
42 1920x1080 120W - - 1022*56*631 mm 1302*325*855 mm M6*15 15.5 17.
Impreso en China