Smart Label Printers User's Guide Models 620, 650, and 650SE U00128837201 For Windows® XP, Server 2003, Vista and Windows 7 or Mac OS® X 10.5 or later.
Smart Label Printers User's Guide Models 620, 650, and 650SE U00128837200 U00128837201 November 2012 February 2013
FCC Compliance Statement This equipment has been tested and found to comply with the limits for a Class B digital device, pursuant to Part 15 of the FCC Rules. These limits are designed to provide reasonable protection against harmful interference in a residential installation. This equipment generates, uses and can radiate radio frequency energy and, if not installed and used in accordance with the instructions, may cause harmful interference to radio communications.
IMPORTANT SAFETY INSTRUCTIONS The following symbols are used in this User's Guide. WARNING. Warning statements are used to indicate actions that may result in risk of severe personal injury or loss of life. CAUTION. Caution statements are used to indicate actions that may result in damage to the printer or other property, or may result in risk of minor personal injury.
Installation For best performance, we recommend that you install your printer on a flat surface in a location that satisfies the following environmental conditions: Not subject to vibration Not exposed to direct sunlight Dust-free Condensation-free Temperatures: 59°F to 95°F (15°C to 35°C) Humidity: 30%RH to 80%RH (non-condensing) ABOUT THIS GUIDE As you'll soon realize, the Smart Label Printer is easy to set up and use.
CONTENTS INTRODUCTION ..................................................................................................................................5 About Your Smart Label Printer............................................................................................5 Software Features................................................................................................................5 GETTING STARTED .......................................................................................
INTRODUCTION About Your Smart Label Printer The Smart Label Printer is the best way to instantly print one-at-a-time labels. Direct thermal printing technology does not use ink, toner or ribbon, just labels. The SLP produces fast, laser quality output on a variety of label sizes with the ability to print text, graphics, POSTNET codes and barcodes. With the wide variety of available SmartLabels, you can use your SLP to create labels for just about anything.
GETTING STARTED What You Need In order to use your SLP and software, you need to have the following: PC Users: Windows XP, Server 2003, Vista or Windows 7 IBM® PC or compatible using 233MHz or higher Pentium-compatible CPU Minimum 64MB RAM, 128MB recommended 1.5GB hard disk space USB port or RS232C serial port CD-ROM or DVD drive Mac Users: Mac OS X v10.
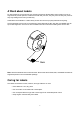
A Word about Labels For best results we recommend the use of Seiko Instruments SmartLabels. Other brands may not be engineered to provide optimum, trouble-free results with your SLP; they may not work with your printer or they may damage it and void your warranty. SmartLabels are available in a wide variety of sizes and colors to properly label almost anything. The SmartLabels have a mark on the backing of each label that the SLP 620, 650, and 650SE uses for top of label alignment.
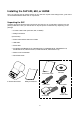
Installing the SLP 620, 650, or 650SE Here, you'll find out how to unpack and set up your new SLP. As part of the setup process, you'll load a roll of standard address labels and run a quick test. Unpacking the SLP Carefully remove the printer and its components from the box. It's a good idea to save the box and packing materials in case you need to store or ship the printer. Accessories vary depending on the package.
Installing the Software Installing the Smart Label Program for MacOS X 1. Insert the Smart Label CD. If the installer does not appear automatically, double-click the CD on your desktop or in the left pane of a new Finder window. 2. Double-click the file SIISmartLabelPrinter.mpkg. The installer will appear. Follow the on-screen instructions. 3. Mac OS X 10.5 or later will automatically set up your printer, once the SLP is connected.
Connecting the SLP to a Power Outlet 1. Connect the supplied AC adapter to the back of the SLP and to a power outlet. DC IN 2. The printer powers on automatically when connected to AC power. The Status Light will flash if no labels are loaded in the printer.
Connecting the SLP to Your Computer Use the USB or serial cable provided with the SLP 620, 650, or 650SE to connect the SLP to your computer. CAUTION: Connecting or disconnecting the interface cable while the printer is turned on may damage the printer. Follow these steps: 1. Make sure that the SLP is turned off. If the Status Light is on, hold the Power Button until the SLP is turned off. 2. Connect the printer to your PC or Mac.
Setting up the Printer If the printer is not recognized using the installation wizard, you will need to set up your printer manually. To do so, follow these steps: Prepare the Roll of Labels 1. Open the Smart Label printer software. 2. Under the Label pull-down menu, select Printer Set-up. 3. Select Add a printer. 4. Select how your printer is connected and click Done. Loading a Roll of Labels Prepare the Roll of Labels 1. Remove the sticker from the beginning of the roll of labels.
Load the Roll of Labels 1. Make sure the power cord is connected and the printer is turned on. The green Status Light should be flashing. 2. Press the left and right side of the Roll Cover, and lift up the edge of the Roll Cover to open.
3. Remove the Spindle from the SLP and insert the label roll into the Spindle. 4. Insert the labels and Spindle into the SLP. Adjust the guides to fit the labels as shown below. Label Guides Label guides SLP provides three types of labels which have different paper width. Insert each label into positions shown in the figures below. 5. Insert the free end of the label roll, label side down, into the paper inlet slot. Push the label stock into the paper inlet slot until you feel a slight resistance.
6. Close the Roll Cover. At the time, be careful not to close the Roll Cover on your fingers. Testing the Printer A quick test lets you know your printer is operating properly and that the labels are loaded correctly. Testing the SLP 620, 650, and 650SE 1. Press and hold the Power Button for 2 seconds to turn the printer standby. 2. Press and hold the Form Feed Button and then press the Power Button. The green Status Light will begin to flash. Do not release the Form Feed Button.
CHANGING LABELS AND PRINTER CARE The SLP 620, 650, and 650SE uses advanced thermal print technology to provide crisp, high-contrast printing. There are no ribbons or cartridges to replace. For best results we recommend the use of Seiko Instruments SmartLabels. Other brands may not be engineered to provide optimum, trouble-free results with your Smart Label Printer; they may not work with your SLP or they may damage it and void your warranty.
Off Line and On Line Mode Pressing and releasing the Power Button toggles the printer between off line and on line mode. An amber Status Light indicates that the printer is off line. There is no communication with the computer when the printer is off line. This feature is a handy way to stop printing so you don't waste labels while you delete labels from the print queue. Changing a Label Roll This procedure describes how to remove and replace label rolls.
Adjusting the Position of Labels If you find the labels are advancing at an angle, follow these steps to realign them: 1. Make sure that the SLP is turned off. If the Status Light is on, hold the Power Button until the SLP is turned off. 2. Swivel the Roll Cover open and remove the Print Engine Cover by pulling it toward you while pressing the left and right side of the Print Engine Cover.
3. Release the pressure on the label stock by moving the Platen Release Lever forward. When you let go of the Platen Release Lever, it goes back to the original position. Hold the Platen Release Lever until the adjustment of the label position completes. Release the platen lever 4. Realign the label stock so it is straight. 5. Return the Platen Release Lever. 6. Replace the Print Engine Cover, starting at the bottom, and push the top edge forward until the Print Engine Cover snaps into place.
Removing Stuck Labels If a label becomes stuck in your printer, remove it as follows: 1. Make sure that the SLP is turned off. If the Status Light is on, hold the Power Button until the SLP is turned off. 2. Swivel the Roll Cover open. With a pair of scissors, cut the label stock between the label roll and the paper inlet slot. 3. Remove the Print Engine Cover by pulling it toward you while pressing the left and right side of the Print Engine Cover.
Cleaning the Printer When Using the Cleaning Card 1. Remove label stock from the printer. 2. Insert the Seiko Smart Label Printer Cleaning Card (SLP-CLNCRD). 3. The Cleaning Card should feed automatically or you can press the Form Feed Button to manually feed the card in a couple of times (you may also gently pull the card to guide it through the Platen). Cleaning Card Cleaning Card Form Button FormFeed Feed button 4. Properly dispose of the used card.
SPECIFICATIONS Smart Label Printer 620, 650, and 650SE The Smart Label Printer is a compact printing device ideally suited for label printing applications. There are no built-in fonts and any text must be converted to a bitmap image by a host computer or device for printing. Developer information can be found on our website at www.siibusinessproducts.com Printer Specifications SLP620 Technology Resolution Direct thermal 203 dpi (8 dots/mm) Max. Paper Width Max. Printable Width SLP650,650SE 300 dpi (11.
Compliance Table Check the list below to see if the printer and its accessories can be operated in destination countries and comply with the regulations.
Environment Specifications SLP620 SLP650,650SE Operating Temperature 41°F to 104°F (5°C to 40°C)* Storage Temperature -4°F to 140°F (-20°C to 60°C) Operating Humidity 30%RH to 80%RH (non-condensing) Storage Humidity 30%RH to 90%RH (non-condensing) * Particular papers are excluded.
TECHNICAL SUPPORT AND SERVICE Please refer to the "Troubleshooting" topic in on-line Help for information on how to determine if your Smart Label Printer needs service and how to contact Seiko Instruments for Technical Support and repairs. You can contact Technical Support on our website under the Support section at: www.siibusinessproducts.com ORDERING LABELS AND PARTS Ordering Labels For best results we recommend the use of Seiko Instruments SmartLabels.