
Instruction manual


Instruction Manual Roundshot D3 - version 4.05 – May 2013 - © by Seitz Phototechnik AG / Switzerland www.roundshot.ch page 105
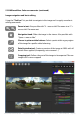
Save
Once the image is optimised and all image adjustment parameters are set, the next
step is to export the image in Tiff or JPEG formats. Open the “Save tab” and select
the image export parameters as described below:
File format: this menu contains all raw conversion
parameters:
• Format: select between Tiff for highest image
quality or JPEG for smaller file size
• Depth: when selecting Tiff it is possible to choose
between 16bit or 8bit colour depth. JPEG is limited
to 8bit
• Compression: for both formats it is possible to use
compression to reduce the output file size. However,
for JPEG this can lead to loss of quality
• ICC profile: select the output colour space of the final image. It is possible to
choose between sRGB, optimized for web applications, or AdobeRGB and
ProPhotoRGB, which allow higher colour precision for fine art work
• Size: depending on the final application the image is not needed in full resolution.
It is therefore possible to reduce the output image size and processing time.
•
Output size: depending on the selected reduction size, this field displays the
expected output image number of pixels and file size on disk
Output file: This menu contains the file name and location options as described
below:
• File name : by default the original file name is used with the new output file
extension. It is possible to change this name by editing this field
• Folder: the default output file location is the location of the original DNG file. It is
possible to change this by editing this field or browsing the new location using the
button on the right side
Press to Export the image directly. During the processing the Seitz raw
converter will not be available for other tasks.
Press to add the image export to a waiting list. The software is immediately
available for the next image conversion. Once all images are ready, open the “batch
process tab” and process all the images. Please refer to next section.
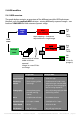
5.2 RAW workflow: Seitz raw converter (continued)