
User's Guide


Add Devices and Map Location
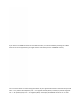
Once the gateway and tracking devices are turned on, when you connect to the online web interface the
device should report be visible on the Device Settings page, and should show an updated time, similar to
the example shown in Figure 13.
Figure 13 – Devices and Gateway Reporting Example
Using the Web Dashboard
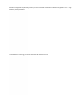
To begin, log in by scanning the QR code below or, using your web browser (Chrome preferred), navigate to
https://lordevelopers.semtech.com/resources/developer-kits/assetracking-kit
Figure 14 - Scan to log in
From this page you can log in to the kit and get information about its setup and use. To log in directly, go to
https://assetracking-kit.semtech.com/signin. Note that your login credentials can be found either on the
inside cover of the Kit box, or on the device data sheet provided with the Kit.
Once you log in to the website, two views will be available: the Device Tracking view and the Device
Settings view. In the Device Tracking view, the location of each tracking device is plotted on a map. From
there, you can extract the time histories of the location data. Use the Device Settings view to designate a
nickname for each device and to see the current status of devices and the gateway.