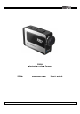
| PR RISM PRISM Bluetooth B h® Action n Camerra SENA A www w.sena.
| PR RISM CON NTENTS S S 1.. PACKAGE CONTENTS 2.. ACCESSOR RIES 3.. GETTING S STARTED 3.1. Open ning and Clossing the Back k Door 3.2. Memo ory Card (no ot included in the package e) 3.3. Battery 3.4. Powe ering On and Off 3.5. Came era LCD Men nu Screen 3.6. Voice e Prompt 4.. CAMERA M MODES AND D MENU SYS STEM 4.1. Button Operationss 4.2. Came era Modes 5.. VIDEO MODE 5.1. Video o Mode Operrations 5.2. Video o Mode Settin ngs 5.3. Video o Recording Time T 6.. SINGLE SH HOT MODE 6.1.
| PR RISM 10.3.3 3. Sidetone * 10.3.4 4. Ultra HD Voice V Record ding * 10.4. Device Setting * 10.4.1 1. Auto powe er off * 10.4.2 2. Beep * 10.4.3 3. LED * 10.4.4 4. TV out (NT TSC / PAL) * 10.4.5 5. Time set * 10.4.6 6. Factory Re eset * 10.4.7 7. Device info o* 10.4.8 8. SD Card Formatting F * 1. BLUETOO OTH AUDIO RECORDING 11 11.1. Settings of Bluettooth Audio Recording R 11.2. Blue etooth Audio Recording with w Sena He eadsets 11.2.1 1. Bluetooth Pairing 11.2.2 2. Bluetooth Connection 11.3.
| PR RISM 15.4.1 1. QRM Duall Suction Cup p Mount Com mponents 15.4.2 2. QRM Duall Suction Cup p Mount Insttallation 15.5. QRM M Handlebarr Mounting 15.5.1 1. QRM Hand dlebar Mounting Compon nents 15.5.2 2. QRM Hand dlebar Mounting Installattion 6. CAMERA SOFTWARE E 16 16.1. PRIS SM Device Manager M 16.2. PRIS SM Smartphone App 17 7.
| PR RISM FCC Complianc ce Informattion This eq quipment has been tested and a found to comply c with the e limits for a Class C A digital device, pursuuant to part 15 of the FCC C Rules. These limits are de esigned to provide reason nable protectiion against harmful h interfe erence when the equipme ent is operate ed in a ercial environment.
| PR RISM 1.
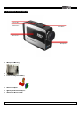
| PR RISM ● ● Lens L Cap ● Cigar C Jack C Charger 7
| PR RISM 2. ACCESS A SORIES QRM Sysstem for Motorccycles QRM S Surface Mou unt Dual Suction n Mount Kit Handle ebar Mount Kit K Flat & Curved Addhesive Moun nts Compositte Cable Co ombo Cable Microphonne Cable Li-Ion Rech hargeable Batte ery USB Pow wer & Data Cable C World Wide USB B Wall Charg ger 3. GETTIN G G STAR RTED and Closing the Back k Door 3.1. Opening a de the small lock near the e bottom of the back doo or to the left. 1.
| PR RISM de the back d door of the ca amera upwa ards and unh inge the bac ck door. 2. Slid he camera, ro otate the bacck door so th hat it is firmly against the camera. 3. To close the back door of th de the back d door downwa ards so that the t top portio on locks into place. 4. Slid 5. Slid de the small lock near the e bottom to the right to co omplete lock king the back k door on thee camera. Card (not inccluded in the package) 3.2. Memory C 1.
| PR RISM e battery icon displayed in the camera’s LCD wil l flash when the battery drops below w 10%. If rec cording is occcurring 3. The when battery reacches 0%, the camera will save the file e and power off. o battery, conn nect the cam mera to a com mputer or US SB power su upply (such aas the wall charger c or cig garette 4. To charge the b D shows solid d red while th he battery is charging, an nd it will turn off when thee battery is fu ully charged.. charger).
| PR RISM with Bluetoo oth headset, you can be guided by voice v prompts. The voicee prompts wiill help you audibly a If you are paired w a in and the e operation yyou have pe erformed while operatingg the camera a. For the details of underrstand which mode you are how to o pair the camera with Blluetooth headset, please e refer to the section, “10.3 Bluetooth Settings”. 4. CAMERA C A MODE ES AND MENU SYSTEM M perations 4.1.
| PR RISM Note: Playb back mode appears only if camera is connected to o a TV or Se ena LCD Pac ck™ (optionaal accessory,, sold separa ately). 5. VIDEO V M MODE 5.1.
| PR RISM matically stop ps recording when the m memory card is full or the e battery is oout of power. Your video will be The camera autom saved d before the ccamera powe ers off. V Mod de Settings 5.2. Video c change tthe resolution n setting at the t video se ettings, and the frame rattes are fixed along with certain c resolutions. You can When n you select 4 480P (120fpss) 720P (60fp ps), you can not take a sttill shot during video recoording.
| PR RISM 6. SINGLE S SHOT MODE 6.1.
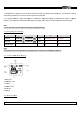
| PR RISM ot Mode Settings 6.2. Single Sho c change the photo resolution r att the single shot setting gs, and the aspect of raatios are fix xed along with the You can resolu utions. esolution Re Aspect of Ratio 3MP 3 3:2 3.2MP 4 4:3 3.5MP 16 6:9 5MP 16 6:9 7. BURST B S SHOT MODE M 7.1.
| PR RISM ot Mode Se ettings 7.2. Burst Sho c change th he photo ressolution at the e burst shot ssettings, and d the aspect ratios are fixxed along witth the resoluttions. You can Resolution As spect Ratio 3MP 3:2 3.2M MP 4:3 3.
| PR RISM 8. TIMELA T APSE MO ODE T e Mode Op perations 8.1.
| PR RISM 18
| PR RISM elapse Mod de Setting gs Time apse mode ttakes a video o (or a series s of photos) a at 1, 3, 5, 10, 30 or 60 se econd intervaals. Timela Type R Resolution Video 1080P/30FPS 720P/60FPS 720P/30FPS Photo 3.5MP (3:2) 3.2MP (4:3) 3MP (16:9) (좌측 병합) 병 Sequ uence Interv val 1s 3s 5s 10s 30s 60s 9.
| PR RISM hile in a thum mbnail preview w, use the Mode M Button tto cycle throu ugh the thum mbnails. Presss the Shot Button B to view w. 5. Wh 6. Use e and to navigate e backward and a forward tto see more media files on o your mem mory card. 7. Depending on whether you u are viewing g videos or p erent control options will appear. Use e the Mode Button photos, diffe and th he Shot Butto on to navigatte. Note: Burst photos and timelapse fiiles will display the first photo in the e series.
| PR RISM 10. CAMER RA SETT TINGS Settings Operations O s 10.1. Camera S ng Settings 10.2. Recordin cording settin ngs, video, single s shot, burst b shot a and timelapse e settings arre the samee as the quic ck settings at a each In rec mode.
| PR RISM 22
| PR RISM 1. Internal M Mic Gain 10.2.1 You can c adjust the internal microphone ga ain of the ca amera. If the e gain is high h, then the ccamera will acquire a more e audio from the t micropho one of the camera. Factory Deffault Auto Level Adjusttment Press s the Mode B Button (Auto / lo ow / middle / high / off) Applicatio on Press the Shot B Button 2. Upside Do own 10.2.
| PR RISM 1. Bluetooth h Pairing 10.3.1 1. Enter E the Bluetooth pairin ng in the Blue etooth setting gs. 2. Set S your Blue etooth headsset to pairing mode. 3. The T pairing iss completed. 10.3.2 2. Bluetooth h Mic. Gain You can c adjust th he Bluetooth microphone e gain of the e Bluetooth headsets h or microphonees. If the gain is high, then the camerra will acquirre more audio from the microphone m o of the Bluetoo oth headsets s.
| PR RISM Factory Deffault middle Level Adjusttment Press s the Mode B Button (middle / high / offf / low) Applicatio on Press the Shot B Button 3. Sidetone 10.3.3 When n using a Sen na headset, sidetone s is supported; s If this feature is enabled, you y can hearr what you are a speaking during video recording. Facttory Default On Enable E / Disable D Presss the Shot Button B 4. Ultra HD V Voice Recorrding 10.3.
| PR RISM 10.4.
| PR RISM 1. Auto pow er off 10.4.1 The camera c can b be configure ed to automa atically powe er off after a specific periiod of inactivvity (when no o videos or photos are be eing taken an nd no buttons have been pressed). T This feature does d not work while chargging the cam mera. Factory Deffault On Idle Time e 5 min Applicatio on Press the Shot B Button 2. Beep 10.4.2 You can c turn off or on the beep sound of th he camera d uring operations.
| PR RISM 5. Time set 10.4.5 Set th he camera clock to ensurre video and photo files a are saved with the correc ct date and ttime. Time can c be set byy Year, Month h, Hour, and Minute, Month/Day/Time: To change Year/M 6. Factory R Reset 10.4.6 It will clear all the settings to fa actory default. 10.4.7 7. Device inffo era. You can c see the ccurrent firmware version on o your came 8. SD Card F Formatting 10.4.8 11. Fo ormatting will remove alll files from a memory ccard.
| PR RISM 11. BLUET TOOTH AUDIO A RECOR RDING t use of Bluetooth head dsets, the ca amera allowss users to ad dd their voice e to the videoo on-the-fly using u the Blu uetooth With the Audio Recording™ ™ feature. Being B able to t narrate th he video during recordin ng not only provides us sers a whole new he need for follow-up f aud dio editing prroviding real--time audio eexperiences. experience but alsso reduces th g 11.1.
| PR RISM R with w Sena a Headsets s 11.2. Bluetootth Audio Recording 1. Bluetooth h Pairing 11.2.1 To rec cord your vo oice to the camera c with Bluetooth h headset, you should pairr the cameraa with a Blue etooth headset (or microp phone). Thiss pairing operation is only y required on nce for each Bluetooth he eadset.
| PR RISM ections at the e same time. conne 1. Turn T on the p paired Sena headset, and d then the ca amera is auto omatically co onnected to tthe paired he eadsets. The e audio channel c betw ween the cam mera and the Sena headsset is open. 2. Start S recordin ng on the cam mera by app propriate buttton operation n. You can c record in ntercom con nversation among two o or three interrcom friends s who use S Sena headse ets.
RISM | PR o the handsfree pairing mode m of the non-Sena headset. h Forr details on handsfree pairing, p refer to the 2.. Enter into user’s guid de of the corrresponding headset. 3.. If the pairing is completed, you will hear th he voice pro ompt saying “PRISM coonnected” fro om the connected nding headse et. correspon Note: If you cannot pair the non-Sen na Bluetooth headset, dellete all pairin ng list and pa air the one aggain. 11.3.2 2.
| PR RISM Video Stop Jo og Dial Press an nd hold for 1 s Single Shot Jo og Dial Press an nd hold for 1 s Burst Shot Jo og Dial Press an nd hold for 1 s TIme elapse (video o) Start Jo og Dial Press an nd hold for 1 s Time elapse (video o) Stop Jo og Dial Press an nd hold for 1 s Still Shot S (video m mode) Ph hone Button Tap Playb back - Forma at Select Ph hone Button Tap Playb back - Move Conttrol Icon Jo og Dial Press an nd hold for 1 s Playb back - Selecct Conttrol Icon Jo og Dial
| PR RISM back - Movve Control Playb Icon Center Butto on Pre ess and hold d for 1 s Playb back - Sele ect Control Center Butto on Icon Pre ess and hold d for 1 s 12.2. Remote C Control by y Non-Sen na Headsetts Type Operration Video Start D (or redia Dial al) Video Stop E Ending a call Single Shot D (or redia Dial al) Burst Shot D (or redia Dial al) TIme elapse (video o) Start D (or redia Dial al) Time elapse (video o) Stop E Ending a call 13.
RISM | PR Y Mac’s o operating sysstem may be e setup to op pen new dev vices automa atically, if noot, open a ne ew Finder window. w 2. Your Your Y Mac’s o operating syystem may be b setup to o open connec cted devices s automaticaally, if not, open o a new Finder window. w 3. Your Y Mac sho ould recognizze the camera as a remo ovable device e—look for PRISM P card iin the list of devices d and open. 4.
| PR RISM camera. 15. CAMER RA MOU UNTING G Quick Rele ease Moun nt) System m for Moto orcycle 15.1. QRM™ (Q The Quick Q Releasse Mount™ System S provid de fast and ssecure ways to switch the e camera moount system on the moto orcycle. There e are three different QRM M types: Top Surface Mo ount, Handleb bar Mount, and a Dual Sucction Cup Mo ount.
| PR RISM 15.2.
| PR RISM S Clamp M Mount enable es you to mo ount the cam mera at the side of your helmet. You ccan adjust the camera an ngle by The Side rotatin ng the joints. When you are a not recorrding, you ma ay simply separate the sllide lock from m the clamp. This mount allows you to o record in th he driver’s po oint of view. 15.2.1 1. Side Clam mp Mount Co omponents Pivo ot The piv vot containss the standard 1/4’’ cam mera mount bbolt on whic ch you fasten the camera a.
| PR RISM The slide lo ock can take in and lock the t rotating bball joint. Slide L Lock for QRM M Flatt Glued Surfa ace Mounting Adapter Curv ved Glued Su urface Mountting Adap pter The mountting adapter can c be glued d on a flat su rface. The mountting adapter can c be glued d on a curvedd surface. 15.3.2 2. QRM Top Surface Mo ount Installa ation 1. Choose C the ssurface that you y like to mount m the cam mera on, and d select a su uitable glued surface mounting adaptter (flat or o curved). 2.
| PR RISM Locking Kno obs he suction cu ups can be lo ocked into po osition by pullling the leveer. Th Suction Cup ps hese legs are e used for du ual suction. Th Long Legss Short Leg g Th his leg is use ed for single ssuction depe ending on the e camera anggle. 15.4.2 2. QRM Duall Suction Cu up Mount Installation 1. Locate L a proper surface to attach the mount, cle ean the surfface location with a moisstened towel, and allow to dry th horoughly. 2.
| PR RISM d Yo ou can choosse the directions of the m mounting arm m and the U-b bolt to best fi t the mount on your hand dlebar. 1/2’’ diameter). When n you are not recording, you y can simp ply separate tthe QRM hea ad from the QRM Q body. 15.5.1 1. QRM Hand dlebar Moun nting Components QRM QRM M head conttains the sta andard 1/4’’ camera mou unt bolt on w which you fa asten the cam mera. QRM M body comb bines with th he QRM head d. The U-bolt can be b installed e either upward ds or downw wards.
| PR RISM 17. CAMER RA SPEC CIFICAT TIONS Ge eneral ● Record time: 2 hourss ● Working g distance (Se ena headsets)): up to 100 me eters (110 yarrds) in open te errain ● Operating temperature: -10˚C ~ 55 5˚C (14°F ~ 13 31°F) ● Dimenssions (main mo odule): 59.0mm x 43.0mm x 21.0mm (2.3 3 in x 1.75 in x 0.8 in) uetooth Blu ● Profile: Headset Proffile, Hands-Fre ee Profile (HF P) ● Bluetoo oth 4.
| PR RISM ● ○ 4:3 5M ○ 4:3 3.2M ○ 16:9 3M Burst sh hot ○ 10 / 5 / 3 picc per sec Tim me lapse mo ode ● Photo & Video ○ pic per 1 / 3 / 5 / 10 / 30 /6 60 sec V-out TV ● Micro H HDMI Ba attery ● Chargin ng time: 3.