30K Motorcycle Bluetooth Communication System with Mesh Intercom™ MENU
CLICK ANY SECTION TO BEGIN ABOUT THE HEADSET INSTALLING THE HEADSET GETTING STARTED PAIRING WITH DEVICES MOBILE PHONE USAGE STEREO MUSIC INTERCOM SETUP MESH INTERCOM USING THE FM RADIO AMBIENT MODE VOICE COMMAND GENERAL SETTINGS REMOTE CONTROL TROUBLESHOOTING
LEGEND: TAP 1x Tap button/Jog Dial the specified number of times ROTATE ROTATE ROTATE ROTATE L L R R HOLD 10s Press and Hold button/ Jog Dial for the specified amount of time ROTATE Rotate Jog Dial clockwise (right) or counterclockwise (left). ROTATE Rotate while Pressing Jog Dial clockwise (right) or counterclockwise (left).
TABLE OF CONTENTS 1. ABOUT THE Motorcycle Bluetooth Communication System with Mesh Intercom™ 9 1.1 Product Details 9 1.1.1 Headset Main Unit 1.1.2 Universal Clamp Kit 9 9 1.2 Package Contents 10 2. Installing the Headset on Your Helmet 12 2.1 Helmet Installation 12 2.2 Using the Glued Surface Mounting Adapter 15 2.3 Switching the Microphone 17 2.3.1 Wired Boom Microphone 2.3.2 Wired Microphone 18 18 2.4 Earbuds 2.5 External Mesh Intercom Antenna 19 19 3.
TABLE OF CONTENTS CONTINUED 4. Pairing the Headset with Other BLUETOOTH DEVICES 32 4.1 Mobile Phone 32 4.2 Additional Mobile Phones, MP3 Player or Sena SR10 Two-Way Radio Adapter 33 4.3 Advanced Selective Pairing: Hands-Free or A2DP Stereo 34 4.3.1 Phone Selective Pairing - Hands-Free Profile 34 4.3.2 Media Selective Pairing - A2DP Profile 35 4.4 GPS Pairing 37 5. MOBILE PHONE USAGE 39 5.1 Making and Answering Calls 5.2 Speed Dialing 39 40 5.2.1 Assigning Speed Dial Presets 5.2.
TABLE OF CONTENTS CONTINUED 7.3 Multi-Way Intercom 51 7.3.1 Starting a Three-Way Intercom Conference 51 7.3.2 Starting a Four-Way Intercom Conference 53 7.3.3 Ending Multi-Way Intercom 54 7.4 Three-Way Conference Phone Call with Intercom Users 7.5 Group Intercom 7.6 Universal Intercom 7.7 VOX Intercom (Default: Disable) 7.8 Intercom VOX Sensitivity (Default: 3) 7.9 HD Intercom (Default: Enable) 7.10 Advanced Noise Control™ (Default: Enable) 54 56 57 60 61 61 62 8. Mesh Intercom 63 8.
TABLE OF CONTENTS CONTINUED 8.7 Audio Overlay Volume Management (Default: Disable) 74 9. Using the FM Radio 75 9.1 FM Radio On/Off 75 9.2 Seek and Save Radio Stations 76 9.3 Scan and Save Radio Stations 78 9.4 Temporary Station Preset 79 9.5 Navigating Preset Stations 80 9.6 Region Selection (Default: Worldwide) 80 9.7 Radio Data System (RDS) Alternative Frequency (AF) Setting (Default: Disable) 81 9.8 FM Station Guide (Default: Enable) 81 10. Ambient Mode 82 11. Voice Command 83 11.
TABLE OF CONTENTS CONTINUED 13. Remote Control 89 13.1 Pairing with the Remote Control 89 14. Troubleshooting 91 14.1 Fault Reset 14.
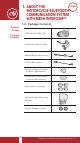
Communication System with Mes MENU 1. ABOUT THE Motorcycle Bluetooth Communication System with Mesh Intercom™ 1.1 Product Details Product Details Package Contents 1.1.1 Headset Main Unit Mesh Intercom Button Mesh Intercom Antenna Status LED Bluetooth Antenna Phone Button Jog Dial 1.1.
MENU 1. ABOUT THE Motorcycle Bluetooth Communication System with Mesh Intercom™ 1.
MENU 1. ABOUT THE Motorcycle Bluetooth Communication System with Mesh Intercom™ Product Details Package Contents • Speaker Pads • Hook and Loop Fasteners for Speakers • Boom Microphone Holder • Hook and Loop Fastener for Holder • 2.5 to 3.
Your Helmet MENU 2. I nstalling the Headset on Your Helmet 2.1 Helmet Installation Helmet Installation Using the Glued Surface Mounting Adapter To securely install the headset on the helmet, please follow this procedure. 1. Insert the back plate of the clamp unit between the internal padding and the external shell of the helmet, and tighten the two screws.
Clamp Unit MENU 2. I nstalling the Headset on Your Helmet Helmet Installation Using the Glued Surface Mounting Adapter Allen Wrench 2. Place the helmet speakers along with the hook and loop fasteners, Fin centered to your ear, in the ear pockets of the helmet. If the helmet has deep ear pockets, you can use the speaker pads to place the speakers closer to your ears.
Allen Wrench MENU 2. I nstalling the Headset on Your Clamp Helmet Unit Helmet Installation Using the Glued Surface Mounting Adapter • Make sure that the microphone is located properly close to your mouth when you wear the helmet. Adjust the direction of the microphone so that the fin side of the microphone is facing outward, away from your lips. Fin Switching the Microphone Earbuds External Mesh Intercom Antenna 3. Attach the headset main unit to the clamp unit.
MENU 2. I nstalling the Headset on Your Helmet Helmet Installation Using the Glued Surface Mounting Adapter 2.2 Using the Glued Surface Mounting Adapter If you have any problem equipping the clamp unit on the helmet for any reason, you may use the glued surface mounting adapter to attach the clamp unit on the external surface of the helmet. 1. Remove the speaker unit. Switching the Microphone Earbuds 1 1 2 External Mesh Intercom Antenna 2 2. Remove the back plate. Allen Wrench 3.
MENU 2. I nstalling the Headset on Your Helmet 5. Reconnect the speaker cable to the speaker port. Helmet Installation Using the Glued Surface Mounting Adapter Switching the Microphone Earbuds External Mesh Intercom Antenna 2 1 6. Locate a proper surface on the helmet to attach the unit then clean the helmet surface location with a moistened towel and allow to dry thoroughly. 7. Peel off the cover of the adhesive tape of the adapter and attach the unit on the proper surface of your helmet.
MENU 2. I nstalling the Headset on Your Helmet 2.3 Switching the Microphone Helmet Installation Using the Glued Surface Mounting Adapter Switching the Microphone Earbuds External Mesh Intercom Antenna If you want to use a different microphone instead of the static boom microphone, please refer to the following steps. 1. Remove the back plate of the clamp unit. 2. Connect the microphone according to your helmet type. 3. Lock the microphone to the clamp. 4.
MENU 2. I nstalling the Headset on Your Helmet 2.3.1 Wired Boom Microphone Helmet Installation Using the Glued Surface Mounting Adapter Switching the Microphone Speaker When installing thePort included wired boom microphone, place the hook and loop fastener at the end of the boom microphone between the internal helmet cheek pad and the internal wall of the helmet shell. The boom microphone should be mounted so it is facing close to your mouth when you wear the Microphone Port helmet.
MENU 2. I nstalling the Headset on Your Helmet 2.4 Earbuds Helmet Installation Using the Glued Surface Mounting Adapter You can connect your earbuds to the clamp while having the speakers connected to the clamp. The sound of the earbuds will be active while the sound of the outer speakers becomes inactive. Switching the Microphone Earbud Port Earbuds External Mesh Intercom Antenna 2.5 External Mesh Intercom Antenna Pull the Mesh Intercom Antenna outwards slightly to unfold it.
3. Getting Started MENU 3. Getting Started 3.
MENU 3. Getting Started 3.2 Powering On and Off Button Functions Powering On and Off Press and hold the Jog Dial and Phone Button at the same time to turn the headset on or off.
MENU 3. Getting Started 3.3 Charging Button Functions Charging the Headset Powering On and Off Charging Checking the Battery Level DC Power Charging & Firmware Upgrade Port Volume Adjustment Downloadable Sena Software Configuration Menu The headset will be fully charged in about 1.5 hours. (The charging time may vary depending on the charging method.) Note: • The headset includes a Fast Charging feature which allows it to charge quickly over a short period of time.
MENU 3. Getting Started 3.4 Checking the Battery Level Button Functions Powering On and Off There are two ways to check battery level: 1. Visually, with LEDs when powering on.
HIGH MENU = 3. Getting Started MEDIUM Button Functions Powering On and Off 2. Audible method: press and hold the Phone = Button and Jog Dial for more than 5 seconds as the headset powers on. A prompt will announce LOW the remaining battery level.
MENU 3. Getting Started 3.5 Volume Adjustment Button Functions Powering On and Off Charging You can raise or lower the volume by rotating the Jog Dial clockwise or counterclockwise. Volume is set and maintained independently at different levels for each audio source (i.e., phone, intercom), even when the headset is rebooted.
MENU 3. Getting Started 3.6 Downloadable Sena Software Button Functions Powering On and Off Charging Checking the Battery Level Volume Adjustment Downloadable Sena Software Configuration Menu 3.6.1 Sena Device Manager The Sena Device Manager allows you to upgrade the firmware and configure its settings directly from your PC or Apple computer. Using this software, you can assign speed dial presets, FM radio station presets and more.
MENU 3.
MENU 3. Getting Started 3.7 Configuration Menu Button Functions Powering On and Off Charging Checking the Battery Level Volume Adjustment The headset can be configured by following a series of voice prompts. Further details about each of these settings will be explained on the following pages. 1. To access the Configuration Menu, press and hold the Jog Dial for 10 seconds until you hear the voice prompt, “Configuration menu.” Accessing the Configuration Menu = 10s CONFIG.
MENU Accessing the Configuration Menu HOLD 3. Getting Started = 10s Button Functions Powering On and Off 2. Rotate the Jog Dial clockwise or CONFIG. counterclockwise to navigate between the MENU menus. You will hear voice prompts for each menu item. The list of functions is shown in the “Configuration menu” “Headset Configuration Menu” on page 30.
Navigating Backward through the Menu ROTATE = MENU L NAVIGATE BACKWARD 3. Getting Started “[Menu prompt]” Button Functions 3. You can enable the feature or execute the command by tapping the Phone Button.
Other Bluetooth Devices 4. P airing the Headset with Other Bluetooth Devices Mobile Phone Additional Mobile Phones, MP3 Player or Sena SR10 Two-Way Radio Adapter Advanced Selective Pairing: Hands-Free or A2DP Stereo MENU When using the headset with other Bluetooth devices for the first time, they’ll need to be “paired.” This enables them to recognize and communicate with one another whenever they’re within range.
4. P airing the Headset with Other Bluetooth Devices MENU 4.1 Mobile Phone Mobile Phone Additional Mobile Phones, MP3 Player or Sena SR10 Two-Way Radio Adapter Advanced Selective Pairing: Hands-Free or A2DP Stereo GPS Pairing 1. Execute Phone Pairing by holding down the Phone Button for 5 seconds.
4. P airing the Headset with Other Bluetooth Devices Mobile Phone Additional Mobile Phones, MP3 Player or Sena SR10 Two-Way Radio Adapter Advanced Selective Pairing: Hands-Free or A2DP Stereo GPS Pairing MENU 4.2 Additional Mobile Phones, MP3 Player or Sena SR10 Two-Way Radio Adapter 1. Execute Second Mobile Phone Pairing by holding down the Jog Dial for 5 seconds. Tap the Phone Button once within 2 seconds.
4. P airing the Headset with Other Bluetooth Devices Mobile Phone MENU 4.3 Advanced Selective Pairing: Hands-Free or A2DP Stereo Phone Pairing allows the headset to establish two Bluetooth profiles: Hands-Free or A2DP Stereo. Advanced Selective Pairing allows the headset to Additional Mobile Phones, MP3 Player or Sena SR10 Two-Way Radio Adapter separate the profiles to enable connection with two devices. Advanced Selective Pairing: Hands-Free or A2DP Stereo 1.
PHONE SELECTIVE PAIRING P TAP 1x MENU 4. P airing the Headset with Other “Phone Bluetooth selective pairing” Devices Mobile Phone Additional Mobile Phones, MP3 Player or Sena SR10 Two-Way Radio Adapter Advanced Selective Pairing: Hands-Free or A2DP Stereo GPS Pairing Bluephone flashing lights 2. With your mobile in Bluetooth= indicates pairing mode, select the device headset is in now the list discoverable. of devices detected. LED STATUS 3. If your mobile phone asks for a PIN, enter 0000.
5s MEDIA SELECTIVE PAIRING TAP MENU 4. P airing the 1x Headset with Other Bluetooth “Media selective pairing” Devices Mobile Phone Additional Mobile Phones, MP3 Player or Sena SR10 Two-Way Radio Adapter Advanced Selective Pairing: Hands-Free or A2DP Stereo 2. With your mobile phone in Bluetoothflashing lightsin the list pairing mode,Red select the headset indicate device is now of devices=detected. 3. If your mobilediscoverable. phone asks for a PIN, enter LED STATUS 0000.
4. P airing the Headset with Other Bluetooth Devices MENU 4.4 GPS Pairing Mobile Phone Additional Mobile Phones, MP3 Player or Sena SR10 Two-Way Radio Adapter Advanced Selective Pairing: Hands-Free or A2DP Stereo 1. Execute GPS Pairing by holding down the Jog Dial for 5 seconds. Within 2 seconds, tap the Phone Button once to hear the voice prompt, “Second mobile phone pairing”. Again within 2 seconds, tap the Phone Button to hear the voice prompt, “GPS pairing”.
phone pairing” TAP 4. P AIRINGP THE1x HEADSET WITH OTHER BLUETOOTH DEVICES“GPS pairing” Mobile Phone Additional Mobile Phones, MP3 Player or Sena SR10 Two-Way Radio Adapter Advanced Selective Pairing: Hands-Free or A2DP Stereo GPS Pairing MENU 2. With your Bluetooth device on the GPS navigation screen, select the headset the list of Green flashing lights in indicates = devices detected. device is now discoverable. 3. If your Bluetooth device asks for a PIN, enter LED STATUS 0000.
5. Mobile phone usage MENU 5. Mobile phone usage 5.1 Making and Answering Calls Making and Answering Calls Answer a Call Speed Dialing = P = P VOX Phone TAP 1x or ANSWER End a Call TAP 1x or END HOLD 2s Reject a Call HOLD = 2s REJECT Make a Call with Voice Dialer = P TAP 1x VOICE DIAL Note: If you have a GPS device connected, you will not hear its voice navigations during a phone call.
MENU 5. Mobile phone usage 5.2 Speed Dialing Making and Answering Calls Speed Dialing VOX Phone 5.2.1 Assigning Speed Dial Presets Speed Dial Presets could be assigned in the settings menu, accessible through Sena Device Manager or Sena Smartphone App. 5.2.2 Using Speed Dial Presets 1. Tap the Phone Button twice to enter into the Speed Dial menu. You will hear the voice prompt, “Speed dial.
Redial Last Number SPEED DIAL = P = P TAP 2x TAP 1x MENU REDIAL “Speed dial” 5. Mobile phone usage Making and Answering Calls “Last redial” 3. To call one of yournumber Speed Dial Presets, tap the Phone Button when you hear the prompt, “Speed dial (#).
MENU 5. Mobile phone usage 5.3 VOX Phone (Default: Enable) Making and Answering Calls Speed Dialing VOX Phone An VOX Phone setting can be found in the settings menu, accessible through Sena Device Manager or Sena Smartphone App. With VOX Phone enabled, you can answer incoming calls by simply saying a word loudly enough, unless you are connected to intercom. For example, when you hear a series of beeps for an incoming call, you can answer the phone by saying “Hello” or any other word loudly.
6. Stereo music MENU 6. Stereo music 6.1 Playing Music with Bluetooth Devices Playing Music with Bluetooth Devices Playing Music with nonBluetooth Devices 1. To play or pause music, press and hold the Jog Dial for 1 second until you hear a double beep. Play/Pause Play/Pause PLAY/PAUSE = = Music Sharing PLAY/PAUSE 1s HOLD 1s “[Beep, Beep]” Audio Boost Smart Volume Control HOLD “[Beep, Beep]” 2. To adjust Volume Up the volume, rotate the Jog Dial clockwise or counterclockwise.
R VOLUME UP MENU Volume Down 6. Playing Music with Bluetooth Devices = Stereo music L ROTATE VOLUME 3. To track forward or back, rotate while pressing the DOWN Jog Dial clockwise or counterclockwise. Track Forward = ROTATE Playing Music with nonBluetooth Devices SKIP TRACK FORWARD Music Sharing Track Backward R Audio Boost = Smart Volume Control ROTATE L SKIP TRACK BACKWARD 6.
Play/Pause HOLD = MENU 1s 6. Stereo music PLAY/PAUSE Playing Music with Bluetooth Devices Playing Music with nonBluetooth Devices Music Sharing To adjust the volume, rotate the Jog Dial clockwise “[Beep, Beep]” or counterclockwise. You can also adjust the volume directly on the connected device. Volume Up ROTATE = R VOLUME UP Volume Down Audio Boost = Smart Volume Control ROTATE L VOLUME DOWN Track Forward 6.
MENU 6. Stereo music 6.4 Audio Boost (Default: Disable) Playing Music with Bluetooth Devices Playing Music with nonBluetooth Devices Music Sharing Audio Boost Smart Volume Control An Audio Boost setting can be found in the settings menu, accessible through Sena Device Manager or Sena Smartphone App. Enabling Audio Boost increases the maximum volume limit. Disabling Audio Boost reduces the maximum volume limit while delivering more balanced sound. 6.
Intercom Setup MENU 7. Bluetooth Intercom Setup 7.1 Intercom Pairing Intercom Pairing Two-Way Intercom Multi-Way Intercom Up to three people can communicate via intercom with the headset simply by pairing their headsets. Pairing with Intercom Friends Pairing with Intercom Friends A Three-Way Conference Phone Call with Intercom Users Group Intercom Universal Intercom VOX Intercom B B Advanced Noise Control™ C C D D 1.
“Intercom pairing” MENU 7. Bluetooth Red flashing lights indicate = Intercom device isSetup now discoverable. Intercom Pairing 2. Tap the Jog Dial on either headset and wait until LED STATUS the LEDs of both turn blue. A Two-Way Intercom Multi-Way Intercom Three-Way Conference Phone Call with Intercom Users = YOU 1x or B Flashing blue LED confirms = intercoms are paired.
MENU 7. Bluetooth Intercom Setup Intercom Pairing Two-Way Intercom Multi-Way Intercom 3. Repeat steps 1 and 2 to pair with Intercom Friends C & D.
MENU 7. Bluetooth Intercom Setup 7.2 Two-Way Intercom Intercom Pairing Two-Way Intercom Multi-Way Intercom Three-Way Conference Phone Call with Intercom Users Group Intercom Universal Intercom VOX Intercom Intercom VOX Sensitivity HD Intercom Advanced Noise Control™ You can start or end an intercom conversation with an Intercom Friend by tapping the Jog Dial. 1. Tap once for Intercom Friend 1.
MENU 7. Bluetooth Intercom Setup 7.3 Multi-Way Intercom Intercom Pairing Two-Way Intercom Multi-Way Intercom Three-Way Conference Phone Call with Intercom Users Group Intercom Universal Intercom VOX Intercom Multi-Way Intercom enables conference-call-style conversations with up to three Intercom Friends at the same time. While Multi-Way Intercom is in progress, mobile phone connection is temporarily disconnected.
MENU Pair with Intercom Friends B & C 7. Bluetooth A Intercom Setup Pair with Intercom Friends B & C Intercom Pairing Two-Way Intercom Multi-Way Intercom Three-Way Conference Phone Call with Intercom Users Group Intercom Universal Intercom VOX Intercom Intercom VOX Sensitivity HD Intercom Advanced Noise Control™ 2. Start B an intercom conversation with one of C A You intercom group.
Starting an Intercom Conversation with Intercom Friend C MENU A 7. Bluetooth B Intercom Setup You Intercom Pairing Two-Way Intercom Multi-Way Intercom Three-Way Conference Phone Call with Intercom Users Group Intercom Universal Intercom VOX Intercom Intercom VOX Sensitivity 4. Now you (A) and two Intercom Friends Intercom Intercom (B & C) are having a Three-Way Intercom Friend B Friend C Conference. Three-Way Intercom A B C You Intercom Friend B Intercom Friend C 7.3.
MENU 7. Bluetooth Intercom Setup 7.3.3 Ending Multi-Way Intercom Intercom Pairing Two-Way Intercom Multi-Way Intercom Three-Way Conference Phone Call with Intercom Users Group Intercom Universal Intercom VOX Intercom 1. Press the Jog Dial for 1 second until you hear a beep to terminate all intercom connections. 2. Tap the Jog Dial to disconnect from your first Intercom Friend. Double tap the Jog Dial to disconnect from your second Intercom Friend. 7.
ADD AN INTERCOM FRIEND DURING ADD AN CALL INTERCOM FRIEND DURING CALL TAP = or or 1x TAP 2x TAP or 2x 7. B luetooth MENU TAP IntercomorSetup Intercom Pairing Two-Way Intercom Multi-Way Intercom Three-Way Conference Phone Call with Intercom Users 3x TAP 2. To disconnect the intercom during a conference 3xonce, twice or phone call, tap the Jog Dial three times.
MENU 7. Bluetooth Intercom Setup 7.5 Group Intercom Intercom Pairing Two-Way Intercom Multi-Way Intercom Three-Way Conference Phone Call with Intercom Users Group Intercom Universal Intercom VOX Intercom Intercom VOX Sensitivity HD Intercom Advanced Noise Control™ Group Intercom allows you to instantly create a Multi-Way Conference Intercom with three of the most recently paired headsets. 1. Go through intercom pairing with up to three headsets you want to have Group Intercom with. 2.
“Group intercom” MENU “Group intercom connected” 7. Bluetooth Intercom Setup Intercom Pairing Two-Way Intercom GreenIntercom, LED Flashing = Group 4. To terminate press the Ambient Mode Button for 1 second during Group BLUETOOTH Intercom. You will hear a voice prompt, “Group LED STATUS intercom terminated”.
MENU 7. Bluetooth Intercom Setup Intercom Pairing Access Universal Intercom in the Configuration Menu = Two-Way Intercom Multi-Way Intercom 10s ACCESS CONFIG. MENU Three-Way Conference Phone Call with Intercom Users “Configuration menu” Group Intercom Universal Intercom HOLD ROTATE = R NAVIGATE FORWARD VOX Intercom Intercom VOX Sensitivity “Universal intercom” HD Intercom Advanced Noise Control™ = P TAP 1x EXECUTE 2. Put the non-Sena Bluetooth headset in Pairing Mode.
MENU 7. Bluetooth Intercom Setup Intercom Pairing Two-Way Intercom 3. You can have Two-Way Intercom or MultiWay Intercom communication with up to three Intercom Friends using non-Sena headsets by following the procedures described below.
MENU 7. Bluetooth Intercom Setup 7.7 VOX Intercom (Default: Disable) Intercom Pairing Two-Way Intercom Multi-Way Intercom Three-Way Conference Phone Call with Intercom Users Group Intercom Universal Intercom VOX Intercom Intercom VOX Sensitivity HD Intercom Advanced Noise Control™ The VOX Intercom setting can be found in the settings menu, accessible through Sena Device Manager or Sena Smartphone App.
MENU 7. Bluetooth Intercom Setup 7.8 Intercom VOX Sensitivity (Default: 3) Intercom Pairing Two-Way Intercom Multi-Way Intercom Three-Way Conference Phone Call with Intercom Users Group Intercom Universal Intercom VOX Intercom Intercom VOX Sensitivity HD Intercom The Intercom VOX Sensitivity setting can be found in the settings menu, accessible through Sena Device Manager or Sena Smartphone App. The sensitivity can be adjusted depending on your riding environment.
MENU 7. Bluetooth Intercom Setup Intercom Pairing 7.10 Advanced Noise Control™ (Default: Enable) Two-Way Intercom The Advanced Noise Control setting can be found in the settings menu, accessible through Sena Device Manager or Sena Smartphone App. Multi-Way Intercom If Advanced Noise Control is enabled, background noise is reduced during intercom conversations.
8. Mesh Intercom MENU 8. Mesh Intercom 8.1 What is Mesh Intercom? What is Mesh Intercom? Mesh Intercom Mode Using the Mesh Mesh Intercom Conference with Bluetooth Intercom Participant Audio Multitasking (Always On) Mesh Intercom is an adaptive and autonomous intercom technology developed by Sena which features self-organizing, self-healing, self-optimizing, and multi-hopping group communication.
MENU 8. Mesh Intercom What is Mesh Intercom? Mesh Intercom Mode Using the Mesh Mesh Intercom Conference with Bluetooth Intercom Participant Audio Multitasking (Always On) IntercomAudio Overlay Sensitivity 8.2 Mesh Intercom Mode (Default: Public Mode) 8.2.1 Public Mode When Mesh Intercom is enabled, the headset will be in Public Mode initially. It can connect with a virtually unlimited number of nearby 30K headsets within a 1.6 km (1.0 mile) range.
MENU 8. Mesh Intercom 8.2.2 Private Mode What is Mesh Intercom? Mesh Intercom Mode Using the Mesh Mesh Intercom Conference with Bluetooth Intercom Participant Audio Multitasking (Always On) IntercomAudio Overlay Sensitivity Audio Overlay Volume Management Mesh A Mesh is a closed network of headsets where participants can leave, join or rejoin a group intercom conversation without affecting the Approx. each 1.0 Mile connection between of the headsets.
MENU 8. Mesh Intercom What is Mesh Intercom? Mesh Intercom Mode Using the Mesh Mesh Intercom Conference with Bluetooth Intercom Participant Audio Multitasking (Always On) IntercomAudio Overlay Sensitivity Audio Overlay Volume Management Private Mode When the headset is in Private Mode, it can connect with up to 15 other 30K headsets. The range between each headset in Private Mode can be up to 2.0 km (1.2 miles). The Mesh can extend up to 8.0 km (5.
MENU 8. Mesh Intercom 8.3 Using the Mesh What is Mesh Intercom? Mesh Intercom Mode Using the Mesh Mesh Intercom Conference with Bluetooth Intercom Participant Audio Multitasking (Always On) IntercomAudio Overlay Sensitivity Audio Overlay Volume Management 8.3.1 Creating the Mesh A user can create a Mesh so that they can invite nearby 30K headsets to join in a closed intercom conversation.
MENU 8. Mesh Intercom What is Mesh Intercom? Mesh Intercom Mode Using the Mesh Mesh Intercom Conference with Bluetooth Intercom Participant Audio Multitasking (Always On) IntercomAudio Overlay Sensitivity Audio Overlay Volume Management Note: A user can join the Mesh within 30 seconds after hearing the invitation voice prompt. 8.3.2 Join an Existing Mesh Users that did not accept the invitation from the creator or were not invited can request to join the Mesh.
[Creator] “Would you like to add a new participant?” TAP = Accept a participant [Creator] M 1x MENU ACCEPT TAP [Participant] M = 8. Mesh Intercom 1x What is Mesh Intercom? Mesh Intercom Mode Using the Mesh Mesh Intercom Conference with Bluetooth Intercom Participant Audio Multitasking (Always On) IntercomAudio Overlay Sensitivity The ACCEPT creator of the“Joined Mesh can the request thereject mesh” for a user to join the closed intercom.
MENU 8. Mesh Intercom 8.3.4 Toggle Public Mode / Private Mode What is Mesh Intercom? Mesh Intercom Mode Using the Mesh Mesh Intercom Conference with Bluetooth Intercom Participant Audio Multitasking (Always On) A user is able to toggle between Public Mode and Private Mode without quitting the Mesh. This allows the user to keep the Mesh Network connection information while in Public Mode. The user can toggle to Private Mode to communicate with participants from the stored Mesh Network information.
MENU 8. Mesh Intercom 8.3.5 Toggle Public Mode / Guest Mode What is Mesh Intercom? Mesh Intercom Mode Using the Mesh Toggle Between Public Mode and Guest Mode “Guest Mode” GUEST GUEST MODE Mesh Intercom Conference with Bluetooth Intercom Participant Audio Multitasking (Always On) IntercomAudio Overlay Sensitivity Audio Overlay Volume Management = M HOLD 3s “Public Mode” PUBLIC MODE 8.3.
MENU 8. Mesh Intercom What is Mesh Intercom? Mesh Intercom Mode Using the Mesh Mesh Intercom Conference with Bluetooth Intercom Participant Audio Multitasking (Always On) 8.4 Mesh Intercom Conference with Bluetooth Intercom Participant Users can use the existing Bluetooth intercom and Mesh Intercom function at the same time. In this case, it is recommended to communicate with other Sena headsets via Bluetooth intercom connection and use Mesh Intercom between 30K headsets.
MENU 8. Mesh Intercom 8.5 Audio Multitasking (Always On) What is Mesh Intercom? Mesh Intercom Mode Using the Mesh Mesh Intercom Conference with Bluetooth Intercom Participant Audio Multitasking (Always On) IntercomAudio Overlay Sensitivity Audio Overlay Volume Management Audio Multitasking allows you to have an intercom conversation while simultaneously listening to music, FM radio, or GPS instructions.
MENU 8. Mesh Intercom What is Mesh Intercom? Mesh Intercom Mode Using the Mesh Mesh Intercom Conference with Bluetooth Intercom Participant 8.7 Audio Overlay Volume Management (Default: Disable) The Audio Overlay Volume Management setting can be found in the settings menu, accessible through Sena Device Manager or Sena Smartphone App. The music, FM radio and GPS overlaid audio reduces in volume whenever there is an ongoing intercom conversation.
MENU 9. Using the FM Radio 9.1 FM Radio On/Off FM Radio On/Off Seek and Save Radio Stations Scan and Save Radio Stations To turn on or shut off the FM radio, press the Phone Button for 1 second until you hear a double beep.
MENU 9. Using the FM Radio 9.2 Seek and Save Radio Stations FM Radio On/Off Seek and Save Radio Stations Scan and Save Radio Stations Temporary Station Preset The “Seek” feature searches for radio stations. 1. Rotate while pressing the Jog Dial clockwise or counterclockwise to search for radio stations.
BACKWARD Enter Preset= Selection Mode ENTER PRESET MODE HOLD 1s MENU HOLD = 1s 9. Using the FM Radio ENTER PRESET MODE FM Radio On/Off Seek and Save Radio Stations Scan and Save Radio Stations Temporary Station Preset Navigating Preset Stations Region Selection Radio Data System (RDS) Alternative Frequency (AF) Setting FM Station Guide “Preset (#)” 3. Rotate the Jog Dial to navigate through the preset numbers that you want to store.
MENU 9. Using the FM Radio 9.3 Scan and Save Radio Stations FM Radio On/Off Seek and Save Radio Stations Scan and Save Radio Stations Temporary Station Preset The “Scan” function automatically searches for radio stations, starting with the current station’s frequency, then up from there. 1. Double tap the Phone Button to scan for stations.
= P TAP 1x MENU SAVE STATION 9. Using“Save the FM preset (#)” Radio 4. To stop scanning, double tap the Phone Button. FM Radio On/Off Stop Scanning Seek and Save Radio Stations = Scan and Save Radio Stations Temporary Station Preset Navigating Preset Stations Region Selection Radio Data System (RDS) Alternative Frequency (AF) Setting FM Station Guide P TAP 2x STOP SCANNING 9.
MENU 9. Using the FM Radio 9.5 Navigating Preset Stations FM Radio On/Off Seek and Save Radio Stations Scan and Save Radio Stations Temporary Station Preset Navigating Preset Stations Region Selection Radio Data System (RDS) Alternative Frequency (AF) Setting FM Station Guide Using the methods above, up to 10 radio stations can be stored. Tap the Phone Button to navigate through the saved stations.
MENU 9. Using the FM Radio FM Radio On/Off Seek and Save Radio Stations Scan and Save Radio Stations Temporary Station Preset Navigating Preset Stations Region Selection Radio Data System (RDS) Alternative Frequency (AF) Setting 9.7 Radio Data System (RDS) Alternative Frequency (AF) Setting (Default: Disable) The RDS AF setting can be found in the settings menu, accessible through Sena Device Manager or Sena Smartphone App.
10. Ambient Mode MENU 10. Ambient Mode You can hear the ambient sound outside of your helmet by activating the Ambient Mode. To activate the Ambient Mode, press the Ambient Mode Button twice which is placed on the bottom of the clamp unit. To deactivate the Ambient Mode, press the Ambient Mode Button twice again.
11. Voice Command MENU 11. Voice Command Voice Command Setting The voice command of the headset allows you to operate certain operations by simply using your voice. You can control the headset completely handsfree using the voice recognition. The voice command function works only with English commands.
MENU 11.
MENU 11. Voice Command Voice Command Setting Note: • Voice command performance may vary based on the environmental conditions including riding speed, helmet type and ambient noise. To improve the performance, minimize wind noise on the microphone by using a large microphone sponge and closing the visor. • To activate the voice command during intercom conversation, tap the Ambient Mode Button once. 11.
12. General Settings MENU 12. General Settings 12.
MENU 12. General Settings 12.3 Voice Prompts (Default: Enable) Function Priority Firmware Upgrades Voice Prompts Sidetone Delete All Bluetooth Pairing Information A Voice prompt setting can be found in the settings menu, accessible through Sena Device Manager or Sena Smartphone App. If Voice prompt is enabled, you can hear Voice prompts for different kinds of features.
MENU 12. General Settings Function Priority 12.5 Delete All Bluetooth Pairing Information Firmware Upgrades A Delete All Bluetooth Pairing Information setting can be found in the Headset Configuration Menu. Voice Prompts Tap the Phone Button when in this menu to Delete All Bluetooth Pairing Information stored in the headset. Sidetone Access Delete All Pairings in the Configuration Menu Delete All Bluetooth Pairing Information HOLD = 10s ACCESS CONFIG.
13. Remote Control MENU 13. Remote Control Pairing with the Remote Control You can remotely control the headset using Sena Remote Control devices (sold separately) such as a Handlebar Remote or a Wristband Remote. This eliminates the need to remove your hands from the handlebars for button operations. 13.1 Pairing with the Remote Control 1. Turn on the headset and the Remote Control device. 2. Execute Remote Control Pairing in the Headset Configuration Menu.
R NAVIGATE FORWARD MENU “Remote control pairing” 13. Remote Control = mode in the Remote Control 3. Enter pairing device. The headset will automatically connect EXECUTE with the Remote Control device in pairing mode. You will hear a voice prompt, “Remote control connected”, when they are successfully paired. P Pairing with the Remote Control TAP 1x Enter Pairing Mode Enter Pairing Mode = on Remote Control.
14. Troubleshooting MENU 14. Troubleshooting Fault Reset Factory Reset Please visit Sena.com for answers to frequently asked questions. This detailed online FAQ section deals with troubleshooting, illustrates case studies and contains tips on using the headset. Click Here to Visit Sena.com 14.1 Fault Reset When the headset is not working properly, you can easily reset the unit: 1. Locate the pinhole reset button below on the back of the main unit. 2.
MENU 14. Troubleshooting 14.2 Factory Reset Fault Reset Factory Reset To erase all of your settings and start fresh, the headset can be restored to factory default settings using the Factory Reset feature. = P HOLD 10s FACTORY RESET “Factory Reset” = Solid red LED STATUS = TAP 1x EXECUTE “Headset reset, good-bye” Note: If you press the Phone Button or don’t press the Jog Dial within 5 seconds, the reset attempt is canceled and the headset returns to standby mode.
MENU Copyright © 2017 Sena Technologies, Inc. All rights reserved. © 1998–2017 Sena Technologies, Inc. All rights reserved. Sena Technologies, Inc. reserves the right to make any changes and improvements to its product without providing prior notice. Sena™ is a trademark of Sena Technologies, Inc. or its subsidiaries in the USA and other countries.