
User Manual


3
Setting Up
▪ ▪ ▪ ▪ ▪ ▪ ▪ ▪ ▪ ▪ ▪ ▪ ▪ ▪ ▪ ▪ ▪ ▪ ▪ ▪ ▪ ▪ ▪ ▪ ▪ ▪ ▪ ▪ ▪ ▪ ▪ ▪ ▪ ▪ ▪ ▪ ▪ ▪ ▪ ▪ ▪ ▪ ▪ ▪ ▪ ▪ ▪ ▪ ▪ ▪ ▪ ▪ ▪ ▪ ▪ ▪ ▪ ▪ ▪ ▪ ▪ ▪ ▪ ▪ ▪ ▪ ▪ ▪ ▪ ▪ ▪ ▪ ▪ ▪ ▪ ▪ ▪ ▪ ▪ ▪ ▪ ▪ ▪ ▪ ▪ ▪ ▪ ▪ ▪ ▪ ▪ ▪ ▪ ▪ ▪ ▪ ▪ ▪ ▪ ▪ ▪ ▪ ▪ ▪ ▪ ▪ ▪ ▪ ▪ ▪ ▪ ▪ ▪ ▪ ▪ ▪ ▪ ▪ ▪ ▪ ▪ ▪ ▪ ▪ ▪ ▪ ▪ ▪ ▪ ▪ ▪ ▪ ▪ ▪ ▪ ▪ ▪ ▪ ▪ ▪ ▪ ▪ ▪
Setting Up
The CSP-series speakers are designed for easy installation. If
necessary, installation can be accomplished without access above
the ceiling.
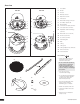
Tools needed for installation
▪ Drywall saw
▪ Slotted screwdriver
▪ Phillips head screwdriver
▪ Wire stripper
▪ Pencil
Preparing the ceiling
Drop Ceilings
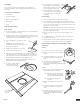
1. Locate the ceiling tile in which the speaker is to be mounted and
remove the tile from the ceiling.
2. Measure to find the center of the tile and place a mark there. Use
that mark to center the cutout template on the tile. With a pencil,
trace an outline of the cutout template on the tile.
3. Use a drywall saw to cut along the traced
line.
Pro tip: For easy cleanup it’s best to
perform this step while placing the tile over
an open box or trashcan.
4. Replace the ceiling tile into the ceiling.
5. Insert the rails through the hole.
6. Place the rails on either side of the hole so that the inverted “V”
ends of the rails fit over the ceiling grid rails. The flat side of the
rails should rest on the tile, and the side with the pre-cut holes
should stand perpendicular on either edge of the hole.
Note: The rails of the mounting bracket do not attach to the
ceiling grid rails, but suspend over them.
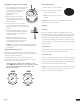
7. Insert the C-ring by angling
it through the hole using
the open end of the ring.
8. Fit the slots of the C-ring over the
rails and attach it by inserting the
bolts through the tabs of the C-ring
and securely tightening the nuts.
9. Pull the speaker wire out so that it
extends beyond the ceiling and gives
you enough length to complete the
installation.
Fixed Ceilings
1. Locate the spot where the speaker will be installed
2. Use a stud finder to locate studs in the ceiling. Make sure they
won’t interfere with your installation. If a stud is near the location
of your hole, make sure that there is 1-inch clearance between the
edge of the hole and the stud.
Pro tip: Drill a small pilot hole and probe inside the ceiling with
a stiff wire to make sure there are no obstructions where you are
planning on placing the speaker.
3. With a pencil, trace an outline of the cutout template on the
ceiling.
4. Use a drywall saw to cut along the traced line and remove the
cutout from the ceiling.
5. Pull the speaker wire out so that it extends beyond the ceiling
and gives you enough length to complete the installation.
Connecting the wiring to the removable locking
connector
CSP-162
1. Open the connector cover plate door.
2. Remove the locking connector from the
socket
3. Strip approximately 1/4" (6 mm) off the
ends of the insulation on the speaker
wires.
4. Insert the exposed ends of the wires
into the connector and tighten the
screw-down terminals using a small flat blade
screwdriver.
CSP-142
1. Remove the cover by unscrewing the two
screws attaching it to the backcan.
1.1. Determine the angle your speaker
wires approach the speaker and
remove the appropriate knockout.
1.2. Feed the wires through the
knockout.
2. Remove the locking connector from the
socket
3. Strip approximately 1/4" (6 mm) off the
ends of the insulation on the speaker
wires.
4. Insert the exposed ends of the wires into
the connector and tighten the screw-
down terminals using a small flat blade
screwdriver.
Inside-ceiling view
of assembled rails
and C-ring.