WIRELESS ACCESS POINT Quick Start Guide Models: AN-100-AP-I-N AN-300-AP-I-N
Araknis Networks Wireless Access Point Quick Start Guide FCC Warning Changes or modifications not expressly approved by the party responsible for compliance could void the user’s authority to operate the equipment. This device complies with Part 15 of the FCC Rules. Operation is subject to the following two conditions: 1. This device may not cause harmful interference, and 2. This device must accept any interference received, including interference that may cause undesired operation.
Araknis Networks Wireless Access Point Quick Start Guide About this Manual This manual was created to provide a reference for installers and end users of Araknis Networks™ products. It provides all known information regarding the installation, setup, use, and maintenance of the product.
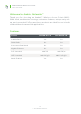
Araknis Networks Wireless Access Point Quick Start Guide Welcome to Araknis Networks™ Thank you for choosing an Araknis™ Wireless Access Point (WAP). With sleek, unobtrusive housings, extensive features, unique easy setup, and convenient PoE power, these products are ideal for use in both residential and commercial applications. Features Feature AN-100-AP-I-N AN-300-AP-I-N 2.4GHz Radio Yes Yes 5GHz Radio No Yes Concurrent Dual-band No Yes Gigabit Ethernet No Yes PoE Standard 802.3af 802.
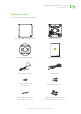
Araknis Networks Wireless Access Point Quick Start Guide Package Contents *Not Pictured: Wall Mount Template AN-100/300-AP-I-N (WAP) Mounting Bracket Ceiling Backing Plate Quick Start Guide DC Power Supply LAN Cable Surface Mounting Screws (2) Drywall Anchors (2) Ceiling/Junction Box Mounting Screws (2) Ceiling/Structured Wiring Nuts & Washers (2 ea.) 5 www.snapav.com | Support: 866.838.
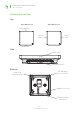
Araknis Networks Wireless Access Point Quick Start Guide Hardware Overview Top AN-100-AP-I-N AN-300-AP-I-N Reset Button Reset Button Status LED Status LED Side Status LED Ventilation Holes Bottom 12V DC Input (For non-PoE) RJ45 PoE Ethernet Jack Rubber Feet (4) Ethernet Cable Knockout 6 © 2014 Araknis Networks®
Araknis Networks Wireless Access Point Quick Start Guide Installation Step 1. Select A Mounting Location General Guidelines • Locate the WAP in a central location. Mounting height or position (ceiling/wall) will not affect performance, but higher mounting will provide better coverage. • Avoid mounting near kitchens or rooms with large appliances that may give off EMI noise, which can reduce connection speed, and in extreme cases, block WiFi connectivity altogether.
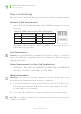
Araknis Networks Wireless Access Point Quick Start Guide Step 2. Install Wiring Decide how the WAP will be powered, then install the required wiring. Network Cable Requirements • Use a Cat5e/6 straight-through cable. 568B termination is recommended: EIA/TIA 568B Pattern (Gold Pins Facing Up) Pin 1 Pin 2 Pin 3 Pin 4 • White/Orange Orange White/Green Blue Pin 5 Pin 6 Pin 7 Pin 8 White/Blue Green White/Brown Brown Maximum cable length is 328 feet (100m). A repeater device is required for longer runs.
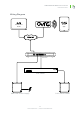
Araknis Networks Wireless Access Point Quick Start Guide Wiring Diagram Mobile Apps Web Browser Access Router 1 Gbps 1 3 5 7 9 11 13 15 2 4 6 8 10 12 14 16 Link/Act 17 18 SFP AN-300-SW-R-16 PoE Switch WAP with Power Supply PoE Powered WAP 9 www.snapav.com | Support: 866.838.
Araknis Networks Wireless Access Point Quick Start Guide Step 3. Mount the Access Point Table Top/Shelf The WAP comes with rubber feet installed for placement on flat surfaces. The mounting bracket is not required for this application. Junction Box Mounting The mounting bracket is compatible with most common junction box and plaster ring dimensions, including common ceiling box sizes: • Single/Double Gang • 3” Octagonal Box • 4” Square Box • 4” Octagonal Box A.
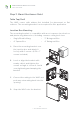
Araknis Networks Wireless Access Point Quick Start Guide Wall or Ceiling Mounting A. Place the bracket over the desired mounting location. B. Level the bracket or align it with nearby objects for uniformity. Point the arrow on the bracket up for wall mounting. C. Mark the “C” or “D” slots on the mounting surface. D. Thread one of the included drywall anchors into the center of each mark using a Phillips screwdriver. E.
Araknis Networks Wireless Access Point Quick Start Guide Ceiling Tile Mounting A. Place the bracket over the desired mounting location and align it with nearby objects for uniformity. B. Mark the “C” or “D” slots on the ceiling tile (and the center hole if needed for wiring). C. Cut the opening with a keyhole saw. Use a drill to make clean holes for the mounting screws. D.
Araknis Networks Wireless Access Point Quick Start Guide Step 4. Check Operation of the WAP Once the WAP is powered, the status LED can be used to determine proper operation. You may check the Wireless Network Connections in your PC to see if the default SSID “araknis_initial” is being broadcast. If the SSID is being broadcast, continue to the next page to begin setup. Status LED Operation After installing the WAP, connect the network and power cables and check the status LED.
Araknis Networks Wireless Access Point Quick Start Guide Step 5. Access the WAP over WiFi Warning – If multiple WAPs are to be installed in the same network, power on and complete network setup for one device at a time to avoid confusion about which WAP you are connected to. Araknis EZ Setup Method (with DHCP Address/Router) Note – Araknis WAPs use a unique setup method that relies on receiving a DHCP IP address.
Araknis Networks Wireless Access Point Quick Start Guide Step 6. Log In and Complete Setup A. After connecting to the WAP over WiFi, open a web browser and enter the configuration address for your device: • AN-100-AP-I-N use: http://config.an100.wap/ • AN-300-AP-I-N use: http://config.an300.wap/ Note – You can also identify your WAP’s network IP address by using the DHCP table on your router (for DHCP mode), or by using IP scanner software. Free IP scanners available online. B. C.
2-Year Limited Warranty Araknis Networks® products have a 2-Year Limited Warranty. This warranty includes parts and labor repairs on all components found to be defective in material or workmanship under normal conditions of use. This warranty shall not apply to products that have been abused, modified, or disassembled. Products to be repaired under this warranty must be returned to SnapAV or a designated service center with prior notification and an assigned return authorization number (RA).