Table of Contents User Manual (English) FreeStyl 2 Digital Long Range Cordless Phone Safety Instructions ............................................................................. 4 General Safety Instructions............................................................ 4 Product Safety Instructions............................................................ 4 Battery Safety Instructions ............................................................ 6 Regulatory Information................................
Adjusting Handset Speakerphone Voice Volume ........................ 33 Placing a Call On Hold .................................................................. 33 Mute............................................................................................. 34 Do Not Disturb (Silent Ring)......................................................... 34 Key Guard..................................................................................... 34 Battery Recharge and Replacement ..........................
. Changes or modifications to this product not expressively approved by the manufacturer will void the warranty and the FCC authorization to operate the equipment. Use only manufacturer provided accessories. 17. Do not install the base station or the handset charger near microwave ovens, radios, TV sets, speakers, or other electrical equipment. These appliances may cause interference to the product or experience interference from the product. 4. Do not use the telephone near water.
Regulatory Information IMPORTANT NOTE: FCC Radiation Exposure Statement: This equipment complies with FCC radiation exposure limits set forth for an uncontrolled environment. This equipment should be installed and operated with minimum distance 20cm between the radiator & your body. FreeStyl 2 FCC ID:U2M-FS2 IC:3616C-FS2 This device complies with Part 15 of the FCC Rules.
- Connect the equipment into an outlet on a circuit different from that to which the receiver is connected. - Consult the dealer or an experienced radio/TV technician for help. FCC Caution: Any changes or modifications not expressly approved by the party responsible for compliance could void the user's authority to operate this equipment. Equipment Checklist 1. In a Base + Handset package, please find the following components: a. Base Station x 1 (antenna installed) b. Base AC/DC Adaptor x 1 c.
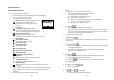
Handset Illustration Antenna Receiver (Earpiece) Speaker Phonebook Display Soft key (2.
Handset Features Basic Handset Features 1. 4-line LCD (Liquid Crystal Display) a. The LCD display has LED (Light Emitting Diode) for backlighting. st b. The 1 line of LCD consists of icons. c. Icons explanation from left to right (1) RSSI level (Receive Signal Strength Indicator) During a call, the number of bars is proportional to the radio signal strength received. (2) Link mode (2.1) Call in-progress (ON/OFF-Hook) The phone symbol indicates the phone line is active when making incoming or outgoing call.
b. Adjust receiver voice volume when in the Talk mode. c. Press to adjust ringer volume when in the Standby mode. d. Press to enter phonebook when in the Standby mode. 9. 6. DND (Do Not Disturb, i.e., Silent Ring) 7. Call Logs a. Redial: Stores 10 phone numbers (up to 26 digits each) dialed most recently. Can perform last-number redial on all 10 numbers. b.
11. Dialing Prefix a. Up to 14 digits, including pause(s), one access code can be preprogrammed to be added automatically in front of the dialed number when dialing from call logs, phonebook, and dial-and-send dialing. See page 51 for more details. 12. Call Hold a. Places call on hold. 13. Mute a. Press MUTE (Left) soft key during talk, the handset microphone will be muted. Press UNMUTE (Left) soft key to release it. 14. Phonebook a.
d. When entering the Base Settings, PIN is required. Default is 0000. Re: Do not change this setting unless you have issues with either answering inbound calls, or transferring calls. Many newer IP-PBX’s/VOIP Server type phone systems want a shorter flash time of 200ms or 300ms. a. b. c. d. 25. Assign next handset ID for new handset a. Using registered handset from MENU-6 - -3, to assign a next handset ID to a new handset. b.
Base Illustration Base Features Basic Base Station Features Page (handset locator only) / Registration Power LED: blue color In use LED: white color 1. Antenna a. The antenna port has a reversed thread connector; to remove antenna or cable, turn counterclockwise; to install, turn clockwise. Improper installation may damage the connector. b. When using an outdoor antenna, locate the antenna (not the base station itself) as high as possible for a clear transmission path. 2. LED a.
Charger Illustration Charger Features 1. DC In Connects to Charger AC Adaptor. 2. Handset Charging Slot a. Charge handset battery when handset is placed in cradle. b. Refer to the handset LCD for charging status (1) Charging: battery status bar is running and the LCD screen will show : “Charging”. (2) Fully Charged: battery status bar stands still and the LCD screen will display “Charge Complete” (3) Charge Fail: If there are any errors during charging mode, the LCD screen will display “Charge Fail” 3.
Getting Started Handset and Charger Installation Base Station Installation 1. There are three possible base station setups: Base station alone Base station plus telephone answering device Base station plus standard telephone Plug the transformer end of the Charger AC/DC adaptor into a standard AC electric power outlet, plug the other end into the “DC In” jack on the back of the Charger. 2. Install battery pack onto the handset. 3. Install handset antenna. 4. Place handset onto the charger slot.
3. Basic Operations Menu Tree Operation Modes Both the base station and handset have levels of operation at which time only certain procedures of functions can be performed. A. Base Operation Modes 1. STANDBY mode- this is the default mode. The page key is active in standby mode only. The base “Power” (blue color) LED will light up during this mode. 2. TALK mode- the base station operates in this mode during phone call. The “In Use” (white color) LED will light up during this mode. 3.
1. Press key followed by a two-digit handset ID or Group ID. Making a Telephone Call 1. Press number. , wait for dial tone, and then enter phone 2. Alternatively, you can enter phone number first then press key. When using this method, you can use the CLEAR (Left) and DELETE (Right) soft keys to edit the number entered. “Delete” erases the last digit entered. “Clear” erases the entire line but remains in the dial-and send dialing. 3. Speed dial by accessing the entries in the phone book (Menu 2) a.
speaking of the broadcast. d. Release key to end the broadcasting. If the handset is on the charger cradle (ringer will be temporarily switched to “Ring” if it has been set to “Vibrate”), lift the handset and press key to start conversation. 3. Broadcasting to an individual handset a. Enter the Handset ID and then press and hold key (left top corner of keys). b. Hear a long “Du…” sound while the initiating handset broadcast all handsets within communication coverage. c.
Ending a Call To end a telephone or intercom call, press cradle. 2. key, or place handset into charger 3. Adjusting Handset Receiver (Earpiece) Voice Volume back to standby, then other handsets can press or to pick this held call. Handset LCD displays a call is on hold. An alert tone (double beep) will occur every 30 seconds to remind the handset user that a call is still on hold. If the operation (e.g., call transfer) after putting a call on-hold fails, the held call may be dropped. 1.
2. To unlock the keypad, press the UNLOCK (Left) soft key, then, within 2 seconds, press the digit “*” to unlock. Advanced Operations Handset Registration 3. Once returning back to standby mode for 15 seconds, the Keyguard will automatically re-enable. 4. Key Guard is in effect until unlocked. Battery Recharge and Replacement 1. Charge the battery when one or several of the following things happen: a. Phone beeps twice (every 60 seconds in talk mode, every 10 minutes in standby mode). b.
registration, the handset display will show “Please register”. Notes: 1. The handset can change group affiliations at any time. 2. The base station is not responsible for group assignments. Consequently, it cannot de-subscribe a handset from a group. 3. When an intercom caller enters a group ID, all handsets subscribed to this group will ring. The first handset to answer will establish a link with the caller. Afterward, it is a one-to-one call, not a one-to-many call. Notes: 1.
automatically. See table below for a list of available characters and their orders. For example, press 2 once for the character “A”, twice for “B”, etc. Notes: If the destination handset does not answer after handset paging or transferring times out, the call is routed back to the originating handset. Notes: 1. When entering a phone number, the cursor automatically advances to the next digit field.
5. Character Table: Key 1 2 3 4 5 6 7 8 9 0 * # b. Press OPTION (Right) soft key to enter the option menu. Characters and Orders ‘+,.*()&1 ABC2 DEF3 GHI4 JKL5 MNO6 PQRS7 TUV8 WXYZ9 0 Caps – when in character editing. *– when in number editing. Space & # – when in character editing # & P (Pause) – when in number editing c. Press 1 to erase the intended phone entry. d. LCD will show “Delete entry?” Press YES (Left) soft key to confirm your change. 8. To edit a phonebook entry: a.
Re : “00” means all handsets iv. During phonebook transferring, LCD shows “Sending” and 2-digit countdown on the LCD will indicate the remaining phonebook numbers which are still pending to be sent. c. For the phone that is to receive the phonebook, press 2 to enter receiving mode. i. When entering the receiving mode, the LCD will show “Ready”. ii. To start to receiving the phonebook, the LCD will show “Get phonebook from Ext. # : xx” (the handset ID that will be doing the sending). iii.
b. Press SELECT left soft key to confirm your selection for receiving or blocking line calls. Press CHANGE left soft key to switch between On and Off of this setting. Re: “On” means to be able to receive calls from outside line; “Off” means to restrict calls from outside line. The default setting is “On”. c, Press SELECT left soft key to confirm your selection for receiving or blocking intercom calls. Press CHANGE left soft key to switch between On and Off of this setting.
b. Delete call log: Caller ID 1. Contact with your local phone company to subscribe to this feature. The phone system receives and displays Caller ID information transmitted by your local phone company. This information may include the calling phone number, name, date, and time. This unit can store up to 50 calls of caller ID information. 2. The display will show the date and time of call on the first line, followed by the name on the second line, and the phone number on the third line.
2. If the handset still indicates the icon even after you have listened to all messages, turn it off by pressing and holding the “Caller ID” key on the handset. Adjust Handset Microphone Gain (sensitivity) The microphone gain setting option is provided so you can adjust microphone sensitivity custom to your workplace environment (such as a loud, noisy environment etc.). Note: You may also want to adjust earpiece settings as well if the workplace environment is extremely loud. a.
Menu Operations 1. Press MENU right soft key to enter menu mode while the phone is in standby mode. Re: You can either press or , followed by SELECT left soft key to confirm the selected menu. Or Press the digit directly to confirm the selected menu. For example, press MENU right soft key followed by 4 and 1 to select Ring Volume. 2. Press 1 to select KeyGuard (see Key Guard operation on page 34 ). 3. Press 2 to add, delete, edit, view and edit the phonebook (see Phonebook instructions on page 39 ).
(2) (3) (4) (5) (6) b. c. d. e. 6. Press Press Press Press Off. If “On” is selected, the handset is prompted to enter the prefix number (up to 14 digits can be entered). Use Delete right soft key to delete the prefix number. Press SAVE left soft key to confirm the selection. When this feature is turned on, the LCD will prompt the user “Dial Prefix? Yes or No”. On each outgoing phone call from call logs, phonebook, and dial-and-send dialing, the current prefix is also displayed.
(1) Enter the DTMF duration (90~200ms), press OK left soft key to confirm b. the setting. Default is 100ms. Re: Please check with your dealer before changing. If the duration does not match with the PSTN or PBX setting, some or all of the DTMF digits you press may not be recognized. Press 2 select flash key timing. Default is 600ms. To avoid users changing phone settings such as Call Settings (MENU-4), Phone Settings (MENU-5) and Base Settings (MENU-6), you can hide these menus.
Call Waiting with Caller ID, 15, 55 Cardiac Pacemaker, 4 Change PIN, 18, 19, 56 Charger Features, 24 Charger Illustration, 23 Index 2 2-Way Intercom, 14, 29 A Adjusting Receiver (Earpiece) Voice Volume, 33 Adjusting Handset Speakerphone Voice Volume, 33 Adjust Handset Microphone Gain, 50 Adjust Headset Ring, 51 B Base ID, 48 Base Illustration, 21 Base Operation, 27 Base PIN, 18, 19, 20 Base Station, 5, 6, 9, 10, 14, 15, 20, 22, 25, 26, 27, 28, 30, 36, 43 Base Station Features, 22 Base Station Installation,
Key Guard, 34, 53 Key Tone, 17, 53 Key Volume, 53 Regulatory Information, 8 REN, 8 Reset Button, 22 Ringer, 14, 15, 20, 31, 32, 34, 51, 53 Ringer Volume, 14, 15 RSSI, 13 L Line Jack, 22 Lithium-Ion (Li-Ion), 7, 10 Line Reversal, 56 S Safety Instructions, 4 Set Time, 20 SILENT, 15, 32, 34 Spare Battery, 10 Speed Dial, 29 Speakerphone, 14, 30, 31, 33, 48 Subscribe BS, 49 M Making a Broadcast, 30 Making a Telephone Call, 29 Making an 2-Way/ Intercom Call, 29 Memory, 27 Menu Display, 18, 57 Menu Mode, 27, 5
Technical Specifications Electrical Specifications Frequency FCC Part 68 Statement Channel Spacing Number of Channels Modulation Multiple Access Frequency Hopping Rate TDD Frame Length Number of Slots/Frame Receiver Sensitivity Base Station 902-928 MHz Peak: 27 dBm Average: 21 dBm 101 kHz 252 Differentially Encoded MSK Frequency Hopping TDD 100 per second 10 ms 4 <-111dBm (@ BER 10-2) Portable Handset 902-928 MHz Peak: 26 dBm Average: 20 dBm 101 kHz 252 Differentially Encoded MSK Frequency Hopping TDD 1
Address: 3F, No. 529, Chung Cheng Rd., Hsintien, Taipei, Taiwan, R.O.C. Tel no.: 886-3-328-9289 If the equipment is causing harm to the telephone network, the telephone company may request that you disconnect the equipment until the problem is resolved. Connection to party line service is subject to state tariffs. Contact the state public utility commission, public service commission or corporation commission for information.