ESR6650 3G Wireless Router Ultra Speed (IEEE 802.
TABLE OF CONTENTS 1. INTRODUCTION .............................................................................................................................................. 1 1.1. 1.2. 1.3. 1.4. 2. SUMMARY ............................................................................................................................... 1 KEY FEATURES ....................................................................................................................... 2 PACKAGE CONTENTS .................
Revision History Version Date Notes 1.
1. Introduction 1.1. Summary Congratulations on your purchase of ESR6650 3G Wireless Router. ESR6650 is compatible with the most popular 3G standards and 802.11g & 802.11b gadgets. ESR6650 is not only a Wireless Access Point, but also doubles as a 4-port full-duplex Switch that connects your wired-Ethernet devices together at incredible speeds.
1.2. Key Features Features 3G Data Card Support Advantages Allows user to share 3G network among multiple users. It supports WCDMA (HSDPA), CDMA2000 and TD-SCDMA. Incredible Data Rate up to 150Mbps** Heavy data payloads such as MPEG video streaming IEEE 802.11b/g Compliant Fully Interoperable with IEEE 802.11b / IEEE 802.11g compliant devices with legacy protection Four 10/100 Mbps Fast Switch Ports Scalability, extend your network.
1.3. Package Contents Open the package carefully, and make sure that none of the items listed below are missing. Do not discard the packing materials, in case of return; the unit must be shipped back in its original package. 1. SOHO Router 2. 100V or 240V Power Adapter 3. 2dBi 2.4GHz SMA Upgradable Antennas x 1 pcs 4. Quick Install Guide 5. CAT 5 UTP Cable 6.
1.4.
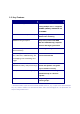
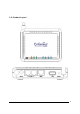
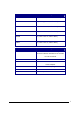
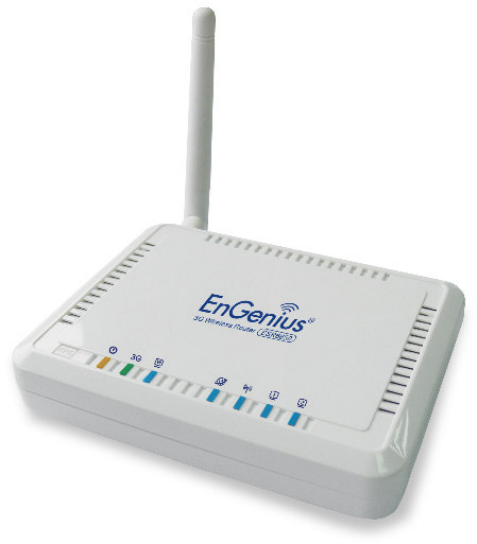
LED Description Power 1 ( On-> red Test/reset default->blink) 3G 1 ( Link-> green on, traffic->blink) WAN 1 ( Link-> blue on, traffic->blink) Internet 1 ( Link-> blue on, traffic->blink) WLAN 1 ( Link-> blue on, traffic->blink) LAN1 1 ( Link-> blue on, traffic->blink) Interface Description Reset Push this button to restart the system Press this button and hold for 10 seconds to reset to default. WPS Push this button once to start WPS.
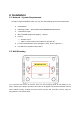
2. Installation 2.1. Network + System Requirements To begin using the ESR6650, make sure you meet the following as minimum requirements: PC/Notebook. Operating System – Microsoft Windows 98SE/ME/XP/2000/VISTA 1 Free Ethernet port. WiFi card/USB dongle (802.11b/g/n) – optional. Internet o 3G data card or o ADSL or Cable modem with an Ethernet port (RJ-45). PC with a Web-Browser (Internet Explorer, Safari, Firefox, Opera etc.) Few Ethernet compatible CAT5 cables. 2.2.
2.3. ESR6650 Placement You can place ESR6650 on a desk or other flat surface, or you can mount it on a wall. For optimal performance, place your Wireless Router in the center of your office (or your home) in a location that is away from any potential source of interference, such as a metal wall or microwave oven. This location must be close to a power connection and your ADSL/Cable modem. If the antennas are not positioned correctly, performance loss can occur.
2.4. Setup LAN & 3G (WAN) LAN connection: Connect Ethernet cable between your PC/Notebook LAN port & one of the 2 available LAN ports on ESR6650. 3G connection: Plug-in your 3G data card into USB port if you would like to access Internet through 3G network. Contact your ISP if you have any questions concerning the access account and password. ADSL (Cable Modem): Connect Ethernet cable between WAN ports of your ADSL/CABLE modem & WAN port of ESR6650. Make sure your ADSL/CABLE modem is working well.
2.5. PC Network Adapter setup (Windows XP) • Enter [Start Menu] select [Control panel] select [Network].
• Select [Internet Protocol (TCP/IP)] =>Click [Properties]. • Select the [General] tab. ESR6650 supports [DHCP] function, please select both [Obtain an IP address automatically] and [Obtain DNS server address automatically].
2.6. Bring up ESR6650 Connect the supplied power-adapter to the power inlet port and connect it to a wall outlet. Then, ESR6650 automatically enters the self-test phase. During self-test phase, Power LED will blink briefly, and then will be lit continuously to indicate that this product is in normal operation.
3. Smart Wizard Click to enter mode selection. Select the mode that ESR6650 is going to be and set its configurations. AP Repeater mode does not enable WAN interface, Setup Wizard will skip WAN Configuration. Click to automatically detect your Internet Network settings.
You could choose your service type or select Others to setup WAN configurations manually. Smart Wizard has detected DHCP client. Configure the host name and MAC address of ESR6650. Click Next to proceed. Smart Wizard has finished setting up WAN Configuration. Click to proceed.
Enter the name for your wireless network (SSID) and security key Click to proceed To apply the entire configuration, click . NOTE: After Wireless settings are applied, you need to connect from your WLAN client with the security settings you just finished configuring. Remember the type of security & security key.
4. Initial Setup ESR6650 ESR6650 uses web-interface for configuration to be accessed through your web browser, such as Internet Explorer or Firefox. - LOGIN Procedure 1. OPEN your browser (e.g. Internet Explorer). 2. Type http://192.168.0.1 in address bar and hit [Enter] button on your keyboard.
3. Click to navigate into ESR6650 configuration home page. 4. You will see the home page of ESR6650 as follows.
5. AP Router Mode 5.1. System - Status This page allows you to monitor the current status of your router. System: You can see the Uptime, hardware information, serial number as well as firmware version information. WAN Settings: This section displays whether the WAN port is connected to a Cable/DSL connection. It also displays the router’s WAN IP address, Subnet Mask, ISP Gateway, MAC address and the Primary DNS.
LAN Settings: This section displays the Router LAN port’s current information. It also shows whether the DHCP Server function is enabled / disabled. WLAN Settings: This section displays the current WLAN configuration settings. Wireless configuration details such as SSID, Security settings, BSSID, Channel number and mode of operation are briefly shown. - LAN The LAN Tabs reveals LAN settings which can be altered at will. If you are an entry level user, try accessing a website from your browser.
LAN IP IP address: 192.168.0.1. It is the router’s LAN IP address (the “Default Gateway” IP address of your LAN clients). It can be changed based on your own choice. IP Subnet Mask: 255.255.255.0 Specify a Subnet Mask for your LAN segment. 802.1d Spanning Tree: This is disabled by default. If 802.1d Spanning Tree function is enabled, this router will use the spanning tree protocol to prevent network loops. DHCP Server DHCP Server: This can enable or disable the Dynamic Pool setting.
Start IP: This is the beginning of the IP pool for DHCP client hosts. End IP:. This is the end of the IP pool for DHCP client hosts Domain name: The Domain Name for the existing or customized network.
- DHCP View the current LAN clients which are assigned with an IP Address by the DHCP-server. This page shows all DHCP clients (LAN PCs) currently connected to your network. The table shows the assigned IP address, MAC address and expiration time for each DHCP leased client. Use the button to update the available information. Hit to get the updated table. You can check “Enable Static DHCP IP“. It is possible to add more static DHCP IPs.
- Schedule This page allows users to set up schedule function for Firewall and Power Saving . Edit schedule options to allow configuration of firewall and power savings services. Fill in the schedule and select type of service. Click to keep the settings.
The schedule table lists the pre-schedule service-runs. You can select any of the schedule record using the check box.
- Event Log View operation event log. This page shows the current system log of the Router. It displays any event occurred after system start up. At the bottom of the page, the system log can be saved to a local file for further processing or the system log can be cleared or it can be refreshed to get the most updated information. When the system is powered down, the system log will be cleared if not saved to a local file.
- Monitor Show histogram for network connection on WAN, LAN & WLAN. Auto refresh keeps information updated frequently. - Language This Wireless Router support multiple language of web pages, You could select your native language here.
5.2. Wizard Click Wizard to configure the Router. Setup wizard will now be displayed; check that the modem is connected and click . The details please refer to Smart Wizard .
5.3. INTERNET ESR6650 supports both 3G and ADSL for Internet access. Please note that 3G (USB interface) network by default is the preferred Internet option. Therefore, in case you have both 3G and ADSL connection setup, ESR6650 will automatically use 3G for Internet access. Please note that inserting 3G data card will switch off ADSL connection immediately. If you prefer to use ADSL for Internet access, do not insert 3G data card into the USB socket.
- Dynamic IP Use the MAC address when registering for Internet service, and do not change it unless required by your ISP. If your ISP used the MAC address of the Ethernet card as an identifier, connect only the PC with the registered MAC address to the Router and click the button. This will replace the current MAC address with the already registered Ethernet card MAC address. Host Name: This is optional.
- Static IP If your ISP Provider has assigned a fixed IP address, enter the assigned IP address, Subnet mask, Default Gateway IP address, and Primary DNS and Secondary DNS (if available) of your ISP provider.
- Point-to-Point over Ethernet Protocol (PPPoE) Login / Password: Enter the PPPoE username and password assigned by your ISP Provider. Service Name: This is normally optional. Maximum Transmission Unit (MTU): This is the maximum size of the packets. Type: Enable the Automatic Connection option to automatically re-establish the connection when an application attempts to access the Internet again.
- Point-to-Point Tunneling Protocol (PPTP) PPTP allows the secure connection over the Internet by simply dialing in a local point provided by your ISP provider. The following screen allows client PCs to establish a normal PPTP session and provides hassle-free configuration of the PPTP client on each client PC. Click to save configuration and connect to ISP provider.
- 3G Network ISP: It shows a list of supported 3G Network Internet Service Provider. APN Code: Enter APN if ISP requires it. Dial Number: Enter phone number if ISP requires it. User Name: Enter 3G network account / username Password: Enter 3G network account password Type: Keep Connection: Keep connection with or without the presence of traffic. Automatic Connection: Connect when traffic is detected.
5.4. Wireless Settings - Basic In basic setting page, you can set wireless Radio, Mode, Band, SSID, and Channel. Radio: You can turn on/off wireless radio. If wireless Radio is off, you cannot associate with AP through wireless. Mode: In this device, we support three operation modes which are AP router and AP route with WDS. If you choose AP Router Mode, you can select AP or WDS function in the drop-down menu. Band: You can select the wireless standards running on your network environment. 2.
ESSID1~4: ESSID is the name of your wireless network. It might be a unique name to identify this wireless device in the Wireless LAN. It is case sensitive and up to 32 printable characters. You might change the default ESSID for added security. Auto Channel: Device will search all valid channels, then select a cleanest channel and change to this channel if you enable this function. Depend on this function is enabled or not, you will see different items below Auto Channel.
- WDS with AP Router Wireless Distribution System, a system that enables the wireless interconnection of access point, allows a wireless network to be extended using multiple APs without a wired backbone to link them. Each WDS AP needs same channel and encryption type settings. MAC address 1~4: Please enter the MAC address(es) of the neighboring APs which participate in WDS. There can be maximum of 4 devices now. Set Security: WDS Security depends on your AP security settings.
Fragment Threshold: This specifies the maximum size of a packet during the fragmentation of data to be transmitted. If you set this value too low, it will result in bad performance. RTS Threshold: When the packet size is smaller than the RTS threshold, the wireless router will not use the RTS/CTS mechanism to send this packet. Beacon Interval: This is the interval of time that this wireless router broadcasts a beacon. A Beacon is used to synchronize the wireless network.
Data Rate: The “Data Rate” is the rate that this access point uses to transmit data packets. The access point will use the highest possible selected transmission rate to transmit the data packets. N Data Rate: The “Data Rate” is the rate that this access point uses to transmit data packets for N compliant wireless nodes. Highest to lowest data rate can be fixed. Channel Bandwidth: This is the range of frequencies that will be used.
- Security This Access Point provides complete wireless LAN security functions, included are WEP, IEEE 802.1x, IEEE 802.1x with WEP, WPA with pre-shared key and WPA with RADIUS. With these security functions, you can prevent your wireless LAN from illegal access. Please make sure your wireless stations use the same security function, and are setup with the same security key. ESSID Selection: This Router support multiple ESSID, you could select and set up the wanted ESSID.
IEEE 802.1x is an authentication protocol. Every user must use a valid account to login to this Access Point before accessing the wireless LAN. The authentication is processed by a RADIUS server. This mode only authenticates users by IEEE 802.1x, but it does not encrypt the data during communication. WEP Encryption When you select 64-bit or 128-bit WEP key, you have to enter WEP keys to encrypt data. You can generate the key by yourself and enter it.
Authentication Type: There are two authentication types: "Open System" and "Shared Key". Both AP and wireless client must be configured with the same authentication type. Key Length: You can select the WEP key length for encryption, 64-bit or 128-bit. The larger the key will be the higher level of security is used, but the throughput will be lower. Key Type: You may select ASCII Characters (alphanumeric format) or Hexadecimal Digits (in the "A-F", "a-f" and "0-9" range) to be the WEP Key.