WPA-Radius Encryption Wi-Fi Protected Access (WPA) is an advanced security standard. You can use an external RADIUS server to authenticate wireless stations and provide the session key to encrypt data during communication. It uses TKIP or CCMP (AES) to change the encryption key frequently. Press button when you are done.
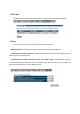
- MAC Address Filtering This wireless router supports MAC Address Control, which prevents unauthorized clients from accessing your wireless network. Enable wireless access control: Enable the wireless access control function Adding an address into the list Enter the "MAC Address" and "Description" of the wireless station to be added and then click . The wireless station will now be added into the "MAC Address Filtering Table" below.
WPS is the simplest way to establish a connection between the wireless clients and the wireless router. You don’t have to select the encryption mode and fill in a long encryption passphrase every time when you try to setup a wireless connection. You only need to press a button on both wireless client and wireless router, and the WPS will do the rest for you. The wireless router supports two types of WPS: WPS via Push Button and WPS via PIN code.
Authentication Mode: It shows the active authentication mode for the wireless connection. Passphrase Key: It shows the passphrase key that is randomly generated by the wireless router during the WPS process. You may need this information when using a device which doesn’t support WPS. Interface: If device is set to repeater mode, you can choose “Client” interface to connect with other AP by using WPS, otherwise you may choose “AP” interface to do WPS with other clients.
- Client List This WLAN Client Table shows the Wireless client associate to this Wireless Router. - Policy The Router can allow you to set up the Wireless Access Policy. WAN Connection: Allow Wireless Client on specific SSID to access WAN port. Communication between Wireless clients: Allow Wireless Client to communicate with other Wireless Client on specific SSID.
5.5. Firewall Settings The Router provides extensive firewall protection by restricting connection parameters, thus limiting the risk of hacker attacks, and defending against a wide array of common Internet attacks. However, for applications that require unrestricted access to the Internet, you can configure a specific client/server as a Demilitarized Zone (DMZ). Note: To enable the Firewall settings select Enable and click Apply - Advanced You can allow the VPN packets to pass through this Router.
packets going to your WAN port IP address to a particular IP address in your LAN. The difference between the virtual server and the DMZ function is that the virtual server re-directs a particular service/Internet application (e.g. FTP, websites) to a particular LAN client/server, whereas DMZ re-directs all packets (regardless of services) from your WAN IP address to a particular LAN client/server.
- Denial of Service (DoS) The Router's firewall can block common hacker attacks, including Denial of Service, Ping of Death, Port Scan and Sync Flood. If Internet attacks occur the router can log the events. Ping of Death: Protections from Ping of Death attack. Discard Ping From WAN: The router’s WAN port will not respond to any Ping requests Port Scan: Protects the router from Port Scans. Sync Flood: Protects the router from Sync Flood attack.
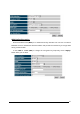
- MAC Filter If you want to restrict users from accessing certain Internet applications / services (e.g. Internet websites, email, FTP etc.), and then this is the place to set that configuration. MAC Filter allows users to define the traffic type permitted in your LAN. You can control which PC client can have access to these services. Enable MAC Filtering: Check to enable or disable MAC Filtering.
Add PC MAC Address Fill in “LAN MAC Address” and of the PC that is allowed / denied to access the Internet, and then click . If you find any typo before adding it and want to retype again, just click and the fields will be cleared. Remove PC MAC Address If you want to remove some PC from the "MAC Filtering Table", select the PC you want to remove in the table and then click . If you want to remove all PCs from the table, just click the button.
- IP Filter Enable IP Filtering: Check to enable or uncheck to disable IP Filtering. Deny: If you select “Deny” then all clients will be allowed to access Internet except for the clients in the list below. Allow: If you select “Allow” then all clients will be denied to access Internet except for the PCs in the list below. Add PC IP Address You can click PC to add an access control rule for users by an IP address or IP address range.
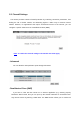
- URL Filter You can block access to some Web sites from particular PCs by entering a full URL address or just keywords of the Web site. Enable URL Blocking: Enable or disable URL Blocking Add URL Keyword Fill in “URL/Keyword” and then click . You can enter the full URL address or the keyword of the web site you want to block. If you happen to make a mistake and want to retype again, just click "Reset" and the field will be cleared.
Remove URL Keyword If you want to remove some URL keywords from the "Current URL Blocking Table", select the URL keyword you want to remove in the table and then click . If you want remove all URL keywords from the table, click button. If you want to clear the selection and re-select again, just click .
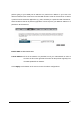
5.6. Advanced Settings - Network Address Translation (NAT) Network Address Translation (NAT) allows multiple users at your local site to access the Internet through a single Public IP Address or multiple Public IP Addresses. NAT provides Firewall protection from hacker attacks and has the flexibility to allow you to map Private IP Addresses to Public IP Addresses for key services such as Websites and FTP. Select Disable to disable the NAT function.
Enable Port Mapping: Enable or disable port mapping function. Description: description of this setting. Local IP: This is the local IP of the server behind the NAT firewall. Protocol: This is the protocol type to be forwarded. You can choose to forward “TCP” or “UDP” packets only, or select “BOTH” to forward both “TCP” and “UDP” packets. Port Range: The range of ports to be forward to the private IP.
If you want to remove a Port Mapping setting from the "Current Port Mapping Table", select the Port Mapping setting that you want to remove in the table and then click D. If you want to remove all Port Mapping settings from the table, click button. Click will clear your current selections. Click at the bottom of the screen to save the above configurations.
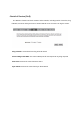
Enable Port Forwarding: Enable or disable Port Forwarding. Description: The description of this setting. Local IP / Local Port: This is the LAN Client/Host IP address and Port number that the Public Port number packet will be sent to. Protocol: Select the port number protocol type (TCP, UDP or both). If you are unsure, then leave it to the default “both” setting.
- Port Triggering (Special Applications) Some applications require multiple connections, such as Internet games, video Conferencing, Internet telephony and others. In this section you can configure the router to support multiple connections for these types of applications. Enable Trigger Port: Enable or disable the Port Trigger function. Trigger Port: This is the outgoing (Outbound) range of port numbers for this particular application.
(1-5) in the “Add” selection box and then click the button. This will automatically list the Public Ports required for this popular application in the location (1-5) you specified. Add Port Triggering Fill in the "Trigger Port", "Trigger Type”, “Public Port”, "Public Type", "Public Port" and "Description" of the setting to be added and then Click . The Port Triggering setting will be added into the "Current Trigger-Port Table" below.
- UPNP With UPnP, all PCs in you Intranet will discover this router automatically. So, you don’t have to configure your PC and it can easily access the Internet through this router. Enable/Disable UPnP: You can enable or Disable the UPnP feature here. After you enable the UPnP feature, all client systems that support UPnP, like Windows XP, can discover this router automatically and access the Internet through this router without having to configure anything.
61
- Quality of Service (QoS) QoS can let you classify Internet application traffic by source/destination IP address and port number. You can assign priority for each type of application and reserve bandwidth for it. The packets of applications with higher priority will always go first. Lower priority applications will get bandwidth after higher priority applications get enough bandwidth. This can let you have a better experience in using critical real time services like Internet phone, video conference …etc.
High/Low Priority Queue: This can put the packets in the protocol and port range to High/Low QoS Queue. Bandwidth Allocation: This can reserve / limit the throughput of specific protocols and port range. You can set the upper bound and Lower bound. Type: Specify the direction of packets. Upload, download or both. IP range: Specify the IP address range. You could also fill one IP address Protocol: Specify the packet type. The default ALL will put all packets in the QoS priority Queue.
Policy: Specify the policy the QoS, Min option will reserve the selected data rate in QoS queue. Max option will limit the selected data rate in QoS queue. Rate: The data rate of QoS queue. Disabled: This could turn off QoS feature.
- Routing You can set enable Static Routing to let the router forward packets by your routing policy. Destination LAN IP: Specify the destination LAN IP address of static routing rule. Subnet Mask: Specify the Subnet Mask of static routing rule. Default Gateway: Specify the default gateway of static routing rule. Hops: Specify the Max Hops number of static routing rule. Interface: Specify the Interface of static routing rule.
5.7. TOOLS Settings - Admin You can change the password required to log into the Router's system web-based management. By default, the password is: admin. Passwords can contain 0 to 12 alphanumeric characters, and are case sensitive. Old Password: Fill in the current password to allow changing to a new password.
Remote management This allows you to designate a host in the Internet the ability to configure the Router from a remote site. Enter the designated host IP Address in the Host IP Address field. Host Address: This is the IP address of the host in the Internet that will have management/configuration access to the Router from a remote site. If the Host Address is left 0.0.0.0 this means anyone can access the router’s web-based configuration from a remote location, providing they know the password.
The Time Zone allows your router to reference or base its time on the settings configured here, which will affect functions such as Log entries and Firewall settings. Time Setup: Synchronize with the NTP server Time Zone: Select the time zone of the country you are currently in. The router will set its time based on your selection. NTP Time Server: The router can set up external NTP Time Server. Daylight Savings: The router can also take Daylight Savings into account.
PC Date and Time: This field would display the PC date and time. Daylight Savings: The router can also take Daylight Savings into account. If you wish to use this function, you must select the Daylight Savings Time period and check/tick the enable box to enable your daylight saving configuration. Click at the bottom of the screen to save the above configurations.
- DDNS DDNS allows you to map the static domain name to a dynamic IP address. You must get an account, password and your static domain name from the DDNS service providers. This router supports DynDNS, TZO and other common DDNS service providers. Enable/Disable DDNS: Enable or disable the DDNS function of this router Server Address: Select a DDNS service provider Host Name: Fill in your static domain name that uses DDNS. Username: The account that your DDNS service provider assigned to you.
- Power Saving power in WLAN mode can be enabled / disabled in this page. - Diagnosis This page could let you diagnosis your current network status.
- Firmware This page allows you to upgrade the router’s firmware. To upgrade the firmware of your Router, you need to download the firmware file to your local hard disk, and enter that file name and path in the appropriate field on this page. You can also use the Browse button to find the firmware file on your PC.
- Back-up This page allows you to save the current router configurations. When you save the configurations, you also can re-load the saved configurations into the router through the Restore Settings. If extreme problems occur you can use the Restore to Factory Defaults to set all configurations to its original default settings. Backup Settings: This can save the Router current configuration to a file named "config.bin" on your PC.
- Reset You can reset the Router when system stops responding correctly or stop functions.
6. Repeater Mode Repeater mode has limited settings compared to the AP mode. Choose “Repeater mode” on the top right corner of the configuration page. System restarts and connects to the IP address http://192.168..0.1 You will see the configuration homepage under “REPEATER” mode now.
6.1. System - Status System status section allows you to monitor the current status of your router. You can see the Uptime, hardware information, serial number as well as firmware version information. LAN Settings: This page displays the Router LAN port’s current LAN & WLAN information. WLAN Settings: Wireless configuration details such as SSID, Security settings, BSSID, Channel number, mode of operation are briefly shown. - LAN The LAN Tabs reveals LAN settings which can be altered at will.
IP address: It is the router’s LAN IP address (Your LAN clients default gateway IP address). It can be changed based on your own choice. IP Subnet Mask: Specify a Subnet Mask for your LAN segment. 802.1d Spanning Tree: This is disabled by default. If 802.1d Spanning Tree function is enabled, this router will use the spanning tree protocol to prevent network loops. - Schedule Add schedule, edit schedule options allow configuration of power savings services. Fill in the schedule and select type of service.
The schedule table lists the pre-schedule service-runs. You can select any of them using the check box.
- Event Log View operation log of ESR6650. This page shows the current system log of the Router. It displays any event occurred after system start up. At the bottom of the page, the system log can be saved to a local file for further processing or the system log can be cleared or it can be refreshed to get the most updated information. When the system is powered down, the system log will disappear if not saved to a local file.
Show the network packets histogram for network connection on WAN, LAN & WLAN. Auto refresh keeps information updated frequently. - Language This Wireless Router support multiple language of web pages, you could select your native language here.
6.2. Wireless -Basic You can set parameters that are used for the wireless stations to connect to this router. The parameters include Mode, ESSID, Channel Number and Associated Client. Radio: Enable or Disable Wireless function Band: Allows you to set the AP fixed at 802.11b, 802.11g or 802.11n mode. You can also select B+G mode to allow 802.11b and 802.11g clients at the same time. Enable ESSID: You can specify the maximum ESSID number. ESSID1~3: Allow you to specify ESSID of WLAN.
-Client List This WLAN Client Table shows the Wireless client associate to this Wireless Router.
The Router can allow you to set up the Wireless Access Policy. Communication between Wireless clients: Allow Wireless Client to communicate with other Wireless Client on specific SSID. Communication between Wireless clients and wired clients: Allow Wireless Client to communicate with other Wireless Client on specific SSID and Wired Client on the switch.
6.3. Tools - Admin You can change the password required to log into the Router's system web-based management. By default, the password is: admin. Passwords can contain 0 to 12 alphanumeric characters, and are case sensitive. Old Password: Fill in the current password to allow changing to a new password.
Remote management This allows you to designate a host in the Internet the ability to configure the Router from a remote site. Enter the designated host IP Address in the Host IP Address field. Host Address: This is the IP address of the host in the Internet that will have management/configuration access to the Router from a remote site. If the Host Address is left 0.0.0.0 this means anyone can access the router’s web-based configuration from a remote location, providing they know the password.
The Time Zone allows your router to reference or base its time on the settings configured here, which will affect functions such as Event Log entries and Schedule settings. Time Setup: Synchronize with the NTP server Time Zone: Select the time zone of the country you are currently in. The router will set its time based on your selection. NTP Time Server: This accept local the IP Address of Local NTP Time Server Address. Daylight Savings: The router can also take Daylight Savings into account.
PC Date and Time: This field would display the PC date and time. Daylight Savings: The router can also take Daylight Savings into account. If you wish to use this function, you must select the Daylight Savings Time period and check/tick the enable box to enable your daylight saving configuration. Click at the bottom of the screen to save the above configurations. - Power Saving power in WLAN mode can be enabled / disabled in this page.
- Diagnosis This page could let you diagnosis your current network status. - Firmware This page allows you to upgrade the router’s firmware. To upgrade the firmware of your Router, you need to download the firmware file to your local hard disk, and enter that file name and path in the appropriate field on this page. You can also use the Browse button to find the firmware file on your PC.
Once you’ve selected the new firmware file, click at the bottom of the screen to start the upgrade process 89
- Back-up The page allows you to save (Backup) the router’s current configuration settings. When you save the configuration setting (Backup) you can re-load the saved configuration into the router through the Restore selection. If extreme problems occur you can use the Restore to Factory Defaults selection, this will set all configurations to its original default settings (e.g. when you first purchased the router). Backup Settings: This can save the Router current configuration to a file named "config.
91
Appendix A – FCC Interference Statement Federal Communication Commission Interference Statement This equipment has been tested and found to comply with the limits for a Class B digital device, pursuant to Part 15 of the FCC Rules. These limits are designed to provide reasonable protection against harmful interference in a residential installation.
This device complies with RSS-210 of the Industry Canada Rules. Operation is subject to the following two conditions: (1) This device may not cause harmful interference, and (2) this device must accept any interference received, including interference that may cause undesired operation. IMPORTANT NOTE: Radiation Exposure Statement: This equipment complies with IC radiation exposure limits set forth for an uncontrolled environment.