
User's Manual


Prepared by KM 11/2015 10 Patent pending
14407 Coil Plus Dr, Unit A | Plaineld, IL 60544
www.sennco.com | techsupport@sennco.com
815.577.3400 | Toll free 866.736.6261
Mon - Fri 9AM - 5PM CST
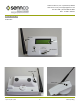
III. Set Up
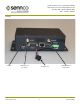
1. Insert bolts through holes in cradle mounng plate. Thread a T nut onto each bolt.
2. Place cradle mounng plate into posion on the xture. The T nuts should be turned to allow them to t through the track. Make sure that
the large opening in the cradle mounng plate is at the top le.
3. From underneath the xture, turn the T nuts perpendicular to the track so they will no longer pass through it.
4. While holding the T nuts in place, use a screwdriver to turn the bolts clockwise unl ghtened down.
5. The slot in the center post of the cradle mounng plate should be open at the top and the large opening in the cradle mounng plate should
be at the top le.
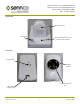
6. Find the cordwinder. Clean the top of the cordwinder box where the cable exits using an alcohol wipe. Dry it with a clean cloth.
7. Peel the backing o of the cordwinder mounng adhesive and secure the adhesive to the cordwinder. Press rmly for about 15 seconds for
a strong adhesive bond.
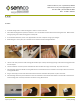
8. Using an alcohol wipe, clean the area underneath the xture where the cordwinder will be placed. Dry with a clean cloth.
9. Peel the backing o of the top of the adhesive and secure the cordwinder to the underside of the xture so that the cable is centered in the
cradle mounng plate. Press rmly for about 15 seconds for a strong adhesive bond.
A. Cradles