Wireless TV Listening System Set 840-TV Instruction manual
I 1 1 2 4 3 5
II B 6 A 7 0 8 9 C D G E F
Contents Contents Safety instructions ................................................................. 2 Delivery includes ..................................................................... 4 Product overview .................................................................... 5 Putting the Set 840-TV system into operation ............... 6 Setting up the transmitter ............................................... 6 Connecting the transmitter to a sound source ............
Safety instructions Safety instructions • • • • • • • • • • • • 2 Please read this instruction manual carefully and completely before using the products. Make this instruction manual easily accessible to all users at all times. Always include this instruction manual when passing the products on to third parties. Do not use the products in situations which require special attention (e.g. when performing skilled jobs). Always keep the products dry and do not expose them to extreme temperatures.
Safety instructions Intended use Intended use includes • having read this instruction manual, especially the chapter “Safety instructions” on page 2, • using the products within the operating conditions and limitations described in this instruction manual. “Improper use” means using the products other than as described in this instruction manual, or under operating conditions which differ from those described herein.
Delivery includes Delivery includes The Set 840-TV system is available as an EU and a US version. The following table shows which items are included with the respective version. Components of the Set 840-TV system 1 RR 840 stethoset receiver with BA 300 Lithium-Polymer rechargeable battery 1 TI 840 transmitter with integrated charging compartments 1 NT 13 mains unit with 2 country adapters (EU, UK) 1 country adapter (US) 1 connection cable with two 3.
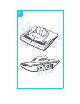
Product overview Product overview The overview pictures of the stethoset receiver and the transmitter can be found on the inside front cover of this instruction manual.
Putting the Set 840-TV system into operation Putting the Set 840-TV system into operation Setting up the transmitter 왘 Choose a suitable place near your sound source (e.g. TV). 왘 Do not place the transmitter close to metal objects such as shelf bars, reinforced concrete walls, etc. as this can decrease the transmitter’s range. It is not necessary that the transmitter and stethoset receiver are in the same room, so you can move around freely in the home or outside in the garden.
Putting the Set 840-TV system into operation Connecting the transmitter to a sound source 왘 Switch your sound source (e.g. TV) off before connecting the transmitter. C I 왘 Plug one end of the connection cable I into the blue socket C of the transmitter. 왘 Check the available connection possibilities of your sound source (e.g.
Putting the Set 840-TV system into operation A Connecting the transmitter to a headphone socket 왘 Plug the other end of the connection cable I into the headphone socket on your sound source. J I Is the plug on the connection cable too small for the headphone socket? 왘 Plug the adapter to ¼” (6.3 mm) jack socket J onto the connection cable I. 왘 Adjust the volume of the headphone socket on your sound source to a medium level. This improves the quality of wireless sound transmission.
Putting the Set 840-TV system into operation C Connecting the transmitter to a SCART socket 왘 Plug the SCART adapter L onto the connection cable I. 왘 Connect the SCART adapter L to the SCART socket on your TV. L I If your TV has several SCART sockets, use the socket SCART output. D Using the MKE 800 TV-N external microphone What if your sound source doesn’t have any of the connections mentioned above? You can then use the optional MKE 800 TV-N microphone.
Putting the Set 840-TV system into operation To connect the MKE 800 TV-N microphone: 왘 If possible, adhere the supplied Velcro tape directly in front of the loudspeaker of your TV. 왘 Press the microphone onto the Velcro tape. 왘 Connect the jack plug of the microphone to the blue socket C of the transmitter. You can change the sound by varying the position of the microphone in front of the loudspeaker.
Putting the Set 840-TV system into operation Connecting the transmitter to the mains The EU and UK country adapters are included with the EU version of the Set 840-TV; the US country adapter is included with the US version of the Set 840-TV. 왘 Slide the supplied country adapter N onto the mains unit M. 왘 Connect the yellow connector of the mains unit to the yellow socket G of the transmitter. 왘 Plug the mains unit M into a wall socket. The operation indicator 0 on the transmitter lights up green.
Using the Set 840-TV system Using the Set 840-TV system To switch the Set 840-TV system on, proceed as follows: Sequence of steps Page 1. Switch your sound source (e.g. TV) on. 12 2. Adjust the volume on the receiver to a low level. 14 3. Switch the receiver on. 13 4. Adjust the desired volume on the receiver. 14 5. If necessary, set a different channel on the transmitter. 15 Switching the transmitter on/off To switch the transmitter on: 왘 Switch your sound source on.
Using the Set 840-TV system Switching the receiver on/off CAUTION! Hearing damage due to high volumes! This receiver allows you to set higher volumes than conventional headphones. This can cause hearing damage in persons with healthy hearing and especially in children. 왘 Before putting the receiver on, set the volume on the receiver to a low level. 왘 Do not continuously expose yourself to high volumes. Switching the receiver on The receiver automatically switches on when you pull the earbows apart.
Using the Set 840-TV system Adjusting the volume 왘 Use the volume control 2 to adjust the volume to a sufficient and comfortable level. Searching for a sound source 왘 Put the receiver on. The receiver automatically searches for one of the 3 channels of the transmitter and starts the channel search on the last selected channel. If a channel is found, the channel search stops. Your hear the sound of the sound source found.
Using the Set 840-TV system What if you don’t hear the desired sound source? The channel search has possibly found another sound source (e.g. from another nearby system). To continue the channel search: 4 왘 Press the channel search button 4 on the receiver repeatedly until you have found your sound source. If you still cannot find your sound source: 왘 Change the transmission channel as described in the next chapter. 왘 Read the chapter “If a problem occurs ...” on page 24.
Using the Set 840-TV system Adjusting the balance 3 The balance control allows for right/ left volume adjustment. Adjust the balance so that you hear equally well with both ears. 왘 Turn the balance control 3 to the left L or right R in order to increase the volume for the corresponding ear. Switching between mono and stereo operation If, despite a correct balance adjustment, you can hear the sound only with one ear: 왘 Set the ST/MO switch D on the transmitter to MO (mono).
Using the Set 840-TV system Individually enhancing the speech intelligibility B The “speech intelligibility” button A allows you to adjust the sound to your individual needs. A Try out which setting works best for you. 왘 Press the “speech intelligibility” button A repeatedly until the sound is optimally adjusted to your needs.
Using the Set 840-TV system Storing and charging the receiver Do not store the receiver on a glass dummy head, chair armrest, or similar for long periods of time as this can reduce the contact pressure of the earbows. Furthermore, with the earbows pulled apart, the receiver remains switched on. 왘 After use, place the receiver into the transmitter’s charging compartment 6 without exerting too much pressure. The receiver automatically switches off.
Using the Set 840-TV system Charging a rechargeable battery in the transmitter’s charging compartment You can charge the receiver’s rechargeable battery or a spare BA 300 rechargeable battery (not included in the delivery of the Set 840-TV) in the charging compartment 7 at the side of the transmitter. The spare battery offers extended listening time while the discharged first battery is being recharged. Before using the spare rechargeable battery for the first time, charge it for at least 3 hours.
What if ... What if ... ... this indicator lights up? Indicator Channel indicator 1 on the receiver Status Meaning lit yellow The receiver has just been switched on or a button has just been pressed. flashes The distance between receiver and transmitter is too great. The receiver switches off after 3 minutes. off The receiver is switched on for more than 30 secs. and no button has been pressed. The receiver is switched off.
What if ... ... you press this button? Button Function Page Channel search button 4 on the receiver Searches for the sound source or a different channel 14 “Speech intelligibility” button A on the transmitter Selects one of the possible settings in order to individually enhance the speech intelligibility 17 ...
What if ... ... you hear acoustic signals or warning signals? Acoustic signal Meaning 1 acknowledgement beep The channel search button has been pressed once briefly. The channel search button has been pressed for 5 seconds. 1–3 short beeps Warning signal The receiver is set to channel 1, 2 or 3. Meaning 6 short beeps The receiver does not receive any signal from the transmitter: • The distance between transmitter and receiver is too great. The receiver switches off after 3 minutes.
Cleaning the Set 840-TV system Cleaning the Set 840-TV system Cleaning the transmitter and the receiver CAUTION! Danger of electric shock and damage to the device electronics! Liquids entering the housing of the devices can cause a short-circuit and damage the electronics. 왘 Keep all liquids far away from the devices. 왘 Do not use any cleansing agents or solvents. 왘 Before cleaning, disconnect the transmitter from the mains. 왘 Use only a slightly damp cloth to clean the devices.
If a problem occurs ... If a problem occurs ... The transmitter does not switch on Possible cause Solution Is the mains unit Check the connection of the connected correctly? mains unit to the transmitter and to the mains (see page 11). Is the sound source switched on? Switch your sound source on. Is the volume of the sound source sufficient? Set the volume on your sound source to a medium level.
If a problem occurs ... You hear the sound only with one ear Possible cause Solution Is the balance adjusted correctly? Turn the balance control 3 to the left or right (see page 16). Is the transmitter set to mono? Set the ST/MO switch D on the transmitter to mono (MO) (see page 16).
Additional technical information Additional technical information Fine adjusting the speech intelligibility The speech intelligibility can be enhanced individually on the transmitter (see page 17).
Additional technical information 왘 Use a screwdriver to turn the treble boost control E to the left or right until the sound can be heard very well. The position “0” corresponds to a minimum boost, the position “MAX” corresponds to a maximum boost, and the control is factory-preset to the medium position. E Function of the treble boost control By means of the transmitter’s steplessly adjustable treble boost control E, the audio signal is boosted as shown in the diagram.
Accessories and spare parts Accessories and spare parts CAUTION! Danger of damage to the device! Components from other manufacturers (e.g. for power supply or rechargeable battery) may cause damage to the device and will invalidate the warranty. 왘 Use only original Sennheiser accessories and spare parts. For the Set 840-TV, the following receivers and stethoset receivers are available from your specialist dealer: Cat. No.
Specifications Specifications System Modulation Carrier frequencies EU version US version Frequency response THD Charging time for rechargeable battery Signal-to-noise ratio (1 mV, peak deviation) Operating temperature Transmitter RF radiated power EU version US version Range EU version US version Audio/microphone connection Power supply Max. current consumption Max. power consumption (transmitter in conjunction with the NT 13 mains unit) Standby consumption Weight Dimensions FM, stereo 863.3/864.0/864.
Specifications Receiver Max. SPL Power supply Operating time Weight Dimensions 125 dB (SPL) via BA 300 rechargeable Li-Pol battery (3.7 V / 150 mAh) up to 9 hours approx. 68 g (with BA 300) approx. 240 x 128 x 26 mm NT 13 mains unit Nominal input voltage Mains frequency Nominal output voltage Nominal output current Ambient temperature 100 V~ to 240 V~ 50–60 Hz 13.
Manufacturer Declarations Manufacturer Declarations Warranty Sennheiser electronic GmbH & Co. KG gives a warranty of 24 months on this product. For the current warranty conditions, please visit our website at www.sennheiser.com or contact your Sennheiser partner.
Manufacturer Declarations Statements regarding FCC and Industry Canada This equipment complies with Part 15 of the FCC Rules and with RSS-210 of Industry Canada. Operation is subject to the following two conditions: (1) this equipment may not cause harmful interference, and (2) this equipment must accept any interference received, including interference that may cause undesired operation.
Index Index Receiver Adjusting the balance 16 Adjusting the volume 14 Automatic channel search 14 Charging the receiver 18 Cleaning 23 No sound signal 24 Operating elements 5 Operating time 18 Putting the receiver on/taking the receiver off 13 Reception is subject to interference 15 Searching for a sound source 14 Sound is hardly intelligible 25 Sound is only audible with one ear 25 Storing the receiver 18 Switching the acoustic signals off 22 Switching the receiver on/off 13 Rechargeable battery Charging
Sennheiser electronic GmbH & Co. KG Am Labor 1, 30900 Wedemark, Germany www.sennheiser.com Printed in China Publ.
I -TV @ EU ~ ~ •• •• •• .....: UK US ~~ •••• •• •••••••• •• •••••••• •• [Zj SENNHEISER Sennheiser electronic GmbH & Co. KG Am Labor 1, 30900 Wedemark, Germany www.sennheiser.com Printed in China Pub!.