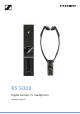
RS 5000 RS 5000 Digital wireless TV headphones Instruction manual
Contents Important safety instructions ...................................................................... 3 Package contents ........................................................................................... 6 Product overview ........................................................................................... 7 Putting the RS 5000 into operation .......................................................... 10 Setting up the transmitter ......................................................
Important safety instructions Important safety instructions 왘 Read this instruction manual carefully and completely before using the product. 왘 Always include this instruction manual when passing the prod- uct on to third parties. 왘 Do not use an obviously defective product. 왘 Only use the product in environments where wireless 2.4 GHz transmission is permitted. Preventing damage to health and accidents 왘 These headphones allow you to set higher volumes than conven- tional headphones.
Important safety instructions 왘 Always ensure that the power supply unit is – in a safe operating condition and easily accessible, – properly plugged into the wall socket, – only operated within the permissible temperature range, – not exposed to direct sunlight for longer periods of time in order to prevent heat accumulation. 왘 Varnish or furniture polish may degrade the feet of the transmit- ter, which could stain your furniture.
Important safety instructions Intended use/Liability This wireless TV headphone system is suitable for use with TV sets, hi-fi systems, and home cinema systems and can be connected to analog and digital audio sources. This product is intended for private domestic use only. It is not suitable for commercial use. This product is also not intended to be used with portable audio devices.
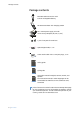
Package contents Package contents RR 5000 stethoset receiver with built-in rechargeable battery + TR 5000 transmitter with charging station NT 5-10AW power supply unit with multi-country adapters (EU, UK, US, AU) 1 pair of ear pads for small ears Optical digital cable, 1.5 m Stereo audio cable with 3.5 mm jack plugs, 1.
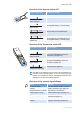
Product overview Product overview Overview of the RR 5000 stethoset receiver 1 Off 2 On 6 3 5 7 8 4 1 Ear pads, replaceable 2 Ear bows with on/off function 3 Volume buttons + and – 6 R marking for the right ear and L marking for the left ear 7 Built-in rechargeable battery 8 Charging contacts 4 Receiver status LED (see page 9) 5 Speech intelligibility button RS 5000 | 7
Product overview Overview of the TR 5000 transmitter 0 1A 9 8 4 1 2 2 5 3 6 7 1 Battery LED , indicating the charging process/ remaining operating time of the receiver (see page 16 and 17) 2 Balance buttons for right ear R and left ear L 3 Hearing profile button for selecting the hearing profiles (see page 24) 4 Hearing profile LED , indicating the activated hearing profile (see page 24) 5 Charging compartment for stethoset receiver 8 | RS 5000 6 Charging contacts for stethoset receiver
Product overview Overview of the Receiver status LED Receiver status LED – The stethoset receiver... ... is switched off. ... is connected to the transmitter. lights up green ... is connected to the transmitter, the rechargeable battery is almost empty. lights up red 1s 1s ... is not connected to the transmitter or cannot connect to the transmitter. flashes green 1s 1s flashes red ... is not connected to the transmitter or cannot connect to the transmitter, the rechargeable battery is almost empty.
Putting the RS 5000 into operation Putting the RS 5000 into operation Setting up the transmitter 왘 Choose a suitable place near your sound source. 왘 Separate the transmitter from other wireless devices in the room by at least 50 cm/20" to avoid interference. 왘 Do not place the transmitter close to metal objects such as shelf bars, reinforced concrete walls, etc. as this can decrease the transmitter’s range.
Putting the RS 5000 into operation Connecting the transmitter to an audio source You can connect the transmitter either to a digital or an analog audio source (e.g. a TV and a stereo hi-fi system). If you connect an audio source to both inputs (digital and analog), only the analog audio source will be reproduced. You can also refer to the beginner’s video guides on how to connect your digital wireless headphone system to a TV: www.sennheiser.com/how-to-videos.
Putting the RS 5000 into operation Connection possibility A: optical (digital) To achieve the best possible listening experience, connect the transmitter to your TV or hi-fi system using the supplied optical digital cable. Note that your wireless headphone system only supports digital signals coded in the PCM format. Information on how to set the audio format of the connected audio source to PCM can be found in the Sound menu or in the instruction manual of your device.
Putting the RS 5000 into operation Connection possibility B: 3.5 mm jack socket (analog) 왘 Connect the stereo audio cable to the blue Analog 3.5 mm In audio input (3.5 mm jack socket) of the transmitter and to the 3.5 mm headphone socket of your audio source. Analog Audio B PHONES 1A TV VOLUME Adjust the volume of the headphone socket on your TV/audio source to at least a medium level. This improves the quality of wireless audio transmission.
Putting the RS 5000 into operation C Connection possibility C: RCA sockets (analog) 왘 Plug the RCA adapter* onto the stereo audio cable. 왘 Connect the stereo audio cable to the blue 3.5 mm jack socket of the transmitter. 왘 Connect the RCA connectors to the RCA sockets (mostly labeled Analog Audio “AUDIO OUT” or ) of your audio source. Connect the red connector to the red RCA socket and the white connector to the white or black RCA socket.
Putting the RS 5000 into operation Connecting the transmitter to the power supply system 1 Connect the connector of the power supply unit to the yellow socket of the transmitter. 2 Select a suitable country adapter and slide it onto the power supply unit until it clicks audibly into place. 3 Plug the power supply unit into the wall socket. All LEDs on the transmitter light up for 5 seconds. The transmitter is in standby mode.
Putting the RS 5000 into operation Charging the stethoset receiver’s rechargeable battery 3h 100 % A complete charging cycle takes about 3 hours. Before using the receiver for the first time, charge its rechargeable battery for a complete charging cycle without interruption. When the rechargeable battery is almost empty, the Receiver status LED lights up red and you hear 2 beeps in the stethoset receiver. The Battery LED on the transmitter lights up white.
Putting the RS 5000 into operation Always store the stethoset receiver in the transmitter’s charging compartment to ensure that it is fully charged when needed. The intelligent battery charging technology prevents overcharging. The display during charging can be set so that it automatically switches off after 30 seconds (see page 31).
Putting the RS 5000 into operation Selecting the ear pads You can choose between ear pads for larger and smaller ears (supplied). The stethoset receiver is delivered with the ear pieces for larger ears already attached. To replace the ear pads: 1 Carefully remove the ear pads from the stethoset receiver. 2 Put the other ear pads on the stethoset receiver. 1 2 Spare ear pads in different materials and forms are available from your Sennheiser partner.
Using the RS 5000 Using the RS 5000 Switching the wireless headphone system on WARNING Danger of hearing damage due to high volumes! This stethoset receiver allows you to set higher volumes than conventional devices. Constant high-volume use can cause hearing damage. 왘 Before putting the stethoset receiver on, set the volume on the receiver to a low level. 왘 Do not expose yourself to high volume levels for extended periods of time.
Using the RS 5000 Switching the wireless headphone system off 왘 Take the stethoset receiver off so that the ear bows fold inwards. The stethoset receiver automatically switches off after 20 seconds. The Receiver status LED goes off. The transmitter automatically switches off (standby) when there is no stethoset receiver connected. The Transmitter status LED goes off. 왘 Always store the stethoset receiver in the transmitter’s charging compartment to ensure that it is fully charged when needed.
Using the RS 5000 Wearing the stethoset receiver 왘 Wear the stethoset receiver so that it hangs freely from your ears and rests lightly on your chest. When putting the stethoset receiver on, observe the L (left) and R (right) markings on the rear of the ear bows. The volume buttons face away from your body to facilitate ease of use. 왘 Wear the stethoset receiver so that – the ear pads are positioned just in front of your ear canals. – you feel a gentle pressure on your ears.
Using the RS 5000 Adjusting the volume Vol + Vol - WARNING Danger of hearing damage due to high volumes! 왘 Before putting the stethoset receiver on, set the volume on the receiver to a low level. 왘 Do not expose yourself to high volume levels for extended periods of time. 왘 Press the volume button + or the volume button – until the volume is adjusted to a comfortable level. When the minimum or maximum volume is reached, you hear a beep in the stethoset receiver.
Using the RS 5000 Adjusting the balance The balance buttons allow for left/right volume adjustment. Adjust the balance so that you hear equally well with both ears. The balance setting is stored on the stethoset receiver. If you are using several receivers with a transmitter, the respective receivers are optimally adjusted to match the personal hearing preferences of the users (e.g. you and your partner).
Using the RS 5000 Selecting a hearing profile for sound enhancement The hearing profiles alter the sound of the audio signal in order to especially improve the speech intelligibility. The profiles are used to specifically change certain frequency ranges by e.g. boosting or attenuating low-frequency or high-frequency tones.
Using the RS 5000 Selecting a hearing profile To select the hearing profile that best suits you, proceed as follows: 1 Switch your audio source on and select a program where speech is foregrounded. 2 Put the stethoset receiver on and make sure that only this receiver is connected to the transmitter. Otherwise, a hearing profile cannot be adjusted. ON 2...4 3 Use the L and R buttons on the transmitter to adjust the balance (see page 23).
Using the RS 5000 Activating/deactivating the speech intelligibility function When speech is mixed with annoying background noise, speech may be difficult to understand. The speech intelligibility function automatically detects and reduces annoying background noise. The audio signal is permanently analyzed and adjusted accordingly so speech is foregrounded and easier to understand.
Cleaning and maintaining the RS 5000 Cleaning and maintaining the RS 5000 CAUTION Liquids can damage the electronics of the product! Liquids entering the housing of the product can cause a short-circuit and damage the electronics. 왘 Keep all liquids far away from the product. 왘 Do not use any solvents or cleansing agents. To clean the wireless headphone system: 왘 Switch your wireless headphone system off and disconnect the transmitter from the socket before cleaning.
Cleaning and maintaining the RS 5000 Replacing the stethoset receiver’s rechargeable battery The BAP 800 rechargeable battery of the stethoset receiver is compactly built into the receiver housing and does not have to be replaced or removed. However, if the operating time of the stethoset receiver decreases drastically or if a charging error is displayed during charging (see page 16), the rechargeable battery may be exhausted or defective and has to be replaced.
Using additional functions Using additional functions The following additional functions are not required for normal use of the wireless headphone system. You can, however, extend the potential use of the system and adjust some of the functions to your individual needs. Pairing one or several stethoset receivers with the transmitter The stethoset receiver and the transmitter of your wireless headphone system are factory pre-paired.
Using additional functions Advanced settings The advanced settings allow you to adjust the wireless headphone system to your individual needs and to protect the settings against accidental changes. Activating the protected settings mode You can change the advanced settings by activating the protected settings mode: 1 Disconnect the transmitter from the power supply system by unplugging the connector of the power supply unit.
Using additional functions Battery status display This setting is saved on the transmitter, independent of the stethoset receiver you are using. To change the battery status display: 왘 Make sure that the protected settings mode is activated (see page 30). 왘 Press the Balance button L. Status and display of Function/behavior the Battery LED permanently activated (operation and charging)* The current charge status is permanently displayed during charging.
Using additional functions Hearing profile and balance protection This setting is saved on the stethoset receiver, independent of the transmitter you are using. 왘 Make sure that your stethoset receiver’s balance setting and hearing profile are correctly adjusted (see page 23 and 24). 왘 Make sure that the protected settings mode is activated (see page 30). 왘 Place the stethoset receiver into the transmitter’s charging com- partment.
Using additional functions Restoring the factory default settings To restore the transmitter to the factory settings: 1 Disconnect the transmitter from the power supply system by unplugging the connector of the power supply unit. 2 Simultaneously press and hold the buttons L, and R. 3 Connect the transmitter to the power supply system by connecting the connector of the power supply unit to the yellow socket of the transmitter while keeping the 3 buttons pressed for at least 3 seconds.
Using additional functions Charging the rechargeable battery using the MCA 800 charging adapter If you have purchased an additional stethoset receiver or an optional MCA 800 charging adapter, you can also charge the stethoset receiver using the charging adapter. WARNING Interference due to magnetic fields! The MCA 800 charging adapter generates stronger permanent magnetic fields that could cause interference with cardiac pacemakers and implanted defibrillators (ICDs).
If a problem occurs ... If a problem occurs ... Problem Possible cause Possible solution Page The transmitter does not switch on No connection to the power supply Check the connections of the power system. supply unit. 15 The rechargeable battery is empty. Recharge the rechargeable battery. The headphones cannot be The rechargeable battery is deep switched on discharged.
If a problem occurs ... Problem Sound only on one ear Sound is distorted You hear echos when using the stethoset receiver with a TV The battery status display goes off Possible cause Possible solution Page The balance is misadjusted. Adjust the balance. 23 The audio cable is not properly connected. Check the audio plug connection. 11 Use an adapter (mono to stereo jack The TV has only a mono headphone socket) to connect the transmitter to socket the TV. – The audio cable is defective.
If a problem occurs ... Leaving the range of the transmitter + The range of the transmitter largely depends on environmental conditions such as wall thickness, wall composition etc. If you leave the range of the transmitter, the audio first cuts out occasionally until it finally cuts out completely. You hear alerts in the stethoset receiver and the Receiver status LED flashes green (or red if the rechargeable battery is almost empty).
Specifications Specifications RS 5000 system Carrier frequency Modulation Signal-to-noise ratio 2.4 to 2.4835 GHz 8-FSK Digital analog input: typ. 85 dBA at 1 Vrms digital input: > 90 dBA max.
Specifications Power consumption Dimensions (W x H x D) operation: typ. 1 W standby: 0.5 W (without charging) approx.
Manufacturer Declarations Manufacturer Declarations Warranty Sennheiser electronic GmbH & Co. KG gives a warranty of 24 months on this product. For the current warranty conditions, please visit our website at www.sennheiser.com or contact your Sennheiser partner. FOR AUSTRALIA ONLY Sennheiser goods come with guarantees that cannot be excluded under the Australian Consumer Law.
Manufacturer Declarations Statements regarding FCC and Industry Canada FCC Declaration of Conformity (DoC) SENNHEISER Model No: TR 2000, RR 2000, TR 5000, RR 5000, RR Flex We, Sennheiser Electronic Corporation One Enterprise Drive • Old Lyme • CT 06371 • USA Tel: +1 (860) 434 9190 Fax: +1 (860) 434 1759 declare the above device comply with the requirements of Federal Communications Commission. This device complies with Part 15 of the FCC rules.
Manufacturer Declarations RF Radiation Exposure Information Since the radiated output power of this device is far below the FCC/ IC radio frequency exposure limits, it is not subjected to routine RF exposure evaluation as per Section 2.1093 of the FCC rules and RSS102 of Industry Canada. This device meets FCC/IC RF exposure guidelines for an uncontrolled environment. The transmitter of this device should be installed and operated at least 20 cm away from the user’s body.
Sennheiser electronic GmbH & Co. KG Am Labor 1, 30900 Wedemark, Germany www.sennheiser.com Publ.