ADN-W C1 / D1 Wireless Units ADN C1 / D1 Wired Units Instruction manual Sennheiser electronic GmbH & Co. KG Am Labor 1, 30900 Wedemark, Germany, www.sennheiser.com Publ.
For your safety For your safety Please make sure to read the “Safety information” supplement included separately with the ADN CU1 central unit. This supplement contains important information on the safe operation of the ADN conference system as well as the manufacturer’s declaration and warranty notes. A detailed instruction manual for the overall ADN conference system can be found • on the Internet at www.sennheiser.com or • on the DVD-ROM supplied with the ADN CU1 central unit.
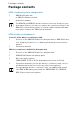
Package contents Package contents ADN standard system components 1 ADN D1 delegate unit or ADN C1 chairperson unit 1 Instruction manual The ADN D1 and ADN C1 wired conference units are ready for operation upon delivery. You have to connect the conference units to the ADN CU1 central unit by means of system cables (detailed information can be found in the ADN system manual).
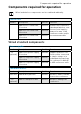
Components required for operation Components required for operation Wired and wireless components can be combined arbitrarily. Central unit Number Description Cat. No. Function 1 ADN CU1-EU central unit, EU version 505553 ADN CU1-UK central unit, UK version 505554 ADN CU1-US central unit, US version 505555 Controls the conference (wired and wireless components) and supplies power to a max.
Components required for operation System cables The system cables are black and have two shielded RJ45 plugs. Number Description, length Divers Cat. No.
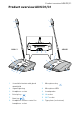
Product overview ADN D1/C1 Product overview ADN D1/C1 1 1 2 2 ADN C1 ADN D1 10 11 12 9 9 8 8 7 6 3 5 7 4 6 1 Sound inlet basket with glued windshield 7 Microphone key 2 Signal light ring 8 Microphone LED 3 Headphone socket 9 Loudspeaker 4 Priority key 10 IN socket 5 Next-key 11 OUT socket 6 Headphone volume control for headphone socket 12 Type plate (see bottom) 3
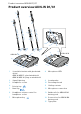
Product overview ADN-W D1/C1 Product overview ADN-W D1/C1 1 1 2 1 2 2 36-50 36-29 15-50 15-3 9 2 W MIC ADN- W MIC ADN- W MIC ADN- W MIC ADN- 1 13 14 10 11 10 11 9 10 11 14 10 11 9 12 ADN-W C1 15 12 8 ADN-W D1 8 7 6 5 3 7 6 3 4 1 Sound inlet basket with glued windshield ADN-W MIC 15: glued windshield ADN-W MIC 36: plug-on windshield 8 Microphone LED 2 Signal light ring 9 Loudspeaker 3 Headphone socket 10 Fastening thread 4 Priority-key 11 Sliding contacts 5
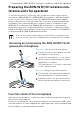
Preparing the ADN-W D1/C1 wireless conference units for operation Preparing the ADN-W D1/C1 wireless conference units for operation To operate the wireless conference unit, you have to connect a gooseneck microphone (ADN-W MIC 15 or ADN-W MIC 36; available in different lengths) to the console of the conference unit. The ADN-W BA battery pack supplies power to the wireless conference unit.
Preparing the ADN-W D1/C1 wireless conference units for operation Replace the defective microphone by a new one. If you screw the microphone to or unscrew it from the wireless conference unit during operation (wireless conference unit is switched on), proper functioning of the conference unit cannot be guaranteed, i.e. volume differences or noise may occur. First connect the microphone and then switch the conference unit on.
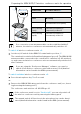
Preparing the ADN-W D1/C1 wireless conference units for operation 2 ADN-W BA Status-LED RF status indictor 2 Color Meaning - good transmission quality blue, flashing slowly transmission quality is temporarily reduced blue, flashing rapidly transmission quality is permanently reduced 2 8 7 If no connection to an antenna module can be established within 5 minutes, the wireless conference unit automatically switches off.
Operating a delegate unit Operating a delegate unit The operation of the ADN D1 wired conference unit and the ADN-W D1 wireless conference unit is identical. Taking the floor/Making a request to speak If the conference mode is set to “Direct Access” or “Override” (detailed information can be found in the ADN system manual): Press the microphone key 7. 2 Your microphone switches on and you can take the floor immediately. The microphone LED 8 and the signal light ring 2 light up red.
Operating a delegate unit Press the microphone key 7 once more. The microphone LED 8 and the signal light ring 2 go off. If the conference mode is set to “Push to talk”: Release the pressed microphone key 7. The microphone LED 8 and the signal light ring 2 go off. Connecting headphones Connect headphones with a 3.5 mm jack plug to the headphone socket 3.
Operating a chairperson unit Operating a chairperson unit The operation of the ADN C1 wired conference unit and the ADN-W C1 wireless conference unit is identical. Beside the chairperson functions, chairperson units offer the same functions as delegate units. A chairperson unit allows you to take the floor at any time without having to “apply” for a comment. If your conference system comprises several chairperson units, all chairperson units have equal rights.
Operating a chairperson unit Setting Function of the priority key „On“ Pressing the priority key 4 deactivates all delegate units. All requests to speak are deleted. „Off“ Pressing the priority key 4 deactivates all currently active delegate units. All requests to speak are retained. Briefly press the priority key 4. The conference system behaves as set.
Cleaning and maintaining the conference units Cleaning and maintaining the conference units Remove the ADN-W BA battery pack from the ADN-W C1 or ADN-W D1 wireless conference units (see „Inserting/removing the battery pack“). Only use a dry and soft cloth to clean the products. Clean the grids of the conference units with a soft brush or paintbrush in order to avoid dust deposits. Specifications ADN D1 and ADN C1 conference units Console Supply voltage 35 V to 52.
Specifications ADN-W D1 and ADN-W C1 wireless conference units Voltage for optional external power supply 12 V$ via ADN-W BA battery pack Charging time of battery pack typ. 4 hours Headphone socket 3.5 mm stereo jack socket Output level at headphone socket 50 mW/16 Ω THD (at 1 kHz) 0,03 % at 50 mW/16 Ω Frequency response 100 Hz to 14.