
BDA ADN-W C1 D1 ADN C1 D1

Preparing the ADN-W D1/C1 wireless conference units for operation
Preparing the ADN-W D1/C1 wireless con-
ference units for operation
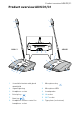
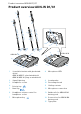
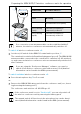
To operate the wireless conference unit, you have to connect a gooseneck
microphone (ADN-W MIC 15 or ADN-W MIC 36; available in different lengths)
to the console of the conference unit. The ADN-W BA battery pack supplies
power to the wireless conference unit. The conference system automatically
recognizes if the connected wireless conference unit is a chairperson unit
(ADN-W C1) or a delegate unit (ADN-W D1) and initializes it automatically.
Information on how to configure the wireless conference components can be
found in the ADN system manual or in the instruction manuals of the ADN CU1
central unit and the ADN-W AM antenna module.
If you do not connect a microphone to the wireless conference unit,
you can use the console as a loudspeaker to output the floor channel.
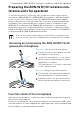
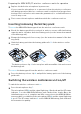
Screwing on/unscrewing the ADN-W MIC 15/36
gooseneck microphone
12
10
To screw on the gooseneck microphone:
Put the gooseneck microphone onto the
microphone connection 12.
Screw the microphone to the micro-
phone connection by turning the fasten-
ing thread 10 clockwise.
The microphone is securely connected
to the conference unit.
To unscrew the gooseneck microphone:
Unscrew the microphone by turning the
fastening thread 10 counterclockwise.
Carefully remove the gooseneck micro-
phone from the microphone connection.
Function check of the microphone
After switch-on, the wireless conference unit checks the proper functioning of
the gooseneck microphone.
If errors occur during the check of the microphone, the microphone LED 8 and,
if the microphone is power supplied, the signal light ring 2 flash red rapidly and
the microphone is automatically deactivated.