C M Y CM MY CY CMY K 100-P Series | Bedienungsanleitung Instruction manual | Notice d’emploi Istruzioni per l’uso | Instrucciones de uso Gebruiksaanwijzing | Manual de instruções |
ew 100 P G3 Set _529660_0309_Sp9.book Seite 1 Mittwoch, 8. April 2009 6:57 18 Contents Contents Important safety instructions ............................................................................................................................................................. 2 The ew 100 G3 evolution wireless series .......................................................................................................................................... 3 The frequency bank system .................
ew 100 P G3 Set _529660_0309_Sp9.book Seite 2 Mittwoch, 8. April 2009 6:57 18 Important safety instructions Important safety instructions • Read this instruction manual. • Keep this instruction manual. Always include this instruction manual when passing the products on to third parties. • Heed all warnings and follow all instructions in this instruction manual. • Use only a cloth for cleaning the products.
ew 100 P G3 Set _529660_0309_Sp9.book Seite 3 Mittwoch, 8. April 2009 6:57 18 The ew 100 G3 evolution wireless series The ew 100 G3 evolution wireless series With the ew 100 G3 evolution wireless series, Sennheiser offers high-quality state-of-the-art RF transmission systems with a high level of operational reliability and ease of use. Transmitters and receivers permit wireless transmission with studio-quality sound.
ew 100 P G3 Set _529660_0309_Sp9.book Seite 4 Mittwoch, 8. April 2009 6:57 18 Product overviews Product overviews Overview of the EK 100 G3 diversity receiver 쐋 Operating elements 3.
ew 100 P G3 Set _529660_0309_Sp9.book Seite 5 Mittwoch, 8. April 2009 6:57 18 Product overviews Overview of the SK 100 G3 bodypack transmitter 쐋 Operating elements Microphone/instrument input (MIC/LINE), 3.
ew 100 P G3 Set _529660_0309_Sp9.book Seite 6 Mittwoch, 8.
ew 100 P G3 Set _529660_0309_Sp9.book Seite 7 Mittwoch, 8.
EW100_P_Set_US_PRT.fm Seite 8 Donnerstag, 9. April 2009 12:14 12 Product overviews Overview of the displays of the EK 100 G3 After switch-on, the diversity receiver displays the standard display “Frequency/Name”. For further illustrations and examples of the different standard displays, refer to page 22. The display backlighting is automatically reduced after approx. 20 seconds. 햲 햳 햴 햵 533.
ew 100 P G3 Set _529660_0309_Sp9.book Seite 9 Mittwoch, 8. April 2009 6:57 18 Product overviews Overview of the displays of the SK 100/SKM 100/SKP 100 G3 After switch-on, the transmitter displays the standard display “Frequency/Name”. For further illustrations and examples of the different standard displays, refer to page 22. The display backlighting is automatically reduced after approx. 20 seconds. 533.
ew 100 P G3 Set _529660_0309_Sp9.book Seite 10 Mittwoch, 8. April 2009 6:57 18 Putting the devices into operation Putting the devices into operation EK 100 G3 diversity receiver Inserting the batteries/accupack For powering the diversity receiver, you can either use two 1.5 V AA size batteries or the rechargeable Sennheiser BA 2015 accupack. Open the battery compartment by pushing the two catches arrows and open the cover .
ew 100 P G3 Set _529660_0309_Sp9.book Seite 11 Mittwoch, 8. April 2009 6:57 18 Putting the devices into operation Mounting the diversity receiver to a camera Use the supplied CA 2 camera adapter to mount the receiver to a camera’s flash mount. Determine where on the perforated plate the flash mount adapter will need to be fastened so that the receiver can best be attached to the camera. At this position, place a square nut under the perforated plate .
ew 100 P G3 Set _529660_0309_Sp9.book Seite 12 Mittwoch, 8. April 2009 6:57 18 Putting the devices into operation SK 100 G3 bodypack transmitter Inserting the batteries/accupack/Charging the accupack The procedure is the same as for the EK 100 G3 diversity receiver: To insert the batteries/accupack: Read the chapter “Inserting the batteries/accupack” on page 10. To charge the accupack: Read the chapter “Charging the accupack” on page 10.
ew 100 P G3 Set _529660_0309_Sp9.book Seite 13 Mittwoch, 8. April 2009 6:57 18 Putting the devices into operation Attaching the bodypack transmitter to clothing You can use the belt clip to attach the bodypack transmitter to clothing (e.g. belt, waistband). The belt clip is detachable so that you can also attach the transmitter with the antenna pointing downwards. To do so, withdraw the belt clip from its fixing points and attach it the other way round.
ew 100 P G3 Set _529660_0309_Sp9.book Seite 14 Mittwoch, 8. April 2009 6:57 18 Putting the devices into operation Close the battery compartment cover . Push the battery compartment into the radio microphone’s body. Screw the lower part of the radio microphone back to the radio microphone’s body.
ew 100 P G3 Set _529660_0309_Sp9.book Seite 15 Mittwoch, 8. April 2009 6:57 18 Putting the devices into operation Changing the color-coded protection ring The color-coded protection ring prevents the multi-function switch from accidental operation. Protection rings in different colors are available as accessories. The protection rings allow you to clearly identify each radio microphone. Remove the color-coded protection ring as shown in the left-hand diagram.
ew 100 P G3 Set _529660_0309_Sp9.book Seite 16 Mittwoch, 8. April 2009 6:57 18 Using the devices Plugging the plug-on transmitter onto a microphone Plug the microphone’s XLR-3M socket onto the transmitter’s XLR-3F socket . Tighten the locking ring in the direction of the arrow. The transmitter uses the microphone body as an antenna – therefore microphones with a metal casing should be used for best signal transmission.
ew 100 P G3 Set _529660_0309_Sp9.book Seite 17 Mittwoch, 8. April 2009 6:57 18 Using the devices Switching the devices on/off EK 100 G3 diversity receiver To switch the diversity receiver on: Push the two battery compartment catches cover . and open the battery compartment 쐋 Press the ON/OFF button . The red ON LED lights up and the standard display “Frequency/Name” appears on the display panel.
ew 100 P G3 Set _529660_0309_Sp9.book Seite 18 Mittwoch, 8. April 2009 6:57 18 Using the devices SK 100 G3 bodypack transmitter, SKM 100 G3 radio microphone and SKP 100 G3 plug-on transmitter P To switch your transmitter on (online operation): SK 100 G3 SKM 100 G3 SKP 100 G3 Push the two catches Briefly press the ON/OFF Briefly press the ON/OFF and open the battery button . button . compartment cover . The radio microphone The plug-on transmitter transmits an RF signal.
ew 100 P G3 Set _529660_0309_Sp9.book Seite 19 Mittwoch, 8. April 2009 6:57 18 Using the devices To switch your transmitter on and to deactivate the RF signal on switch-on (offline operation): SK 100 G3 SKM 100 G3 SKP 100 G3 Keep the ON/OFF button pressed until “RF Mute On?” appears on the display panel. Keep the ON/OFF button pressed until “RF Mute On?” appears on the display panel. Keep the ON/OFF button pressed until “RF Mute On?” appears on the display panel. Press the SET button .
ew 100 P G3 Set _529660_0309_Sp9.book Seite 20 Mittwoch, 8. April 2009 6:57 18 Using the devices To transfer the parameters: Switch the transmitter and the diversity receiver on. On the receiver, call up the “Sync” menu item. “Sync” appears on the display panel of the diversity receiver. Place the infra-red interface of the transmitter (see page 5 to page 7) in front of the infra-red interface of the diversity receiver . The parameters are transferred to the transmitter.
ew 100 P G3 Set _529660_0309_Sp9.book Seite 21 Mittwoch, 8. April 2009 6:57 18 Using the devices How you are using the devices determines how long the lock mode remains deactivated: When you are in the operating menu The lock mode remains deactivated until you exit the operating menu. When one of the standard displays is shown The lock mode is automatically activated after 10 seconds. The lock mode icon flashes prior to the lock mode being activated again.
ew 100 P G3 Set _529660_0309_Sp9.book Seite 22 Mittwoch, 8.
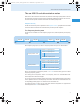
ew 100 P G3 Set _529660_0309_Sp9.book Seite 23 Mittwoch, 8. April 2009 6:57 18 Overview of the operating menus SK 100/SKM 100/SKP 100 G3 To select a standard display: SK 100 G3 SKM 100 G3 Press the rocker button. Contents of the display AF AF AF Move the multifunction switch. SKP 100 G3 Press the UP button/DOWN button. Selectable standard display 533.875 MHz ew100 G3 “Frequency/Name” B.Ch: 20.12 533.875 MHz “Channel/Frequency” ew100 G3 B.Ch: 20.
ew 100 P G3 Set _529660_0309_Sp9.book Seite 24 Mittwoch, 8. April 2009 6:57 18 Overview of the operating menus When one of the standard displays is shown on the display panel, you can get into the main menu by pressing the SET button . The extended menu “Advanced Menu” and the “Easy Setup” menu can be accessed via the corresponding menu items.
ew 100 P G3 Set _529660_0309_Sp9.book Seite 25 Mittwoch, 8.
ew 100 P G3 Set _529660_0309_Sp9.book Seite 26 Mittwoch, 8. April 2009 6:57 18 Synchronizing transmitters with diversity receivers Synchronizing transmitters with diversity receivers When synchronizing transmitters with diversity receivers, please observe the following: Make sure that the desired frequencies are listed in the enclosed frequency information sheet. OR: Contact your Sennheiser partner who will be pleased to calculate intermodulation-free frequencies for you.
ew 100 P G3 Set _529660_0309_Sp9.book Seite 27 Mittwoch, 8. April 2009 6:57 18 Synchronizing transmitters with diversity receivers Using freely selectable frequencies You can also freely select the receiving frequencies and store these frequencies in the frequency banks “U”. It might be that the freely selected frequencies are not intermodulation-free If you use frequencies from the frequency bank “U”, it might be that the frequencies are not intermodulation-free.
ew 100 P G3 Set _529660_0309_Sp9.book Seite 28 Mittwoch, 8. April 2009 6:57 18 Cleaning the devices Cleaning the devices CAUTION! Liquids can damage the electronics of the devices! Liquids entering the housing of the devices can cause a short-circuit and damage the electronics. Keep all liquids away from the devices. Use a cloth to clean the devices from time to time. Do not use any solvents or cleansing agents.
ew 100 P G3 Set _529660_0309_Sp9.book Seite 29 Mittwoch, 8. April 2009 6:57 18 If a problem occurs ... If a problem occurs ... EK 100 G3 Problem Possible cause Possible solution Diversity receiver cannot be operated, “Locked” appears on the display panel Lock mode is activated Deactivate the lock mode (see page 20). No operation indication Batteries are flat or accupack is flat Replace the batteries or recharge the accupack (see page 10).
ew 100 P G3 Set _529660_0309_Sp9.book Seite 30 Mittwoch, 8. April 2009 6:57 18 If a problem occurs ... SK 100/SKM 100/SKP 100 G3 Problem Possible cause Possible solution Transmitter cannot be operated, “Locked” appears on the display panel Lock mode is activated Deactivate the lock mode (see page 20). No operation indication Batteries are flat or accupack is flat Replace the batteries or recharge the accupack (see page 13).
ew 100 P G3 Set _529660_0309_Sp9.book Seite 31 Mittwoch, 8.
ew 100 P G3 Set _529660_0309_Sp9.book Seite 32 Mittwoch, 8. April 2009 6:57 18 Specifications Approved by Canada Industry Canada RSS 123 IC 2099A-G3EK100 limited to 806 MHz SK 100/SKM 100/SKP 100 G3 RF output power at 50 Ω Pilot tone squelch AF frequency response SK SKM/SKP Signal-to-noise ratio (1 mV RF, peak deviation) SK/SKM/SKP Max. input voltage (SK) microphone/line Max.
ew 100 P G3 Set _529660_0309_Sp9.book Seite 33 Mittwoch, 8.
ew 100 P G3 Set _529660_0309_Sp9.book Seite 34 Mittwoch, 8. April 2009 6:57 18 Manufacturer Declarations Manufacturer Declarations Warranty Sennheiser electronic GmbH & Co. KG gives a warranty of 24 months on this product. For the current warranty conditions, please visit our web site at www.sennheiser.com or contact your Sennheiser partner.
ew 100 P G3 Set _529660_0309_Sp9.book Seite 35 Mittwoch, 8. April 2009 6:57 18 Manufacturer Declarations Statements regarding FCC and Industry Canada These devices comply with Part 15 of the FCC Rules and with RSS-210 of Industry Canada. Operation is subject to the following two conditions: (1) these devices may not cause harmful interference, and (2) these devices must accept any interference received, including interference that may cause undesired operation.
C M Y CM MY CY CMY K Sennheiser electronic GmbH & Co. KG Am Labor 1, 30900 Wedemark, Germany www.sennheiser.com Printed in Germany Publ.