
Instruction manual - Digital 6000 (v4.0)


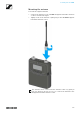


Table Of Contents
- The Digital 6000 Series
- Products in the Digital 6000 series
- Accessories
- Installing Digital 6000 series devices
- Installing the EM 6000
- Connectors on the rear of the device
- Connecting/disconnecting the EM 6000 to/from the power supply system
- Connecting the EM 6000 to a network
- Outputting analog audio signals
- Outputting digital audio signals
- Outputting audio via a Dante™ network (EM 6000 DANTE only)
- Connecting the word clock
- Connecting remote antennas
- Connecting rod antennas
- Installing the EM 6000 in a rack
- Installing the SKM 6000
- Installing the SK 6000
- Installing the SK 6212
- Installing the L 6000 | LM 6060 | LM 6061 | LM 6062
- Using Digital 6000 series devices
- Using the EM 6000
- Operating elements on the front of the device
- Switching the EM 6000 on and off
- Displays on the EM 6000 display panel
- Buttons for navigating through the menu
- Home screen
- Muting the audio signal
- Setting options in the menu
- Menu structure
- Frequency menu item
- Name menu item
- Sync Settings menu item
- Encryption menu item
- Command Mode menu item
- Scan & Auto-Setup menu item
- Walktest menu item
- AF Output menu item
- Test Tone menu item
- Bank Edit menu item
- System menu item
- System -> Transmission Mode menu item
- System -> Wordclock menu item
- System -> Network menu item
- System -> Device ID menu item
- System -> Dante Settings (only EM 6000 DANTE) menu item
- System -> Booster Feed menu item
- System -> Brightness menu item
- System -> Auto Setup menu item
- System -> Info menu item
- System -> Hardware menu item
- System -> Help menu item
- System -> TX Update menu item
- System -> Reset menu item
- Using the headphone output
- Updating the firmware of the receiver
- Updating the firmware of the Dante™ interface
- Status messages
- Using the SKM 6000
- Using the SK 6000
- Using the SK 6212
- Using the L 6000
- Switching the L 6000 on and off
- Charging rechargeable batteries
- Meaning of the LEDs on the L 6000 charger and LM 6060, LM 6061 and LM 6062 charging modules
- Preparing rechargeable batteries for storage (storage mode)
- Resetting settings (factory reset)
- Updating the firmware
- Operating the L 6000 via a network
- Establishing a radio link
- Synchronizing devices
- Overview
- Recommendations for using antennas
- Equidistant frequency grid
- Link Density mode
- Word clock scenarios for digital audio (AES3 and Dante™)
- Overview
- Product variants
- Specifications
- Cleaning and maintenance

Installing the SK 6000
58
Connecting an instrument or line source to the
SK 6000
You can connect instruments or audio sources with a line level to the
SK 6000 bodypack transmitter.
To do so, you require the Sennheiser CI 1-4 cable (6.3 mm (1/4") jack plug
to 3-pin audio connector)
To connect an instrument or line source to bodypack transmitter:
▷ Connect the 3-pin audio connector of the CI 1-4 cable to the SK 6000
bodypack transmitter audio socket as shown in the figure.
▷ Tightly screw on the audio cable coupling ring on the audio socket
thread of the SK 6000 bodypack transmitter.
►