EK SK 500 Instructions for use /
Thank you for choosing Sennheiser! We have designed this product to give you reliable operation over many years. Over half a century of accumulated expertise in the design and manufacture of high-quality electro-acoustic equipment have made Sennheiser a world-leading company in this field. Please take a few moments to read these instructions carefully, as we want you to enjoy your new Sennheiser product quickly and to the fullest.
Contents The SK 500 G2 bodypack transmitter ................................... 4 The channel bank system .................................................. 4 Safety instructions .................................................................... 5 Delivery includes ....................................................................... 5 Areas of application .................................................................. 6 The operating controls .........................................................
The SK 500 G2 bodypack transmitter The SK 500 G2 bodypack transmitter is part of the evolution wireless series ew 500 G2. With this series, Sennheiser offers high-quality state-of-the-art RF transmission systems with a high level of operational reliability and ease of use. Transmitters and receivers permit wireless transmission with studio-quality sound.
Safety instructions Never open an electronic unit! If units are opened by customers in breach of this instruction, the warranty becomes null and void. Use the unit in dry rooms only. Use a damp cloth for cleaning the unit. Do not use any cleansing agents or solvents.
Areas of application The transmitter can be combined with receivers of the ew 500 G2 series (EM 500 G2 rack-mount receiver or EK 500 G2 bodypack receiver). The receivers are available in the same five UHF frequency ranges and are equipped with the same channel bank system with factory-preset frequencies.
The operating controls Microphone/line input (MIC/LINE), 3.
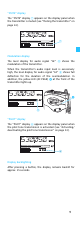
Indications and displays LC display panel Alphanumeric display “B.
“MUTE” display The “MUTE” display appears on the display panel when the transmitter is muted (see “Muting the transmitter” on page 14). Modulation display The level display for audio signal “AF” shows the modulation of the transmitter. When the transmitter’s audio input level is excessively high, the level display for audio signal “AF” shows full deflection for the duration of the overmodulation. In addition, the yellow LED (AF PEAK) at the front of the transmitter lights up.
Preparing the bodypack transmitter for use Inserting and replacing the batteries For powering the transmitter, two 1.5 V AA size batteries are required. Press the two unlocking buttons battery compartment cover . and open the Insert the two batteries as shown above. Please observe correct polarity when inserting the batteries. Close the battery compartment. The battery compartment cover locks into place with an audible click.
y The taking into account of the different voltage characteristics of primary cells (batteries) and accupacks. The battery status indications on the displays, the transmission of transmitter battery status information to the rack-mount receivers and the switch-off thresholds at the end of the operating time are corrected correspondingly. Due to the missing sensor, individual rechargeable battery cells will not be identified as accupacks.
Positioning the microphones The ME 3 and ME 4 microphones are directional microphones, i.e. their sound inlet should always be directed towards the sound source (e.g. mouth). The ME 2 with omni-directional pick-up pattern picks up sound equally from all directions. It is the best choice if movements of the speaker’s head have to be compensated for. However, it should be attached as close as possible to the sound source.
Using the bodypack transmitter Switching the transmitter on/off The transmitter can only be switched off when the standard display is shown on the display panel. When in the operating menu, briefly pressing the ON/OFF button will cancel your entry (ESC function) and return you to the standard display with the last stored settings. Note: Remove the batteries or the accupack when the transmitter will not be used for extended periods of time. Press the two unlocking buttons battery compartment cover .
Muting the transmitter The transmitter has a MUTE switch that noiselessly mutes the transmitter’s audio signal without switching the transmitter off. Set the MUTE switch to the position “MUTE”. The “MUTE” display appears on the display panel. Provided that the pilot tone function is activated on both the transmitter and the receiver, the “MUTE” display also appears on the receiver display panel. Set the MUTE switch back to the original position to retransmit the audio signal.
The operating menu A special feature of the Sennheiser ew 500 G2 series is the similar, intuitive operation of transmitters and receivers. As a result, adjustments to the settings can be made quickly and “without looking” – even in stressful situations, for example on stage or during a live show or presentation. The buttons Buttons Mode To...
Working with the operating menu By way of example of the “TUNE” menu, this section describes how to use the operating menu. After switching the transmitter on, the standard display is shown on the display panel. Getting into the operating menu Press the SET button to get from the standard display into the operating menu. The last selected menu flashes on the display. Selecting a menu Press the / rocker button to select a menu. Press the SET button to get into the setting mode of the selected menu.
Storing a setting Press the SET button to store the setting. “STORED” appears on the display, indicating that the setting has been stored. The display then returns to the top menu level. With most menus, new settings become effective immediately without having to be stored. An exception are the “BANK”, “CHAN”, “TUNE” and “RESET” menus. With these menus, new settings only become effective after they have been stored (“STORED” appears on the display, indicating that the setting has been stored).
Operating menu of the transmitter SET EXIT BANK SET Changing the channel bank BANK 1 BANK U Current channel bank / : 1...8, U (User Bank) SET: Stores the setting STORED CHAN SET 1.03 B.CH Current channel (display depends on "DISPLY" setting) Changing the channel 1.02 / : Channel B.CH 01...20 SET: Stores the setting STORED TUNE SET 790.025 MHz Current frequency on the selected channel Setting the frequency for channel bank "U" 791.
DISPLY NAME SET Assigning the transmitter a name VOCAL Current transmitter name STORED RESET SET RST. NO Security check Loading the factorypreset default settings GUCAL / : Transmitter name (6 characters) Letters w/o pronounciation marks, numbers from 0...9, special characters, spaces SET: 5 x next character, then store RST.
Adjustment tips for the operating menu Switching between channel banks – BANK Via the “BANK” menu, you can switch between the transmitter’s nine channel banks. Each of the channel banks “1” to “8” has up to 20 switchable channels that are factory-preset to a transmission frequency (see “The channel bank system” on page 4).
Use the / rocker button to select the desired transmission frequency. Transmission frequencies are tunable in 25-kHz steps within a switching bandwidth of 36 MHz max. For intermodulation-free frequencies, please refer to the enclosed frequency table. Adjusting the sensitivity – SENSIT Via the “SENSIT” menu, you can adjust the transmitter’s input sensitivity.
Selecting the standard display – DISLPY Via the “DISPLY” menu, you can select the standard display: Selectable standard display Contents of standard display “FREQ” “NAME” “CHAN” Entering a name – NAME Via the “NAME” menu, you can enter a freely selectable name for the transmitter. You can, for example, enter the name of the performer for whom the adjustments have been made.
remains unchanged. After the reset, the transmitter is restarted and the standard display is shown on the display panel. Activating/deactivating the pilot tone transmission – PILOT Via the “PILOT” menu, you can activate or deactivate the pilot tone transmisssion. The pilot tone supports the receiver’s squelch function (Squelch) and protects against interference due to RF signals from other units. The transmitter adds an inaudible signal, known as the pilot tone, to the transmitted signal.
Troubleshooting Error checklist Problem Possible cause Possible solution No operation indication Batteries are flat or accupack is flat Replace the batteries or recharge the accupack No RF signal Transmitter and receiver are not on the same channel Set transmitter and receiver to the same channel Transmitter is out of Check the squelch range threshold setting or reduce the distance between transmitter and receiving antenna RF signal available, no audio signal, “MUTE” display appears on the display p
Recommendations and tips ... for the ME 2 and ME 4 clip-on microphones y To reduce level variations to a minimum when the user turns his or her head away from the microphone, attach the microphone as centrally as possible. y To protect the microphone against excessive sweat/ moisture, avoid direct skin contact. y Attach the microphone carefully and conduct the cable so that noise due to friction is avoided.
Care and maintenance Use a slightly damp cloth to clean the transmitter from time to time. Note: Do not use any cleansing agents or solvents.
Specifications RF characteristics Modulation wideband FM Frequency ranges 518–554, 626–662, 740–776, 786–822, 830–866 MHz Transmission frequencies 8 channel banks with up to 20 factory-preset channels each 1 channel bank with up to 20 freely selectable channels (1440 frequencies, tunable in steps of 25 kHz) Switching bandwidth 36 MHz Nominal/peak deviation ± 24 kHz / ± 48 kHz Frequency stability ≤ ± 15 ppm RF output power at 50 Ω typ.
Microphones ME 2 MKE 2-ew ME 3 ME 4 Transducer condenser condenser condenser condenser Principle Sensitivity 20 mV/Pa 5.6 mV/Pa 1.6 mV/Pa 40 mV/Pa Pick-up pattern omniomnisuperdirectional directional cardioid Max. SPL 130 dB SPL 140 dB SPL 150 dB SPL 120 dB SPL cardioid Connector assignment 3.
Frequency response curve ME 2 Frequency response curve ME 3 Frequency response curve ME 4 Accessories ME 2: Clip-on microphone, condenser, omni-directional MKE 2: Clip-on microphone , black or beige, condenser, omni-directional ME 4: Clip-on microphone, condenser, cardioid ME 3: Headmic, condenser, super-cardioid CI 1: Instrument cable, with ¼” (6.
Manufacturer declarations Warranty regulations The guarantee period for this Sennheiser product is 24 months from the date of purchase. Excluded are accessory items, rechargeable or disposable batteries that are delivered with the product; due to their characteristics these products have a shorter service life that is principally dependent on the individual frequency of use. The guarantee period starts from the date of original purchase.
Sennheiser electronic GmbH & Co. KG 30900 Wedemark, Germany Phone +49 (5130) 600 0 Fax +49 (5130) 600 300 www.sennheiser.com Printed in Germany Publ.