
Instruction manual 300 IEM Series G3 Download300 IEM Series: SR 300 IEM G3 and EK 300 IEM G3

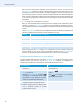


Table Of Contents
- Important safety instructions
- The evolution wireless series ew 300 IEM G3
- The frequency bank system
- Product overviews
- Putting the devices into operation
- Putting the SR 300 IEM G3 transmitter into operation
- Setting up the transmitter on a flat surface
- Mounting the transmitter into a 19” rack
- Connecting the mains unit
- Connecting devices to the input sockets
- Connecting devices to the output sockets
- Connecting a remote antenna to the BNC socket and positioning the antenna
- Connecting the AC 3 antenna combiner to the BNC socket
- Daisy chaining audio signals
- Connecting transmitters in a network
- Putting the EK 300 IEM G3 diversity receiver into operation
- Putting the SR 300 IEM G3 transmitter into operation
- Using the devices
- Switching the devices on/off
- Monitoring the audio signal via headphones
- Deactivating the lock mode temporarily
- Selecting a standard display on the diversity receiver
- Adjusting the audio channels on the transmitter
- Activating/deactivating the RF signal on the transmitter
- Synchronizing transmitters and EK 300 IEM G3 receivers via the infra-red interface
- Using the operating menus
- Synchronizing the transmitter with the diversity receiver
- Cleaning the devices
- If a problem occurs ...
- Specifications
- Manufacturer Declarations

Using the devices
20
Once you have performed a frequency preset scan with a receiver, you can use the
Easy Setup Sync function to transfer unused frequency presets from the receiver to the
transmitters via the infra-red interface. In order to configure a multi-channel system, you
use the diversity receiver to transfer the first unused channel from the selected frequency
bank to the first transmitter and the next unused channel to the second transmitter and
so on, thus ensuring that all transmitters of a multi-channel system operate on suitable
frequencies.
2. Sync: Transfer from a transmitter to a receiver
Once you have selected and set the desired receiver settings on the transmitter (either
manually or using the Easy Setup Sync function), you transfer these settings to a receiver.
This configures the receiver and establishes a transmission link between transmitter and
receiver.
Via the “Sync Settings” submenu, you can adjust the receiver parameters listed below and
activate or deactivate their transfer to an EK 300 IEM G3 receiver.
When carrying out the Sync function, the transmitter’s current frequency bank and
channel setting as well as the receiver parameters adjusted via the “Sync Settings”
submenu are transferred to the EK 300 IEM G3 receiver via the infra-red interface.
Carrying out an Easy Setup Sync or a Sync function
The following assumes that you are using the Easy Setup Sync function for setting up a multi-
channel system. You can also you the Easy Setup Sync function for establishing a
transmission link between one transmitter and one EK 300 IEM G3 receiver.
Setting Transferred receiver parameter
“Balance” Current balance setting (“−15”/“+15”)
“Squelch” Current squelch setting (“Off”, “5 dB” ... “25 dB”)
“Mode” Current audio mode setting (“Stereo”/“Focus”)
“High Boost” Current treble boost setting (“flat”/“High boost”)
“Auto Lock” Current lock mode setting (“active”/“inactive”)
“Limiter” Current limiter setting (“−18 dB”, “−12 dB”, “−6dB”, “Off”)
Easy Setup Sync Sync
왘 Switch all transmitters and one diversity
receiver on.
왘 Switch your transmitter and your diver-
sity receiver on.
왘 On all transmitters, call up the “Easy
Setup” menu item.
The text “Easy Setup Sync” and the
icon appear on the display panels of the
transmitters. The RF signal of the trans-
mitters is automatically deactivated.
왘 Press the button on the trans-
mitter.
The icon appears on the display
panel of the transmitter.
왘 Use your diversity receiver to perform a
frequency preset scan (Scan New List).
왘 Select a channel within a frequency bank
with a sufficient number of unused
channels (Current List).
–