
User Manual
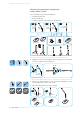
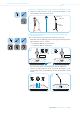
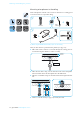
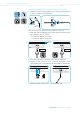
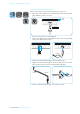
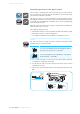

Table Of Contents
- Important safety information
- Sennheiser SpeechLine – True to the word
- Overview of the SpeechLine IS microphone series
- Package contents
- Product overview
- Overview of the MEB 114 (-S) boundary layer microphones
- Overview of the MEB 102 (-L) | MEB 104 (-L) surface-mounted boundary layer microphones
- Overview of the MEG 14-40 (-L(-II)) gooseneck microphones
- Overview of the MZH 30xx (-L) goosenecks
- Overview of the MAT 133 (-S) | MAT 153-S table stands
- Overview of the MAS 133 inline switch box
- Overview of the MAS 1 microphone button
- Overview of the MZFS 60 | MZFS 80 microphone stands
- Mounting and installing the products
- Connecting the products
- Adjusting and using the products
- Cleaning and maintaining the products
- Specifications
- Manufacturer Declarations

Mounting and installing the products
SpeechLine IS microphone series | 23
B) Mounting the MZH 3015 w gooseneck microphone
to the ceiling
왘 Tightly screw one of the microphone heads o
nto the gooseneck in order
to ensure a reliable ground connection.
Once you have chosen a position for the product (see page 16):
왘 Drill a hole with the following diameter through the mounting surface
(pl
ate thickness 10 mm - 65 mm):
– 24 mm for the MZT 30 table mount
– 51 mm for the MZS 31 shock mount
왘 Insert the table mount or the shock mount int
o the drilled hole.
왘 Connect the XLR connector of the gooseneck microphone to the
c
orresponding socket of the MZT 30 table mount/MZS 31 shock mount.
왘 Connect a suitable cable (see
page 26) and lay the cable.
MZH 30xx
MZT 30
MZS 31
ME 34|35|36
MZH
30xx (-L)
ME 34
ME 35
ME 36
MZH 30xx
51 mm 24 mm
10 mm –
65 mm
MZT 30 MZS 31
MZS 31 MZT 30