
User Manual


23
Putting the products into operation
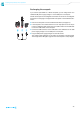
Preparing the headset microphone for use
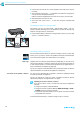
Adjusting the microphone boom and the neckband padding
For best possible comfort and optimum fit of the headset microphone, the
neckband padding and the microphone boom have to be adjusted to properly
fit your head.
왘 Put on the headset microphone and adjust it so that a comfortable and
secure fit is ensured.
Make sure to wear the neckband padding around the back of your head. If
the neckband padding is worn too close to the top of the head, it can slip
out of position.
왘 Change the length of the headband padding by means of the Velcro fas-
tener to ensure a snug and comfortable fit.
왘 Adjust the microphone boom so that the sound inlet points towards the
mouth and is positioned approx. 2 to 3 cm from the corner of the mouth.
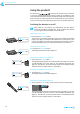
Using the windshield
The windshield attenuates annoying wind noise by 10 dB.
왘 Slip the windshield onto the microphone capsule.
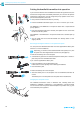
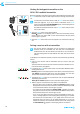
Attaching the clip-on microphone to clothing
The ME 2-2 clip-on microphone is supplied with a microphone clip.
왘 Use the microphone clip to attach the clip-on microphone to clothing (e.g.
tie, lapel).
왘 Conduct the cable so that noise due to friction is avoided and that the con-
nection cable and the antenna do not cross.
왘 Attach the microphone at a distance of approx. 20 cm to the mouth.
The clip-on microphone has an omni-directional pick-up pattern. It is there-
fore not necessary to position it precisely.
ATTENTION
Damage to the microphone boom
The microphone boom can break or be impaired in its function when you bend
or turn it. Frequent alternate bendings close to the microphone head can also
damage the microphone boom and possibly reduce the adjustability of the
microphone.
왘 Only adjust the microphone boom as described in this chapter.
2–3 cm