
Instruction manual


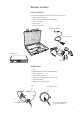
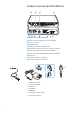
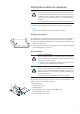
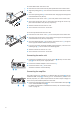
Table Of Contents

7
Putting the system into operation
You can set up the device on an even surface or mount it into a 19” rack.
Note:
Do not fit the rubber feet when rack mounting the device.
Setting up the device
To ensure that the device cannot slip on the surface on which it is placed, fix
the supplied four self-adhesive soft rubber feet to the base of the device.
왘 Ensure that the base of the device is clean and free from grease before
fitting the rubber feet.
왘 Fix the rubber feet to the base of the device by peeling off the backing
paper and fitting them as shown.
Rack mounting
For mounting two central units into a 19” rack, you require the GA 2 rack
adapter. The GA 2 rack adapter consists of:
y 1 blanking plate
y 2 rack mount “ears”
y 1 jointing plate
y 2 blanking plugs for closing off unused BNC holes
y 12 recessed head screws M 3x6
y 2 recessed head screws M 6x10
Risk of staining of furniture surfaces!
Some furniture surfaces have been treated with varnish, polish
or synthetics which might cause stains when they come into
contact with other synthetics. Despite a thorough testing of
the synthetics used by us, we cannot rule out the possibility of
staining.
왘 Do not place the central unit on delicate furniture surfaces.
CAUTION!
Danger of heat damage!
When installing the device in a closed or multi-rack assembly,
please consider that, during operation, the temperature within
the rack may rise significantly.
왘 Make sure not to affect the ventilation required for safe
operation or provide additional ventilation.
Danger of electric shock!
When installing the device in a closed or multi-rack assembly,
please note that intrinsically harmless leakage currents of the
individual devices may accumulate, thereby exceeding the
allowable limit value.
왘 Ground the rack via an additional ground connection.
CAUTION!
CAUTION!
89
0
A