
Instructions for use
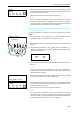
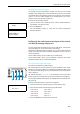
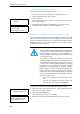
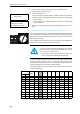
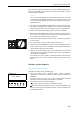

Table Of Contents
- Thank you for choosing Sennheiser!
- Contents
- Important safety instructions
- Important safety information
- SDC 8200 - the digital conference and interpretation system
- Overview of the components of the SDC 8200 system
- The components of the SDC 8200 system in detail
- Operating the components of the SDC 8200 system
- Turning the conference and interpretation system on/off
- Operating the delegate units
- Operating the VIP units
- Operating the chairman unit
- Operating the interpreter consoles
- Adjusting the volume and the middle and treble response of the headphones connected to the interpreter console
- Adjusting the volume of the interpreter consoles’ built-in loudspeakers
- Configuring the B-channel of an interpreter console
- Setting the channel to be output via the interpreter console’s built-in loudspeaker
- Selecting an interpretation channel
- Using the interpreter console
- Switching between the A-channel and the B-channel
- Muting the microphone of the interpreter console
- Displaying text messages on the interpreter console’s display
- Operating the central unit
- Structuring the SDC 8200 system
- Interconnecting the conference/interpreter consoles
- Connecting cable strings to a central unit
- Interconnecting up to twelve SDC 8200 CU central units
- The three expansion stages
- Determining maximum cable lengths
- Structuring an interpretation system
- Selectable modes between or within interpreter booths
- Using external equipment
- Setting up the SDC 8200 system
- Preparing the SDC 8200 system components for set up
- Interconnecting the SDC 8200 system components
- Connecting additional equipment
- Connecting external audio sources
- Setting up remote conferences
- Connecting PA systems, recording units, etc.
- Pin assignment of the 15-pole sub-D socket (AUX OUT 2-3-4-5-6)
- Connecting an SDC 8200 AO analog output unit to the SDC 8200 CU central unit
- Connecting several SDC 8200 AO analog output units to the SDC 8200 CU central unit
- Connecting external equipment to the SDC 8200 AO’s phoenix connector
- Connecting a PC to the central unit
- Configuring the SDC 8200 system
- Introduction to the central unit’s operating menu
- The start display
- The six main menus
- The submenus of the “Conference” menu (part 1 of 7)
- The submenus of the “Conference” menu (part 2 of 7)
- The submenus of the “Conference” menu (part 3 of 7)
- The submenus of the “Conference” menu (part 4 of 7)
- The submenus of the “Conference” menu (part 5 of 7)
- The submenus of the “Conference” menu (part 6 of 7)
- The submenus of the “Conference” menu (part 7 of 7)
- The submenus of the “Interpretation” menu (part 1 of 5)
- The submenus of the “Interpretation” menu (part 2 of 5)
- The submenus of the “Interpretation” menu (part 3 of 5)
- The submenus of the “Interpretation” menu (part 4 of 5)
- The submenus of the “Interpretation” menu (part 5 of 5)
- The submenus of the “Aux-In/Out” menu (part 1 of 8)
- The submenus of the “Aux-In/Out” menu (part 2 of 8)
- The submenus of the “Aux-In/Out” menu (part 3 of 8)
- The submenus of the “Aux-In/Out” menu (part 4 of 8)
- The submenus of the “Aux-In/Out” menu (part 5 of 8)
- The submenus of the “Aux-In/Out” menu (part 6 of 8)
- The submenus of the “Aux-In/Out” menu (part 7 of 8)
- The submenus of the “Aux-In/Out” menu (part 8 of 8)
- The submenus of the “System” menu (part 1 of 2)
- The submenus of the “System” menu (part 2 of 2)
- The submenus of the “Language” and the “License” menu (part 1 of 1)
- Setting the volume of the consoles’ built-in loudspeakers
- Configuring the conference system
- Automatically initializing all conference consoles
- Manually initializing all conference consoles
- Loading the factory-preset default configuration for the conference system
- Adding a conference console to an already existing configuration
- Removing a conference console from an already existing configuration
- Reserving a microphone number
- Selecting a conference mode
- Setting the speaker limit
- Adjusting the audio settings for the consoles’ built-in loudspeakers
- Adjusting the audio settings for the consoles’ microphones
- Configuring additional chairman units (Chairmen)
- Deleting the list of chairman units (Chairmen)
- Configuring additional VIP units (VIP)
- Deleting the list of VIP units (VIP)
- Activating/deactivating the special rights of the VIP units (VIP)
- Resetting the conference system (Reset)
- Testing the consoles’ built-in loudspeakers
- Testing the consoles’ microphones
- Activating/deactivating the flashing of the signal light ring
- Configuring the display of the voting options
- Configuring the interpretation system
- Working with the interpreter configuration
- Creating a new interpreter configuration
- Modifying the currently active interpreter configuration
- Loading a previously saved interpreter configuration
- Options
- Setting the max. number of interpreter booths/languages
- Setting the max. number of interpreter consoles per booth
- Configuring the operating mode between booths
- Configuring the operating mode within a booth
- Configuring the language options for the interpreter booths
- Configuring the main target language (A-channel) of a booth
- Configuring the second target language (B-channel) of a booth
- Enabling the auto-relay interpretation function (Auto-floor)
- Half-automatically initializing all interpreter consoles on the central unit
- Manually assigning an interpreter console an individual booth number
- Manually assigning an interpreter console an individual desk number (interpreter console number)
- Displaying the booth and desk number of an interpreter console
- Adding interpreter consoles to an existing configuration
- Loading the factory-preset default configuration for the interpretation system
- Resetting the interpretation system
- Configuring the audio inputs and outputs of the central unit and the anaolog output unit
- Choosing the audio inputs and outputs
- Adjusting the volume of the audio outputs
- Adjusting the volume differences between the Aux Out 1 outputs
- Assigning a channel to an audio output
- Turning on/off the audio inputs or outputs
- Adjusting the volume differences between the headphone outputs
- Configuring the audio outputs for remote conferencing
- Turning on/off an external equalizer
- Adjusting the input level of an audio input
- Adjusting the input sensitivity of an audio input
- Configuring the outputs of the SDC 8200 AO analog output unit
- Making a system diagnosis
- Configuring connected additional components
- Software, language and license
- Introduction to the central unit’s operating menu
- If problems occur...
- Accessories
- Specifications
- Appendix A: Camera control protocol
- Appendix B: Control panel protocol
- Appendix C: Repeater for the SDC 8200 system
- Manufacturer declarations

Configuring the SDC 8200 system
108
왘 From the central unit’s operating menu, choose “Aux-In/Out”.
왘 Choose the desired audio input.
왘 Choose “
Sensitivity”.
The current input sensitivity (“
LOW” or “HIGH”) is shown on the display.
–Choose “
LOW” if the connected audio source delivers a strong signal
(e.g. CD player).
–Choose “
HIGH” if the connected audio source delivers a weak signal
(e.g. microphone).
왘 Adjust the input sensitivity and press the ENTER key to save your set-
ting.
Configuring the outputs of the SDC 8200 AO analog output unit
You can configure the outputs of the SDC 8200 AO analog output unit via
the two DIP switches and the rotary switch located on the printed circuit
board of the SDC 8200 AO. For configuring the outputs, you have to open
the analog output unit.
The two DIP switches and the rotary switch are located in the middle of the
printed circuit board, directly behind the front panel.
With the two DIP switches (2 switch positions: ON or OFF) and the rotary
switch (16 switch positions: 1 to F), you assign a channel number to the
output OUT 1 (reference output). The outputs OUT 2 to OUT 8 are auto-
matically assigned the subsequent channel numbers.
The following table shows the possible switch positions and the resulting
channel assignments:
(*) can be set to position “ON” or “OFF”
Aux In 1
2 Sensitivity
Aux In 1
Sensitivity = HIGH
Press ENTER to Save
ON
1
2
0
1
2
3
4
5
6
7
8
9
A
B
C
D
E
F
Warning! Danger of electric shock!
If you do not disconnect the analog output unit from the
central unit before opening the SDC 8200 AO’s housing,
you can receive an electric shock.
왘 Disconnect the SDC 8200 AO from the central unit
before configuring the SDC 8200 AO’s outputs!
DIP switches Rotary
switch
OUT 0 OUT1 OUT2 OUT3 OUT4 OUT5 OUT6 OUT7 OUT8
21
OFF OFF 0 0 01234567
OFF OFF 1 0 1 2 3 4 5 6 7 8
OFF OFF 2 0 23456789
OFF OFF ... 0 ... ... ... ... ... ... ... ...
OFF OFF F 0
15 16 17 18 19 20 21 22
(*) ON 0 0 16 17 18 19 20 21 22 23
(*) ON 1 0 17 18 19 20 21 22 23 24
(*) ON ... 0
... ... ... ... ... ... ... ...
(*) ON 4 0
20 21 22 23 24 25 26 27
(*) ON 5 0
21 22 23 24 25 26 27 28