
Instructions for use


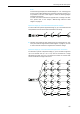
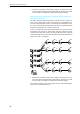
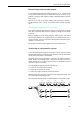
Table Of Contents
- Thank you for choosing Sennheiser!
- Contents
- Important safety instructions
- Important safety information
- SDC 8200 - the digital conference and interpretation system
- Overview of the components of the SDC 8200 system
- The components of the SDC 8200 system in detail
- Operating the components of the SDC 8200 system
- Turning the conference and interpretation system on/off
- Operating the delegate units
- Operating the VIP units
- Operating the chairman unit
- Operating the interpreter consoles
- Adjusting the volume and the middle and treble response of the headphones connected to the interpreter console
- Adjusting the volume of the interpreter consoles’ built-in loudspeakers
- Configuring the B-channel of an interpreter console
- Setting the channel to be output via the interpreter console’s built-in loudspeaker
- Selecting an interpretation channel
- Using the interpreter console
- Switching between the A-channel and the B-channel
- Muting the microphone of the interpreter console
- Displaying text messages on the interpreter console’s display
- Operating the central unit
- Structuring the SDC 8200 system
- Interconnecting the conference/interpreter consoles
- Connecting cable strings to a central unit
- Interconnecting up to twelve SDC 8200 CU central units
- The three expansion stages
- Determining maximum cable lengths
- Structuring an interpretation system
- Selectable modes between or within interpreter booths
- Using external equipment
- Setting up the SDC 8200 system
- Preparing the SDC 8200 system components for set up
- Interconnecting the SDC 8200 system components
- Connecting additional equipment
- Connecting external audio sources
- Setting up remote conferences
- Connecting PA systems, recording units, etc.
- Pin assignment of the 15-pole sub-D socket (AUX OUT 2-3-4-5-6)
- Connecting an SDC 8200 AO analog output unit to the SDC 8200 CU central unit
- Connecting several SDC 8200 AO analog output units to the SDC 8200 CU central unit
- Connecting external equipment to the SDC 8200 AO’s phoenix connector
- Connecting a PC to the central unit
- Configuring the SDC 8200 system
- Introduction to the central unit’s operating menu
- The start display
- The six main menus
- The submenus of the “Conference” menu (part 1 of 7)
- The submenus of the “Conference” menu (part 2 of 7)
- The submenus of the “Conference” menu (part 3 of 7)
- The submenus of the “Conference” menu (part 4 of 7)
- The submenus of the “Conference” menu (part 5 of 7)
- The submenus of the “Conference” menu (part 6 of 7)
- The submenus of the “Conference” menu (part 7 of 7)
- The submenus of the “Interpretation” menu (part 1 of 5)
- The submenus of the “Interpretation” menu (part 2 of 5)
- The submenus of the “Interpretation” menu (part 3 of 5)
- The submenus of the “Interpretation” menu (part 4 of 5)
- The submenus of the “Interpretation” menu (part 5 of 5)
- The submenus of the “Aux-In/Out” menu (part 1 of 8)
- The submenus of the “Aux-In/Out” menu (part 2 of 8)
- The submenus of the “Aux-In/Out” menu (part 3 of 8)
- The submenus of the “Aux-In/Out” menu (part 4 of 8)
- The submenus of the “Aux-In/Out” menu (part 5 of 8)
- The submenus of the “Aux-In/Out” menu (part 6 of 8)
- The submenus of the “Aux-In/Out” menu (part 7 of 8)
- The submenus of the “Aux-In/Out” menu (part 8 of 8)
- The submenus of the “System” menu (part 1 of 2)
- The submenus of the “System” menu (part 2 of 2)
- The submenus of the “Language” and the “License” menu (part 1 of 1)
- Setting the volume of the consoles’ built-in loudspeakers
- Configuring the conference system
- Automatically initializing all conference consoles
- Manually initializing all conference consoles
- Loading the factory-preset default configuration for the conference system
- Adding a conference console to an already existing configuration
- Removing a conference console from an already existing configuration
- Reserving a microphone number
- Selecting a conference mode
- Setting the speaker limit
- Adjusting the audio settings for the consoles’ built-in loudspeakers
- Adjusting the audio settings for the consoles’ microphones
- Configuring additional chairman units (Chairmen)
- Deleting the list of chairman units (Chairmen)
- Configuring additional VIP units (VIP)
- Deleting the list of VIP units (VIP)
- Activating/deactivating the special rights of the VIP units (VIP)
- Resetting the conference system (Reset)
- Testing the consoles’ built-in loudspeakers
- Testing the consoles’ microphones
- Activating/deactivating the flashing of the signal light ring
- Configuring the display of the voting options
- Configuring the interpretation system
- Working with the interpreter configuration
- Creating a new interpreter configuration
- Modifying the currently active interpreter configuration
- Loading a previously saved interpreter configuration
- Options
- Setting the max. number of interpreter booths/languages
- Setting the max. number of interpreter consoles per booth
- Configuring the operating mode between booths
- Configuring the operating mode within a booth
- Configuring the language options for the interpreter booths
- Configuring the main target language (A-channel) of a booth
- Configuring the second target language (B-channel) of a booth
- Enabling the auto-relay interpretation function (Auto-floor)
- Half-automatically initializing all interpreter consoles on the central unit
- Manually assigning an interpreter console an individual booth number
- Manually assigning an interpreter console an individual desk number (interpreter console number)
- Displaying the booth and desk number of an interpreter console
- Adding interpreter consoles to an existing configuration
- Loading the factory-preset default configuration for the interpretation system
- Resetting the interpretation system
- Configuring the audio inputs and outputs of the central unit and the anaolog output unit
- Choosing the audio inputs and outputs
- Adjusting the volume of the audio outputs
- Adjusting the volume differences between the Aux Out 1 outputs
- Assigning a channel to an audio output
- Turning on/off the audio inputs or outputs
- Adjusting the volume differences between the headphone outputs
- Configuring the audio outputs for remote conferencing
- Turning on/off an external equalizer
- Adjusting the input level of an audio input
- Adjusting the input sensitivity of an audio input
- Configuring the outputs of the SDC 8200 AO analog output unit
- Making a system diagnosis
- Configuring connected additional components
- Software, language and license
- Introduction to the central unit’s operating menu
- If problems occur...
- Accessories
- Specifications
- Appendix A: Camera control protocol
- Appendix B: Control panel protocol
- Appendix C: Repeater for the SDC 8200 system
- Manufacturer declarations

Operating the components of the SDC 8200 system
42
Working with the central unit’s operating menu
To choose a menu item from the central unit’s operating menu:
왘 Make sure that the central unit is turned on and that all conference/
interpreter consoles are connected.
The start display appears, showing the current volume setting for the
consoles’ built-in loudspeakers (see “Setting the volume of the con-
soles’ built-in loudspeakers” on page 85) and to which of the central
unit’s ports P1 to P6 a cable string is connected (see “Making a system
diagnosis” on page 109).
왘 Press the ENTER key .
You get to the first main menu “
Conference”.
왘 Turn the jog wheel until the desired main menu is shown on the dis-
play and press the ENTER key .
You enter the desired main menu.
왘 Turn the jog wheel until the desired submenu is shown on the dis-
play and press the ENTER key .
You enter the desired submenu where you can choose between addi-
tional submenu items by using the jog wheel or choose a setting (in
this case, the current value and the text “Press ENTER to Save” are
shown on the display).
왘 To change the current value:
Turn the jog wheel until the desired value is shown on the display
and press the ENTER key .
The new value is saved and you return to the previous menu level.
왘 To keep the current value unchanged:
Press the EXIT key .
The current value remains unchanged and you return to the previous
menu level.
왘 To exit the central unit’s operating menu, press the EXIT key repeat-
edly until the start display appears.
Via the central unit’s operating menu, you can
y select one out of ten possible conference modes (see “Selecting a confer-
ence mode” on page 88)
Note!
The selection of some of the conference modes only makes sense if
your conference and interpretation system is PC controlled
y adjust the volume, treble, middle and bass response of the consoles’
built-in loudspeakers (see “Adjusting the audio settings for the con-
soles’ built-in loudspeakers” on page 88)
y configure the options for the conference (see “Configuring the confer-
ence system” on page 85) and interpretation system (see “Configuring
the interpretation system” on page 93)
y initialize the conference consoles (see “Automatically initializing all con-
ference consoles” on page 85 or see “Manually initializing all conference
consoles” on page 85) and the interpreter consoles (see “Half-automat-
ically initializing all interpreter consoles on the central unit” on page 99
or see “Manually assigning an interpreter console an individual booth
number” on page 100)
y specifiy the indication of the voting options on the displays
>Volume =
P1 P2 P3 P4 P5 P6