Cordless TV Listening System Set 830 S Instruction manual
I 1 7 7 2 3 4 5 6 Q
II D 8 C 9 B 0 A E F G H
Contents Contents Safety instructions ................................................................. 2 Delivery includes ..................................................................... 4 Product overview .................................................................... 5 Putting the Set 830 S into operation ................................. 6 Setting up the transmitter ............................................... 6 Connecting the transmitter to a sound source ............
Safety instructions Safety instructions • Please read this instruction manual carefully and completely before using the devices. • Make this instruction manual easily accessible to all users at all times. Always include this instruction manual when passing the devices on to third parties. • Do not use the devices in situations which require special attention (e.g. when performing skilled jobs). • Always keep the devices dry and do not expose them to extreme temperatures.
Safety instructions Intended use Intended use includes: • having read this instruction manual, especially the chapter “Safety instructions”, • using the devices within the operating conditions and limitations described in this instruction manual. “Improper use” means using the devices other than as described in this instructions, or under operating conditions which differ from those described herein.
Delivery includes Delivery includes Delivery of the Set 830 S system includes: 1 RI 830 S receiver with BA 300 Lithium-Polymer rechargeable battery 1 TI 830 transmitter with integrated charging compart-ments 1 EZT 3011 induction loop 1 NT 13 mains unit with 3 country adapters (EU, UK, US) 1 connection cable with two 3.5 mm stereo jack plugs for connection to a headphone socket 3 audio adapters: 1 adapter 3.5 mm to ¼“ (6.
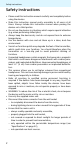
Product overview Product overview The overview pictures of the receiver and the transmitter can be found on the inside front cover of this instruction manual.
Putting the Set 830 S into operation Putting the Set 830 S into operation Setting up the transmitter 왘 Place the transmitter so that: – there are no obstacles in the light path between transmitter and receiver and – transmitter and receiver are not exposed to direct sunlight. Direct sunlight may interfere with the reception and may damage the transmitter. If you are using a plasma TV screen: Plasma TV screens radiate an infra-red signal that can adversely affect the transmission quality.
Putting the Set 830 S into operation Connecting the transmitter to a sound source 왘 Switch your sound source (e.g. TV) off before connecting the transmitter. E I 왘 Plug one end of the connection cable I into the blue socket E of the transmitter. 왘 Check the available connection possibilities of your sound source (e.g. TV).
Putting the Set 830 S into operation A Connecting the transmitter to a headphone socket J 왘 I Plug the other end of the connection cable I into the head-phone socket on your sound source. Is the plug on the connection cable too small for the headphone socket? 왘 왘 Plug the adapter to ¼“ (6.3 mm) jack socket J onto the connection cable. Adjust the volume of the headphone socket on your sound source to a medium level. This improves the quality of cordless sound transmission.
Putting the Set 830 S into operation C Connecting the transmitter to a SCART socket I L 왘 Plug the SCART adapter L onto the connection cable I. 왘 Connect the SCART adapter L to the SCART socket on your TV. Note: If your TV has several SCART sockets, use the socket SCART output. D Using the MKE 800 TV-N external microphone What if your sound source doesn’t have any of the connections mentioned above? You can then use the optional MKE 800 TV-N microphone (see page 30).
Putting the Set 830 S into operation Connecting the transmitter to the mains M N EU UK 왘 Select the suitable country adapter N for your wall socket. 왘 Slide the supplied country adapter onto the mains unit M. 왘 Connect the yellow connector of the mains unit to the yellow socket H of the transmitter. 왘 Plug the mains unit M into a wall socket. The operation indicator B on the transmitter lights up green.
Putting the Set 830 S into operation Connecting headphones or the induction loop for hearing aids to the receiver The socket 7 of the receiver allows you to connect • the supplied induction loop Q, • headphones or • a connection cable to your hearing aid. Connecting the induction loop Carefully remove the clip O from the receiver. 왘 Attach the clip of the induction loop as shown. 왘 왘 Connect the induction loop Q to the socket 7 of the receiver. 7 왘 Q Set your hearing aid to position “T”.
Putting the Set 830 S into operation Connecting headphones 7 왘 Connect the 3.5 mm jack plug of the headphones to the socket 7 of the receiver. Wearing the receiver In order to wear the receiver, you can use the supplied lanyard P, the clip O or the supplied induction loop Q. The induction loop is suitable for users of hearing aids, the lanyard and the clip are useful if you are using headphones.
Putting the Set 830 S into operation Attaching the receiver to clothing or belt If you want to attach the receiver to your clothing or belt, use the attachment clip O. To attach the receiver: O 왘 Attach the clip O to your clothing or belt. To remove the receiver: 왘 Pull the clip O with the receiver away from your clothing or belt.
Using the Set 830 S system Using the Set 830 S system To switch the Set 830 S system on, proceed as follows: Sequence of steps 1. Switch your sound source (e.g. TV) on. The transmitter automatically switches on. 2. Adjust the volume on the receiver to a low level. 3. Switch the receiver on. 4. Adjust the desired volume on the receiver. Page 14 15, 16 15 16 Switching the transmitter on/off To switch the transmitter on: 왘 Switch your sound source on. The transmitter automatically switches on.
Using the Set 830 S system Switching the receiver on/off CAUTION! Hearing damage due to high volumes! This receiver allows you to set higher volumes than conventional headphones. This can cause hearing damage in persons with healthy hearing and especially in children. 왘 Before using the receiver, set the volume on the receiver to a low level. 왘 Do not continuously expose yourself to high volumes. To switch the receiver on: 1 왘 Press the on/off button 3 until the channel indicator 1 lights up.
Using the Set 830 S system Adjusting the volume 왘 Use the volume control 2 to adjust the volume to a sufficient and comfortable level. Searching for a sound source 왘 Switch the receiver on. Do you hear the desired sound source? Yes: The receiver has already found the sound source. 1 5 No: 왘 Briefly press the channel search button 5. The sound source is searched for. On the receiver, the channel indicator 1 can light up as follows: Channel indicator Frequency 2.3+2.
Using the Set 830 S system Adjusting the balance The balance control allows for right/left volume adjustment. Adjust the balance so that you hear equally well with both ears. 4 왘 Turn the balance control 4 to the left L or right R in order to increase the volume for the corresponding ear. Switching between mono and stereo operation If, despite a correct balance adjustment, you can hear the sound only with one ear: 왘 Set the ST/MO switch F of the transmitter to MO (mono).
Using the Set 830 S system Individually enhancing the speech intelligibility D The “speech intelligibility” button C allows you to adjust the sound to your individual needs. C Try out which setting works best for you. 왘 Press the “speech intelligibility” button C sound is optimally adjusted to your needs.
Using the Set 830 S system Storing and charging the receiver 왘 B A After use, place the receiver into the transmitter’s charging compartment 8 without exerting too much pressure. The receiver automatically switches 8 off. When the receiver is placed correctly into the charging compartment, the indicator A lights up: red: The battery is being charged. green: The battery is fully charged. Notes: – With a fully charged battery, the operating time is up to 12 hours.
Using the Set 830 S system Charging a rechargeable battery in the transmitter’s charging compartment You can charge the receiver’s rechargeable battery or a spare BA 300 rechargeable battery (not included in the delivery of the Set 830 S) in the charging compartment 9 at the side of the transmitter. The spare battery offers extended listening time while the discharged first battery is being recharged. Note: Before using the spare rechargeable battery for the first time, charge it for at least 3 hours.
What if... What if... ...this indicator lights up? Indicator Channel indicator 1 on the receiver Status lit yellow off Operation indicator B on the transmitter lit green Charging indicator A Charging indicator 0 “Speech intelligibility” indicator D on the transmitter lit red off lit green lit yellow off Meaning Receiver has just been switched on or a button has just been pressed. Receiver is switched on for more than 30 secs. and no button has been pressed. Receiver is switched off.
What if... ...you change the position of this control/switch? Control/switch Function Volume control 2 Reduces or increases the volume of the receiver. on the receiver Balance control 4 Increases the volume for the left or the right ear. on the receiver Mono/stereo slide switch F on the transmitter Treble adjustment control G on the transmitter Page 16 17 Sets the transmitter to mono or stereo operation. 17 Treble adjustment is only to be made by a hearing aid technician / an expert. 28 ...
What if... Warning signal 6 short beeps 2 long beeps 5 Meaning The receiver does not receive any signal from the transmitter: • The distance between transmitter and receiver is too great. The receiver switches off after 3 minutes. • The transmitter is switched off. The rechargeable battery is almost flat. To switch the acoustic signals on and off: 왘 Press the channel search button 5 of the receiver for approx. 5 seconds. You hear a short acoustic signal. Note: Warning signals cannot be switched off.
Cleaning the Set 830 S Cleaning the Set 830 S Cleaning the transmitter and the receiver CAUTION! Liquids can damage the electronics of the devices! Liquids entering the housing of the devices can cause a short-circuit and damage the electronics. 왘 Keep all liquids far away from the devices. 왘 Do not use any cleansing agents or solvents. 왘 Before cleaning, disconnect the transmitter from the mains. 왘 Use only a slightly damp cloth to clean the devices. If a problem occurs ...
If a problem occurs ... You cannot hear anything Possible cause Is there a free line of sight between receiver and transmitter? Are transmitter and receiver exposed to direct sunlight? Is the receiver still within the transmitter’s range? Are all connectors connected correctly? Is the operation indicator B lit? Solution Remove obstacles in the light path between receiver and transmitter. Avoid exposure to direct sunlight. Move the receiver closer to the transmitter.
If a problem occurs ... You hear the sound only with one ear Possible cause Is the balance adjusted correctly? Solution Is the transmitter set to mono? Set the mono/stereo switch F on the transmitter to the left (see page 17). Turn the balance control 4 to the left or right (see page 17).
Additional technical information The loudspeakers of your TV are muted Possible cause Some TVs have a function that mutes the loudspeakers when you connect a transmitter. Solution Via the operating menu of your TV, check if and how the muting can be deactivated. Use a different audio socket on your TV or use the MKE 800 TV-N external microphone (see “Accessories and spare parts” on page 30).
Additional technical information Compression (settings 1 and 3) Deterioration of the ability to hear quiet sounds as well as loud ones is a typical symptom of old age. Compression compensates for these volume differences by boosting the volume of quiet sounds and reducing the volume of loud sounds if necessary. Compression seems to put the speech in the foreground, making it easier to understand. Compression is self-regulating; once it has been activated, it is not necessary to make any other settings.
Additional technical information Changing the operating mode The transmitter can be set to a different operating mode. This is useful when the sound of your sound source is very low and the transmitter therefore does not always switch on automatically. 왘 Press the “speech intelligibility” button C for approx. 5 seconds. D C The indicator D goes off.
Accessories and spare parts Accessories and spare parts CAUTION! Danger of damage to the device! Components from other manufacturers (e.g. for power supply or rechargeable battery) may cause damage to the device and will invalidate the warranty! 왘 Use only original Sennheiser accessories and spare parts. For the Set 830 S, the following receivers and stethoset receivers are available from your specialist dealer: Cat. No.
Accessories and spare parts The following Set 830 S accessories are available from your specialist dealer: Cat. No. 500898 502566 504061 003448 528185 528184 517627 500974 502710 001676 004658 001678 004657 002408 004652 002409 004653 Accessory/spare part BA 300 spare rechargeable battery EZT 3011 induction loop EZT 3012 induction loop EZI 120 induction couplers Lanyard Clip for attaching the receiver Extension cable, 3 m (3.
Specifications Specifications System Modulation FM, stereo Carrier frequencies 2.3 MHz/2.8 MHz Frequency response 50 Hz–16,000 Hz THD <1% Charging time for rechargeable battery approx. 3 hrs Signal-to-noise ratio (1 mV, peak deviation) typ. 75 dBA Operating temperature 10 °C to 40 °C Transmitter Range up to 12 m within a room Audio/microphone connection 3.5 mm stereo jack socket Power supply 13.5 V DC/500 mA via NT 13 mains unit Weight approx. 260 g Dimensions approx.
Specifications NT 13 mains unit Nominal input voltage 100 V~ to 240 V~ Mains frequency 50–60 Hz Max. power consumption 2.4 W (incl. battery charging) Nominal output voltage 13.5 V DC Nominal output current 500 mA Standby consumption approx. 0.9 W (w/o battery charging) Ambient temperature +5°C to +40°C The NT 13 mains unit is certified in accordance with the legal safety requirements of Europe, the United States, Canada, Russia and Japan.
Manufacturer Declarations Manufacturer Declarations Warranty Sennheiser GmbH & Co. KG gives a warranty of 24 months on this product. For the current warranty conditions, please visit our web site at www.sennheiser.com or contact your Sennheiser partner. Declaration of Conformity This equipment is in compliance with the essential requirements and other relevant provisions of Directives 2004/108/EU and 2006/95/EU. The declaration is available at www.sennheiser.com.
Manufacturer Declarations This equipment has been tested and found to comply with the limits for a Class B digital device, pursuant to Part 15 of the FCC Rules. These limits are designed to provide reasonable protection against harmful interference in a residential installation. This equipment generates, uses and can radiate radio frequency energy and, if not installed and used in accordance with the instructions, may cause harmful interference to radio communications.
Index Index Receiver Adjusting the balance 17 Adjusting the volume 16 Attaching the receiver to clothing 13 Channel indicator (meaning) 21 Cleaning 24 Indicators (meaning) 21 No sound signal 25 Operating time 19 Sound only audible with one ear 26 Storing and charging the receiver 19 Switching the acoustic signals off 23 Switching the receiver on/off 15 Rechargeable battery Replacing and charging the rechargeable battery 20 Special functions Changing the operating mode 28 Fine adjusting the speech intelligi
Sennheiser electronic GmbH & Co. KG Am Labor 1, 30900 Wedemark, Germany www.sennheiser.com Printed in China Publ.