SK 100 Notice d’emploi
Contents Contents Important safety instructions ........................................................................... 2 The SK 100 G3 bodypack transmitter.............................................................. 3 The frequency bank system ........................................................................ 3 Areas of application ...................................................................................... 4 Delivery includes..........................................................
Important safety instructions Important safety instructions • Read this instruction manual. • Keep this instruction manual. Always include this instruction manual when passing the device on to third parties. • Heed all warnings and follow all instructions. • Clean the device only with a slightly damp cloth. • Do not place the device near any heat sources such as radiators, stoves, or other devices (including amplifiers) that produce heat. • Only use attachments/accessories specified by Sennheiser.
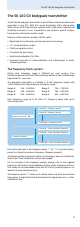
The SK 100 G3 bodypack transmitter The SK 100 G3 bodypack transmitter The SK 100 G3 bodypack transmitter is part of the evolution wireless series generation 3 (ew G3). With this series, Sennheiser offers high-quality state-of-the-art RF transmission systems with a high level of operational reliability and ease of use. Transmitters and receivers permit wireless transmission with studio-quality sound.
The SK 100 G3 bodypack transmitter Areas of application The bodypack transmitter can be combined with the EM 100 G3 stationary receiver. The EM 100 G3 stationary receiver is available in the same UHF frequency ranges and is equipped with the same frequency bank system. This has the advantage that • a transmission system is ready for immediate use after switch-on, • several transmission systems can be operated simultaneously on the preset frequencies without causing intermodulation interference.
Delivery includes Delivery includes The packaging contains the following items: 1 SK 100 G3 bodypack transmitter 2 AA size batteries, 1.
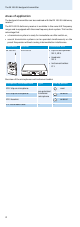
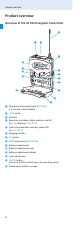
Product overview Product overview Overview of the SK 100 bodypack transmitter 쐋 Microphone/instrument input (MIC/LINE), 3.
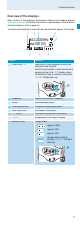
Product overview Overview of the displays After switch-on, the bodypack transmitter displays the standard display “Frequency/Name”. For further illustrations and examples of the different standard displays, refer to page 13. The display backlighting is automatically reduced after approx. 20 seconds. 543.
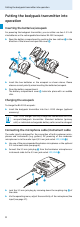
Putting the bodypack transmitter into operation Putting the bodypack transmitter into operation Inserting the batteries/accupack For powering the bodypack transmitter, you can either use two 1.5 V AA size batteries or the rechargeable Sennheiser BA 2015 accupack. 왘 Open the battery compartment by pushing the two catches direction of the arrows and open the cover . in the 왘 Insert the two batteries or the accupack as shown above. Please observe correct polarity when inserting the batteries/accupack.
Putting the bodypack transmitter into operation Attaching and positioning the microphones ME 2 왘 Use the microphone clip to attach the microphone to clothing (e.g. tie, lapel). 왘 Attach the ME 2 microphone as close as possible to the sound source. The ME 2 clip-on microphone has an omni-directional pick-up pattern. It is therefore not necessary to position it precisely. ME 3 왘 Adjust the ME 3 headmic so that a comfortable and secure fit is ensured. The ME 3 headmic has a cardioid pick-up pattern.
Putting the bodypack transmitter into operation Attaching the bodypack transmitter to clothing You can use the belt clip to attach the bodypack transmitter to clothing (e.g. belt, waistband). The belt clip is detachable so that you can also attach the transmitter with the antenna pointing downwards. To do so, withdraw the belt clip from its fixing points and attach it the other way round. The belt clip is secured so that it cannot slide out of its fixing points accidentally.
Using the bodypack transmitter Using the bodypack transmitter To establish a transmission link, proceed as follows: 1. Switch the receiver on (see the instruction manual of the receiver). 2. Switch the bodypack transmitter on (see below). The transmission link is established and the receiver’s RF level display “RF” reacts. Switching the bodypack transmitter on/off 왘 Push the two battery compartment catches compartment cover .
Using the bodypack transmitter To activate the RF signal: ON/OFF SET 왘 Briefly press the ON/OFF button. “RF Mute Off” appears on the display panel. 왘 Press the SET button. The transmission icon is displayed again. Deactivating the lock mode temporarily You can activate or deactivate the automatic lock mode via the “Auto Lock” menu item (see page 18). If the lock mode is activated, you have to temporarily deactivate it In order to be able to operate the bodypack transmitter: 왘 Press the rocker button.
Using the bodypack transmitter The current state of the muting function or the RF signal is displayed on the display panel of the bodypack transmitter: Audio signal is muted Transmitter’s display panel: “MUTE” is displayed Audio signal is activated (muting is canceled) Transmitter’s display panel: “MUTE” is not displayed RF signal is deactivated Transmitter’s display panel: Transmission icon is not displayed RF signal is activated Transmitter’s display panel: Transmission icon is displayed
Using the operating menu Using the operating menu The buttons Button Function of the button Press the ON/OFF button • Switches the bodypack transmitter on and off ON/OFF • Cancels the entry and returns to the current standard display (ESC function) • Deactivates the RF signal (special function, see page 12) Press the SET button SET • Changes from the current standard display to the operating menu • Calls up a menu item • Enters a submenu • Stores the settings and returns to the operating menu Press
Using the operating menu Display Function of the menu item LCD Contrast Adjusts the contrast of the display panel (see page 20) Reset Resets the bodypack transmitter (see page 21) Software Revision Displays the current software revision (see page 21) Exit Exits the extended menu “Advanced Menu” and returns to the main menu Working with the operating menu If the lock mode is activated, you have to deactivate it In order to be able to work with the operating menu (see page 11).
Using the operating menu Exiting a menu item To return to the next higher menu level: 왘 Change to the “Exit” menu item. Menu Exit SET 왘 Confirm your selection. You return to the next higher menu level. To directly return to the current standard display: ON/OFF 16 왘 Press the ON/OFF button.
Adjusting settings via the operating menu Adjusting settings via the operating menu Make use of the possibility to adjust settings via the operating menu of your receiver and to transfer these settings to the bodypack transmitter. For more information, refer to the instruction manual of the receiver. The relevant information is marked with the sync icon. For more detailed information on the operating menu, visit the SK 100 G3 product page at www.sennheiser.com.
Adjusting settings via the operating menu Selecting the frequency bank and the channel manually – “Frequency Preset” SET SET Menu Frequency Preset B.Ch: 5.12 Frequency Preset B.Ch: 5.12 MHz Frequency Preset B.Ch: 1.12 MHz Call up “Frequency Preset” Select the frequency bank and confirm Select the channel; store the setting SET “Stored” When you are in the “Frequency Preset” menu item, the RF signal is deactivated.
Adjusting settings via the operating menu The extended menu “Advanced Menu” Setting transmission frequencies and frequency banks – “Tune” When you have selected one of the system banks and then select the “Tune” menu, the bodypack transmitter automatically switches to channel 1 of the frequency bank “U”. In this case, “U.1” briefly appears on the display panel. Upon delivery, the channels of the frequency bank “U” are not assigned a transmission frequency.
Adjusting settings via the operating menu Setting the mode for the MUTE switch – “Mute Mode” SET Advanced Menu Mute Mode AF On/Off Mute Mode RF On/Off Mute Mode AF On/Off Call up “Mute Mode” Select the desired setting Store the setting SET “Stored” Mode Function “AF On/Off” When the switch is in the MUTE position, no audio signal is transmitted. “RF On/Off” When the switch is in the MUTE position, the RF signal is deactivated. “Disabled” The muting function is deactivated.
Adjusting settings via the operating menu Loading the factory-preset default settings – “Reset” Advanced Menu Reset Call up “Reset” SET Reset Yes Select the desired setting; apply the setting “Stored” SET When resetting the bodypack transmitter, only the selected settings for the pilot tone and for the frequency bank “U” remain unchanged. Displaying the software revision – “Software Revision” You can display the current software revision of the bodypack transmitter.
Adjustment tips Adjustment tips Synchronizing the bodypack transmitter with a receiver When synchronizing the bodypack transmitter with a receiver, please observe the following: 왘 Only use a bodypack transmitter and a receiver from the same frequency range (see the type plate on the transmitter and the receiver). 왘 Make sure that the desired frequencies are listed in the enclosed frequency information sheet.
If a problem occurs ... If a problem occurs ... Problem Possible cause Possible solution Bodypack Lock mode is activated transmitter cannot be operated, “Locked” appears on the display panel Deactivate the lock mode (see page 12). No operation indication Batteries are flat or accupack is flat Replace the batteries or recharge the accupack (see page 8).
Specifications Specifications RF characteristics Modulation wideband FM Frequency ranges 516–558, 566–608, 626–668, 734–776, 780–822, 823–865 MHz (A to E, G, see page 3) Transmission frequencies 1,680 frequencies, tuneable in steps of 25 kHz 20 frequency banks, each with up to 12 factory-preset channels 1 frequency bank with up to 12 user programmable channels Switching bandwidth 42 MHz Nominal/peak deviation ±24 kHz/±48 kHz Frequency stability ≤±15 ppm RF output power at 50 Ω typ.
Specifications Approved by Canada Industry Canada RSS 210 IC 2099A-G3SK limited to 806 MHz USA FCC-Part 74 FCC-ID: DMO G3SK limited to 698 MHz Microphones ME 3 ME 4 Microphone type condenser ME 2 condenser condenser Sensitivity 20 mV/Pa 1.6 mV/Pa 40 mV/Pa Pick-up pattern omni-directional cardioid cardioid Max. SPL 130 dB SPL 120 dB SPL 150 dB SPL Connector assignment 3.
Specifications Frequency response curve ME 2 dBV -10 -20 -30 -40 -50 -60 50 100 200 500 1.000 1k 2k 5k 10.000 10k 20k Hz 1.000 1k 2k 5k 10.000 10k 20k Hz 1.000 1k 2k Frequency response curve ME 3 dBV -40 -50 -60 -70 -90 -100 50 100 200 1m 500 5 cm Frequency response curve ME 4 dBV -10 -20 -30 -40 -50 -60 50 100 0° / 1 m 26 200 500 90° / 1 m 0° / 10 cm 5k 10.
Manufacturer Declarations Manufacturer Declarations Warranty Sennheiser electronic GmbH & Co. KG gives a warranty of 24 months on this product. For the current warranty conditions, please visit our web site at www.sennheiser.com or contact your Sennheiser partner.
Sennheiser electronic GmbH & Co. KG Am Labor 1, 30900 Wedemark, Germany www.sennheiser.com Printed in Germany Publ.