
Instruction manual SKM 100 G3


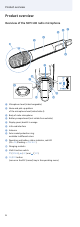
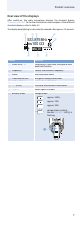

Table Of Contents
- Important safety instructions
- The SKM 100 G3 radio microphone family
- Delivery includes
- Product overview
- Putting the radio microphone into operation
- Using the radio microphone
- Using the operating menu
- Adjusting settings via the operating menu
- The main menu “Menu”
- The extended menu “Advanced Menu”
- Setting transmission frequencies and the frequency bank “U” – “Tune”
- Setting a transmission frequency for the current channel
- Selecting a channel and assigning this channel a frequency
- Activating/deactivating the pilot tone transmission – “Pilot Tone”
- Adjusting the contrast of the display panel – “LCD Contrast”
- Loading the factory-preset default settings – “Reset”
- Displaying the software revision – “Software Revision”
- Adjustment tips
- Cleaning the radio microphone
- If a problem occurs ...
- Specifications

7
Product overview
Overview of the displays
After switch-on, the radio microphone displays the standard display
“Frequency/Name”. For further illustrations and examples of the different
standard displays, refer to Seite 12.
The display backlighting is automatically reduced after approx. 20 seconds.
Display Meaning
햲 Audio level “AF” Modulation of the radio microphone with
peak hold function
햳 Frequency Current transmission frequency
햴 Name User selectable name
햵 Transmission icon RF signal is being transmitted
햶 Lock mode icon Lock mode is activated
햷 “P” (Pilot) Pilot tone transmission is activated
햸 “MUTE” Audio signal is muted
햹 Battery status Charge status:
approx. 100%
approx. 70%
approx. 30%
charge status is critical
,
the red LOW BATT LED 쐎
is
flashing
:
MHz
533.875
ew100 G3
MUTE
P
AF
햳 햴
햲
햶
햵
햹햸햷
쐎