
Instruction Manual SKM 500 G3


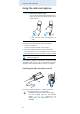


Table Of Contents
- Important safety instructions
- The SKM 500 G3 radio microphone family
- Delivery includes
- Product overview
- Putting the radio microphone into operation
- Using the radio microphone
- Using the operating menu
- Adjusting settings via the operating menu
- Synchronizing the radio microphone with a receiver
- Cleaning the radio microphone
- Recommendations and tips
- If a problem occurs ...
- Accessories and spare parts
- Specifications
- Index

12
Using the radio microphone
Using the radio microphone
To establish a transmission link, proceed as follows:
1. Switch the receiver on
(see the instruction manual of the receiver).
2. Switch the radio microphone on (see next section).
The transmission link is established and the display
backlighting of the receiver changes from red to orange.
If you cannot establish a transmission link between radio
microphone and receiver, refer to the chapter “Synchro-
nizing the radio microphone with a receiver” on page 26.
Switching the radio microphone on/off
To switch the radio microphone on (online operation):
CAUTION! Reduced transmission range
If you touch the antenna 쐆 of the radio micro-
phone, the transmission range will be consid-
erably reduced!
Only hold the radio microphone by its
body.
It is vital to observe the notes on frequency
selection on page 26.
Briefly press the ON/OFF button 쐉.
The radio microphone transmits an RF signal.
The red ON LED 쐎 lights up. The standard
display “Frequency/Name” appears on the
display panel. The transmission icon 햵 is
displayed.
쐆
쐉
쐎
햵
ON/OFF