C M Y CM MY CY CMY K SKP 100 Instruction Manual
SKP100_529675_0409_Sp9.book Seite 1 Donnerstag, 9. April 2009 1:48 13 Contents Contents Important safety instructions .......................................................................... 2 The SKP 100 G3 plug-on transmitter .............................................................. 3 Areas of application ........................................................................................ 3 The frequency bank system ..........................................................................
SKP100_529675_0409_Sp9.book Seite 2 Donnerstag, 9. April 2009 1:48 13 Important safety instructions Important safety instructions • Read this instruction manual. • Keep this instruction manual. Always include this instruction manual when passing the device on to third parties. • Heed all warnings and follow all instructions. • Clean the device only with a slightly damp cloth.
SKP100_529675_0409_Sp9.book Seite 3 Donnerstag, 9. April 2009 1:48 13 The SKP 100 G3 plug-on transmitter The SKP 100 G3 plug-on transmitter The SKP 100 G3 plug-on transmitter is part of the evolution wireless series generation 3 (ew G3). With this series, Sennheiser offers high-quality state-of-the-art RF transmission systems with a high level of operational reliability and ease of use. Transmitters and receivers permit wireless transmission with studio-quality sound.
SKP100_529675_0409_Sp9.book Seite 4 Donnerstag, 9. April 2009 1:48 13 Delivery includes The factory-preset frequencies within one frequency bank are intermodulation-free. These frequencies cannot be changed. For an overview of the frequency presets, please refer to the supplied frequency information sheet. Updated versions of the frequency information sheet can be downloaded from the SKP 100 G3 product page on our website at www.sennheiser.com.
SKP100_529675_0409_Sp9.book Seite 5 Donnerstag, 9.
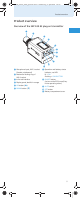
SKP100_529675_0409_Sp9.book Seite 6 Donnerstag, 9. April 2009 1:48 13 Product overview Overview of the displays After switch-on, the plug-on transmitter displays the standard display “Frequency/Name”. For further illustrations and examples of the different standard displays, refer to page 10. The display backlighting is automatically reduced after approx. 20 seconds. 533.
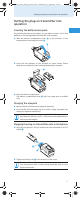
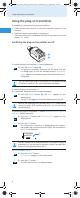
SKP100_529675_0409_Sp9.book Seite 7 Donnerstag, 9. April 2009 1:48 13 Putting the plug-on transmitter into operation Putting the plug-on transmitter into operation Inserting the batteries/accupack For powering the plug-on transmitter, you can either use two 1.5 V AA size batteries or the rechargeable Sennheiser BA 2015 accupack. 왘 Slide the battery compartment cover embossed arrow and open the cover in the direction of the . 왘 Insert the two batteries or the accupack as shown below.
SKP100_529675_0409_Sp9.book Seite 8 Donnerstag, 9. April 2009 1:48 13 Using the plug-on transmitter Using the plug-on transmitter To establish a transmission link, proceed as follows: 1. Switch the diversity receiver on (see the instruction manual of the receiver). 2. Switch the plug-on transmitter on (see below). The transmission link is established and the diversity receiver’s RF level display “RF” reacts.
SKP100_529675_0409_Sp9.book Seite 9 Donnerstag, 9. April 2009 1:48 13 Using the plug-on transmitter Deactivating the lock mode temporarily You can activate or deactivate the automatic lock mode via the “Auto Lock” menu item (see page 14). If the lock mode is activated, you have to temporarily deactivate it In order to be able to operate the plug-on transmitter: ON/OFF 왘 Press the ON/OFF button. “Locked” appears on the display panel. 왘 Press the UP button (왖). “Unlock?” appears on the display panel.
SKP100_529675_0409_Sp9.book Seite 10 Donnerstag, 9. April 2009 1:48 13 Using the plug-on transmitter The current state of the muting function or the RF signal is displayed on the display panel of the plug-on transmitter: 533.
SKP100_529675_0409_Sp9.book Seite 11 Donnerstag, 9.
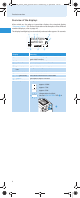
SKP100_529675_0409_Sp9.book Seite 12 Donnerstag, 9. April 2009 1:48 13 Using the operating menu Working with the operating menu If the lock mode is activated, you have to deactivate it In order to be able to work with the operating menu (see page 9). By way of example of the “Sensitivity” menu, this section describes how to use the operating menu. Changing from the current standard display to the operating menu SET 왘 Press the SET button. The current standard display is replaced by the main menu.
SKP100_529675_0409_Sp9.book Seite 13 Donnerstag, 9. April 2009 1:48 13 Adjusting settings via the operating menu Adjusting settings via the operating menu Make use of the possibility to adjust settings via the operating menu of your receiver and to transfer these settings to the plugon transmitter. For more information, refer to the instruction manual of the receiver. The relevant information is marked with the sync icon.
SKP100_529675_0409_Sp9.book Seite 14 Donnerstag, 9. April 2009 1:48 13 Adjusting settings via the operating menu When setting up multi-channel systems, please observe the following: Only the factory-preset frequencies within one frequency bank are intermodulation-free (see page 17). Plug-on transmitter and receiver of a transmission link have to be set to the same frequency. It is vital to observe the notes on frequency selection on page 17.
SKP100_529675_0409_Sp9.book Seite 15 Donnerstag, 9. April 2009 1:48 13 Adjusting settings via the operating menu Setting a transmission frequency for the current channel 왘 Press the UP button (왖)/DOWN button (왔) until the “Tune” menu item appears. SET 왘 Press the SET button. The frequency selection appears. Advanced Menu Tune SET Call up “Tune” Tu n e 543 .200 MHz B.Ch: U. 1 SET Tu n e 548.200 MHz B.Ch: U.
SKP100_529675_0409_Sp9.book Seite 16 Donnerstag, 9. April 2009 1:48 13 Adjusting settings via the operating menu Activating/deactivating the pilot tone transmission – “Pilot Tone” Advanced Menu Name Pilot Tone SET Pilot Active Call up “Pilot Tone” Pilot Inactive Select the desired setting Store the setting SET “Stored” The plug-on transmitter adds an inaudible pilot tone to the audio signal.
SKP100_529675_0409_Sp9.book Seite 17 Donnerstag, 9. April 2009 1:48 13 Synchronizing the plug-on transmitter with a receiver Synchronizing the plug-on transmitter with a receiver When synchronizing the plug-on transmitter with a receiver, please observe the following: 왘 Only use a plug-on transmitter and a receiver from the same frequency range (see the type plate on the transmitter and the receiver). 왘 Make sure that the desired frequencies are listed in the enclosed frequency information sheet.
SKP100_529675_0409_Sp9.book Seite 18 Donnerstag, 9. April 2009 1:48 13 Cleaning the plug-on transmitter Cleaning the plug-on transmitter CAUTION! Liquids can damage the electronics of the plug-on transmitter! Liquids entering the housing of the device can cause a short-circuit and damage the electronics. 왘 Keep all liquids away from the plug-on transmitter. 왘 Use a slightly damp cloth to clean the plug-on transmitter from time to time. Do not use any solvents or cleansing agents.
SKP100_529675_0409_Sp9.book Seite 19 Donnerstag, 9. April 2009 1:48 13 If a problem occurs ... If a problem occurs ... Problem Possible cause Possible solution Plug-on transmitter cannot be operated, “Locked” appears on the display panel Lock mode is activated Deactivate the lock mode (see page 9). No operation indication Batteries are flat or Replace the batteries or accupack is flat recharge the accupack (see page 7).
SKP100_529675_0409_Sp9.book Seite 20 Donnerstag, 9. April 2009 1:48 13 Accessories Accessories The following SKP 100 G3 accessories are available from your specialist dealer: Cat. No.
SKP100_529675_0409_Sp9.book Seite 21 Donnerstag, 9.
SKP100_529675_0409_Sp9.book Seite 22 Donnerstag, 9. April 2009 1:48 13 Manufacturer Declarations Pin assignment of XLR-3 socket XLR-3 socket (female), unbalanced (Audio In) + 2 1 3 Manufacturer Declarations Warranty Sennheiser electronic GmbH & Co. KG gives a warranty of 24 months on this product. For the current warranty conditions, please visit our web site at www.sennheiser.com or contact your Sennheiser partner.
C M Y CM MY CY CMY K Sennheiser electronic GmbH & Co. KG Am Labor 1, 30900 Wedemark, Germany www.sennheiser.com Printed in Germany Publ.