
Planning and setting up single-room and multi-room installations with SpeechLine Digital Wireless


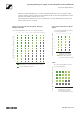


Table Of Contents

AN 1106 v2.0 | 6/12
System planning for single-room and multi-room installations
SpeechLine Digital Wireless
Single-room setup procedure with SpeechLine Digital
Wireless
With this document we would like to provide some guidance for when you start planning your
project with SpeechLine Digital Wireless in the license-free 1.9 GHz frequency band for one single
room with a maximum number of up to 20 wireless microphone links depending on product vari-
ants and country-specific regulations (see “Shared use of 1.9 GHz spectrum”).
SpeechLine Digital Wireless offers two different RF power modes for different types of installations:
the automatic mode with adaptive power for single-room installations and the manual mode for
multi-room installations.
For this scenario the automatic power mode needs to be used. The automatic power mode is
the default factory setting. If the manual mode is selected, navigate to the RF Settings tabs in the
Sennheiser Control Cockpit and select Automatic from the RF Power dropdown menu for all receiv-
ers used.
For the SL Rack Receiver DW you can also select the automatic mode in the System Settings -> RF
Power menu of the device itself.
For detailed technical information on SpeechLine Digital Wireless please refer to the sys-
tem instruction manual.
You can access it via the Sennheiser Documentation App (available free of charge for iOS
and Android) or via the download area of the SpeechLine Digital Wireless product page.
Sennheiser Documentation App:
www.sennheiser.com/documentation-app
SpeechLine Digital Wireless product page:
www.sennheiser.com/speechline-dw
Single-room setup with SL Rack Receiver DW only
For an installation in one single room using only the SL Rack Receiver DW please observe the fol-
lowing steps:
f Install all receivers in one rack.
f Connect all cables for the receivers.
f Mount all antennas as recommended and feasible.
f Ensure that all receivers are switched off.
f Switch on the first receiver. This receiver will become the Master.
f If necessary, pair a transmitter. Only if necessary, as the sets are delivered already paired.
f Wait until both the LED of the receiver and the LED of the transmitter light up green.
f Perform a walktest to ensure the best reception coverage.
f Switch on all other receivers. They will synchronize with the Master.
Make sure to leave the Master receiver switched on during this step.