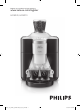
Register your product and get support at www.senseo.com/register HD8030, HD8010 4203_000_7242_1_DFU Booklet_Lux_A5_v2.
1 4203_000_7242_1_DFU Booklet_Lux_A5_v2.
HD8030, HD8010 English 4 Nederlands 32 Français 60 4203_000_7242_1_DFU Booklet_Lux_A5_v2.
ENGLISH Table of contents Introduction 4 General description 5 Important 5 Danger 5 Warning 5 Caution 6 Compliance with standards 7 Installing the coffeemaker 7 Placing and removing the bean-funnels 7 Preparing for use 8 Filling the water tank 8 Automatic rinsing cycle 9 Using the coffeemaker 10 Brewing 1 or 2 cups of coffee 10 Brewing a jug of coffee 11 Selecting the coffee strength (HD8030 only) 13 Manual rinsing cycle 13 Adjusting the grinding degree 14 Cleaning and maintenance 16 Cleaning the water t
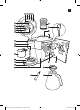
ENGLISH 5 For support and movies on how to clean, maintain and descale the coffeemaker and how to adjust the grinder, go to www.senseo.com/sarista/support . General description (Fig.
ENGLISH - Children should be supervised to ensure that they do not play with the coffeemaker. Keep the packaging materials (plastic bags, cardboard buffers, etc.) out of the reach of children, as they are not a toy. This coffeemaker is designed to grind beans and brew coffee. Use it correctly and with care to avoid scalding by hot water and steam. Do not use the coffeemaker if the plug, the mains cord or the coffeemaker itself is damaged.
ENGLISH - 7 Never use accessories or parts made by other manufacturers or that become invalid if you use such parts or accessories. - cause damage to the water tank and the coffeemaker. Compliance with standards - This Philips coffeemaker complies with all standards regarding according to evidence available today. Installing the coffeemaker Never install the coffeemaker in environments where the temperature may drop to 0° or below.
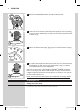
ENGLISH 2 Pull the round AROMA LOCK® seal off the bean-funnel. 3 Insert the screw thread of the bean-funnel properly into the opening in the top of the coffeemaker (1). Then turn the bean-funnel clockwise to fasten it (2). 4 When the ‘bean-funnel empty’ light goes on, the bean-funnel is empty. 5 To replace the empty bean-funnel with a full one, turn the bean-funnel anticlockwise (1) and remove it (2). Then perform step 1 to place a new full bean-funnel on the coffeemaker.
ENGLISH 9 Note:The ‘water tank empty’ light goes on when there is not enough water in the water tank to brew one cup of coffee. 1 Remove the water tank from the coffeemaker. 2 Rinse the water tank under the tap. 3 Fill the water tank with cold tap water up to the MAX indication. cause damage to the water tank and the coffeemaker. 4 Slide the water tank back into the coffeemaker. Automatic rinsing cycle The coffeemaker automatically performs a rinsing cycle every time you switch it on.
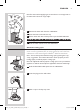
ENGLISH 4 Press the on/off button to switch on the coffeemaker. , , cup. Empty the cup into the sink. out of the spout into the , When the activity light lights up continuously, the rinsing cycle is Using the coffeemaker Brewing 1 or 2 cups of coffee 1 Check if there is enough water in the water tank. Fill the water tank with water, if necessary (see chapter ‘Preparing for use’).
ENGLISH 11 5 Place 1 or 2 cups on the drip tray cover. 6 Press the 1-cup or 2-cup button. Tip:You can interrupt the brewing cycle at any time, which can give you a stronger coffee.To do this, press the same cup button (1-cup button or 2-cup button) that you pressed to start brewing coffee. However, if you do this, the machine does not complete the interrupted brewing cycle if you switch it on again or press the same cup button again. Note: Each cup of coffee is brewed from freshly ground beans.
ENGLISH Note:The coffee beans have to be visible above the matt section of the beanfunnel. If this is not the case, there are not enough coffee beans in the beanfunnel to brew six cups of coffee. Replace the bean-pack with a full one or one Note: If the bean-funnel becomes empty during brewing, the ‘bean-pack empty’ light goes on and the coffeemaker stops during brewing.
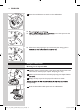
English 13 7 Press the jug button. Note: Each cup of coffee is brewed from freshly ground beans. ,, The coffeemaker grinds the required amount of coffee beans for the first cup of coffee and then brews coffee into the jug. The coffeemaker grinds coffee beans and brews coffee five more times to fill the jug. ,, The activity light flashes once when the beans for the first cup are ground, twice when the beans for the second cup are ground etc.
ENGLISH 2 Turn the bean-funnel anticlockwise to remove it. 3 Slide the detachable coffee spout into the coffeemaker. 4 Place a cup on the drip tray cover. 5 Press the 1-cup button to start the rinsing cycle. Adjusting the grinding degree You can adjust the coffee grinder with the grinding degree adjustment tool to set the coffee strength to your personal taste. When you adjust the taste, adjust the grinder to a coarser setting. Note: Over time the grinder may change to a coarser setting.
English 15 1 Remove the coffee grounds container from the coffeemaker. 2 Open the service door. 3 Take the grinding degree adjustment tool out of the recess next to the brewing unit. 4 Close the service door. 5 Slide the coffee grounds container back into the coffeemaker. 4203_000_7242_1_DFU Booklet_Lux_A5_v2.
ENGLISH 6 Insert the lug on the broad end of the grinding degree next to the cap of the grinding degree adjustment hole and press lightly. This makes the cap open automatically. 7 Insert the narrow end of the grinding degree adjustment tool into the grinding degree adjustment hole so that the opening in the tool button, when the device starts grinding you can adjust the grinding degree. 8 For a coarser setting, push down and turn the grinding degree the grinding degree adjustment tool anticlockwise.
ENGLISH 2 17 under the tap. 3 Clean the water tank with hot water and some washing-up liquid and rinse it under the tap. 4 down gently. 5 Fill the water tank with fresh, cold tap water and slide it back into the coffeemaker. 6 Remove the coffee grounds container from the coffeemaker and empty it. 7 Clean the coffee grounds container with hot water and some washing-up liquid and rinse it under the tap. 8 Slide the coffee grounds container back into the coffeemaker.
ENGLISH 11 Clean the drip tray and the drip tray cover with hot water and some washing-up liquid and rinse them under the tap. 12 Clean the guiding grooves for the drip tray in the bottom of the coffeemaker with a moist cloth. 13 Put the drip tray cover on the drip tray and slide the drip tray back into the coffeemaker. Cleaning the detachable coffee spout 1 Remove the detachable coffee spout. 2 Rinse the detachable coffee spout under the tap.
ENGLISH 19 2 Rinse the inside of the jug and the lid with warm water. Clean the outside of the jug with a damp cloth. Note:The jug is not dishwasher-proof. 3 Put the jug in upright position without the lid on and let the inside of the jug dry. 4 When the inside of the jug is dry, place the lid on the jug and turn it to the ‘closed/brewing’ position Cleaning the brewing unit Do not clean the brewing unit in the dishwasher and do not use soap or a cleaning agent to clean it.
English 5 Rinse the outside of the brewing unit under a lukewarm tap. Never use any soap or other cleaning agent to clean the brewing unit. Do not dry the brewing unit with a cloth to prevent fibres from collecting inside the brewing unit. After rinsing, just shake off excess water. 6 Carefully rinse the upper filter under a lukewarm tap. 7 Thoroughly clean the inside of the coffeemaker with a damp cloth.
English 21 9 Make sure that the locking hook of the brewing unit is in the correct position. The hook is not correctly positioned if it is still in bottommost position. -- To position the hook correctly, push it upwards until it is uppermost position. 10 Slide the brewing unit back into the coffeemaker until it clicks into position. Do not press the PUSH button. 11 Close the service door. 12 Slide the coffee grounds container back into the coffeemaker. 4203_000_7242_1_DFU Booklet_Lux_A5_v2.
ENGLISH Lubrication For optimal performance of the coffeemaker, lubricate the brewing unit after 400 cups of coffee or once a month. - For more information on what and how to lubricate, watch the instruction movies on www.senseo.com/sarista/support. - For optimal brewing results, we advise you to use the lubricant supplied by Philips. You can buy this lubricant in the online shop at www.shop.philips.com/service. 1 Switch off the coffeemaker and unplug it.
ENGLISH 23 Descaling the coffeemaker Scale builds up inside the coffeemaker during use. It is essential to descale the coffeemaker when the CALC CEAN light is lit. Only use the special Philips SENSEO® SARISTA descaling solution (CA6400) to descale the coffeemaker. For more information on how to descale this coffeemaker, you can watch the instruction movies on www.senseo.com/sarista/support. When to descale - Descale the coffeemaker as described below as soon as the CALC CLEAN light lights up continuously.
English ,, The CALC CLEAN light starts flashing quickly. 2 Remove the water tank from the coffeemaker. 3 Pour the contents of a Philips SENSEO® SARISTA descaling solution bottle (250ml) into the water tank and then add 1 litre of tap water to fill the water tank to the MAX indication. MAX 4 Slide the water tank back into the coffeemaker. 5 Remove the detachable coffee spout or the coffee jug from the coffeemaker. 6 Make sure the drip tray is empty. 7 Place a bowl with a capacity of 1.
English 25 8 Press the 1-cup button and the 2-cup button simultaneously for 1 second to start the descaling procedure. ,, The activity light and the CALC CLEAN light both flash slowly to indicate that the descaling cycle has started. ,, The water-descaling solution mixture comes out at intervals. The coffeemaker stops descaling a few times to let the descaling solution act. ,, When the water tank is empty, the descaling cycle is finished.
English 5 Press the 1-cup button and the 2-cup button simultaneously for 1 second to start the rinsing cycle. ,, The activity light and the CALC CLEAN light flash slowly. ,, During the flushing cycle, water comes out of the coffeemaker in a continuous flow. 6 When the activity light goes out, the ‘water tank empty’ light goes on and the CALC CLEAN light flashes quickly, empty the bowl and rinse and fill the water tank.
ENGLISH 27 Ordering accessories To purchase accessories for this coffeemaker, please visit our online shop at www.shop.philips.com/service. If the online shop is not available in your country, go to your Philips dealer or a Philips service centre. If you Extra jug for HD8010 You can buy a jug as accessory for HD8010 under number CA6501. Note:The instructions for the jug included in this user manual also apply to this jug.
ENGLISH Meaning of light signals Light signal Meaning ’Water tank empty’ light on Not enough water in continuously. water tank. ‘Coffee grounds container full’ light on continuously. Action Fill the water tank (see chapter ‘Preparing for use’). Water tank not properly placed. Insert the water tank into the coffeemaker properly. Coffee grounds container is full. Remove the coffee grounds container, empty and clean it. Coffee grounds container not properly placed.
ENGLISH 29 Troubleshooting This chapter summarises the most common problems you could encounter with your coffeemaker. If you are unable to solve the problem with the information below, visit www.senseo.com/sarista/support for a lst of frequently asked questions or contact the Consumer Care Centre in your country. On this site you can also watch instruction movies on how to use, clean and descale your Philips SENSEO® SARISTA coffeemaker. Problem Possible solution The coffeemaker does not work.
ENGLISH Problem Possible solution The brewing unit cannot be slid back into the coffeemaker. Check if the reference signs on the side of the brewing unit match. See chapter ‘Cleaning and maintenance’ or watch the instruction movie on cleaning the brewing unit on www.senseo.com/sarista/support The service door does not open. Perhaps you try to open the service door to remove the brewing unit while the coffee grounds container is still in the coffeemaker.
English 31 Technical specifications Feature Value / location Nominal voltage Inside of service door Power rating Inside of service door Material Plastic Cord length 1.5 m Water tank capacity 1250ml Coffee grounds container capacity 10 cakes Capacity of coffee jug 6 cups 4203_000_7242_1_DFU Booklet_Lux_A5_v2.
NEDERLANDS Inhoudsopgave Inleiding 32 Algemene beschrijving 33 Belangrijk 33 Gevaar 33 Waarschuwing 33 Let op 34 Naleving van richtlijnen 35 Voor het eerste gebruik 35 De bean-funnels plaatsen en verwijderen 35 Klaarmaken voor gebruik 37 Het waterreservoir vullen 37 Automatische spoelcyclus 37 Handmatige spoelcyclus 41 De maalsterkte instellen 42 Schoonmaken en onderhoud 44 De kan schoonmaken 46 De zetgroep schoonmaken 47 Smeren 50 Ontkalkingsprocedure 51 Accessoires bestellen 55 Milieu 56 Garantie en
NEDERLANDS 33 www.senseo.com/sarista/support. Algemene beschrijving 1 2 3 4 5 6 7 8 9 10 11 12 13 14 15 16 17 18 19 20 21 22 23 24 25 26 27 1) Activiteitslampje ’Waterreservoir leeg’-lampje CALC CLEAN-lampje ’Bean-funnel leeg’-lampje 1-kops knop Kanknop Aan/uitknop 2-kops knop Bedieningspaneel Waterreservoir Lekplaat ’Lekbak vol’-indicator Lekbak Smeermiddel Zetgroep Servicedeur Maalsterkteaanpassingsgat Opening voor bean-funnel Hulpmiddel voor aanpassing maalsterkte Bean-funnel Belangrijk gebruikt.
NEDERLANDS tenzij iemand die verantwoordelijk is voor hun veiligheid toezicht op - gebruikt. Houd toezicht op kinderen om te voorkomen dat ze met de Houd de verpakkingsmaterialen (plastic zakken, kartonnen buffers enz.) buiten het bereik van kinderen. De verpakkingsmaterialen zijn geen speelgoed. te zetten. Gebruik het apparaat voorzichtig en op de juiste wijze om verbranding door heet water en stoom te voorkomen.
NEDERLANDS - 35 Om verbrandingsgevaar te vermijden, moet u altijd de inhoud in een kop gieten en niet direct uit de kan drinken. - personeelskeukens van bijvoorbeeld winkels, kantoren, boerderijen of vergelijkbare werkomgevingen en ook niet voor gebruik door gasten van hotels, motels, bed & breakfasts en andere verblijfsaccommodaties. Gebruik nooit accessoires of onderdelen van andere fabrikanten of - indien gebruik is gemaakt van dergelijke onderdelen of accessoires.
NEDERLANDS 1 Trek de verticale strip naar beneden om de beschermende hoes van de bean-funnel te verwijderen. 2 Trek de ronde AROMA LOCK®-afdichting van de bean-funnel. 3 Plaats de schroefdraad van de bean-funnel goed in de opening aan de funnel vervolgens rechtsom om deze te bevestigen (2). 4 Wanneer het ‘bean-funnel leeg’-lampje gaat branden, is de bean-funnel leeg. 5 Om de lege bean-funnel te vervangen met een volle bean-funnel, draait u de bean-funnel linksom (1) en verwijdert u deze (2).
NEDERLANDS 37 Klaarmaken voor gebruik Het waterreservoir vullen Vul het waterreservoir voor elk gebruik met vers water. Opmerking: Het ‘waterreservoir leeg’-lampje gaat branden wanneer er niet 1 2 Spoel het waterreservoir onder de kraan. 3 Vul het waterreservoir tot aan de MAX-aanduiding met koud kraanwater. Vul het waterreservoir nooit met warm of heet water of met spuitwater, omdat dit schade kan veroorzaken aan het waterreservoir en de 4 Automatische spoelcyclus spoelcyclus uit.
NEDERLANDS 3 Plaats een kop op de lekplaat. 4 , , Het activiteitslampje begint te knipperen. Na een korte opwarmtijd stroomt er water uit de tuit en in de kop. Leeg de kop in de gootsteen. , Wanneer het activiteitslampje ononderbroken brandt, is de 1 Controleer of er genoeg water in het waterreservoir zit.Vul het waterreservoir zo nodig met water (zie hoofdstuk ‘Klaarmaken voor gebruik’). 2 Zorg ervoor dat de bean-funnel goed is bevestigd (zie hoofdstuk ‘Voor het eerste gebruik’).
NEDERLANDS 39 3 Leeg de lekbak als de ‘lekbak vol’-indicator zichtbaar is. Opmerking: Als u de ‘lekbak vol’-indicator negeert, kan de lekbak tijdens het 4 5 Plaats 1 of 2 koppen op de lekplaat. 6 Druk op de 1-kops of 2-kops knop. Hiervoor drukt u op dezelfde knop (1-kops knop of 2-kops knop) waarop u dezelfde knop drukt. , , Het activiteitslampje knippert één keer wanneer de bonen gemalen zijn. , , 4203_000_7242_1_DFU Booklet_Lux_A5_v2.indd 39 vult beide koppen ook voor de andere helft.
NEDERLANDS de kan. Opmerking: Maak de kan voor het eerste gebruik altijd schoon met warm water en een beetje afwasmiddel. Als u de kan een tijdje niet hebt gebruikt, spoel de kan dan met warm water om geuren te verwijderen. 1 Controleer of het waterreservoir tot de MAX-aanduiding is gevuld.Vul het waterreservoir zo nodig met water (zie hoofdstuk ‘Klaarmaken voor gebruik’).
Nederlands 41 6 Plaats de kan op de lekplaat. Tip: Als u de koffie langer warm wilt houden, spoel dan de kan met heet water. Hierdoor wordt de kan voorverwarmd voordat u koffie gaat zetten. 7 Druk op de kanknop. Opmerking: Elke kop koffie wordt gezet van versgemalen bonen. ,, De koffiezetter maalt de benodigde hoeveelheid koffiebonen voor de eerste kop koffie en zet dan koffie in de kan. De koffiezetter maalt koffiebonen en zet nog vijf keer koffie om de kan te vullen.
NEDERLANDS 1 Controleer of het waterreservoir voldoende is gevuld en of het activiteitslampje brandt. 2 Draai de bean-funnel linksom om deze te verwijderen. 3 4 Plaats een kop op de lekplaat. 5 Druk op de 1-kops knop om de spoelcyclus te beginnen. De maalsterkte instellen grovere maling. Opmerking: De instelling van de molen kan na verloop van tijd veranderen in een grovere maling. Het wordt aangeraden de maalsterkte af en toe aan te passen aan uw persoonlijke smaak.
Nederlands 43 1 Verwijder de koffiedikbak uit de koffiezetter. 2 Open de servicedeur. 3 Neem het hulpmiddel voor het aanpassen van de maalsterkte uit de uitsparing naast de zetgroep. 4 Sluit de servicedeur. 5 Schuif de koffiedikbak terug in de koffiezetter. 4203_000_7242_1_DFU Booklet_Lux_A5_v2.
NEDERLANDS 6 Steek het nokje op het brede uiteinde van het hulpmiddel voor het aanpassen van de maalsterkte naast de dop van het maalsterkteaanpassingsgat en druk zachtjes. Hierdoor opent de dop automatisch. 7 Plaats het smalle uiteinde van het hulpmiddel voor het aanpassen van de maalsterkte in het maalsterkteaanpassingsgat, zodat de opening in het hulpmiddel op de pin onder in het gat past. Druk op de 1-kops knop. Wanneer het apparaat begint te malen, kunt u de maalsterkte instellen.
NEDERLANDS 45 2 3 Maak het waterreservoir schoon met warm water en een beetje afwasmiddel en spoel het af onder de kraan. 4 voorzichtig naar beneden te duwen. 5 Vul het waterreservoir met vers, koud kraanwater en schuif het 6 7 afwasmiddel en spoel het af onder de kraan. 8 9 10 Verwijder de lekplaat en leeg de lekbak. 4203_000_7242_1_DFU Booklet_Lux_A5_v2.
NEDERLANDS 11 Maak de lekbak en de lekplaat schoon met warm water en een beetje afwasmiddel en spoel het af onder de kraan. 12 schoon met een vochtige doek. 13 Plaats de lekplaat op de lekbak en schuif de lekbak terug in de 1 2 3 op. De kan schoonmaken Maak de kan na elk gebruik schoon. Gebruik geen agressieve schoonmaakmiddelen, oplosmiddelen of chemische stoffen om de kan schoon te maken. 1 Ontgrendel het deksel door de hendel naar het verwijdersymbool te draaien.
NEDERLANDS 47 2 Spoel de binnenkant van de kan en het deksel af met warm water. Maak de buitenkant van de kan schoon met een vochtige doek. Opmerking: De kan is niet vaatwasmachinebestendig. 3 Zet de kan rechtop met het deksel eraf en laat de binnenkant van de kan drogen. 4 Als de binnenkant van de kan droog is, plaatst u het deksel op de kan De zetgroep schoonmaken Maak de zetgroep niet schoon in de vaatwasmachine en gebruik geen zeep of schoonmaakmiddelen om deze schoon te maken.
Nederlands 5 Spoel de buitenkant van de zetgroep af onder een lauwe kraan. Gebruik nooit zeep of een ander schoonmaakmiddel om de zetgroep schoon te maken. Droog de zetgroep niet met een doek om te voorkomen dat zich vezels ophopen in de zetgroep. Schud alleen het overtollige water na het spoelen af. 6 Spoel het bovenste filter voorzichtig af onder een lauwe kraan. 7 Reinig de binnenkant van de koffiezetter grondig met een vochtige doek.
Nederlands 49 9 Zorg dat de vergrendelhaak van de zetgroep in de juiste stand staat. De haak is niet juist geplaatst als deze nog steeds in onderste stand staat. -- Om de haak in de juiste stand te zetten, drukt u de haak omhoog totdat deze in de bovenste stand staat. 10 Schuif de zetgroep terug in de koffiezetter tot deze vastklikt. Druk niet op de PUSH-knop. 11 Sluit de servicedeur. 12 Schuif de koffiedikbak terug in de koffiezetter. 4203_000_7242_1_DFU Booklet_Lux_A5_v2.
NEDERLANDS Smeren - Voor meer informatie over wat en hoe te smeren bekijkt u de www.senseo.com/sarista/support. Voor optimale resultaten raden wij u aan om het smeermiddel te gebruiken dat door Philips wordt geleverd. U kunt dit smeermiddel kopen via de Online Shop: www.shop.philips.com/service. - 1 2 Volg stap 2 tot en met 4 in ‘De zetgroep schoonmaken’ om de 3 Smeer wat smeermiddel op de geleiderrails in de zetgroep. 4 Smeer wat smeermiddel rond de as in de onderkant van de zetgroep.
NEDERLANDS 51 lampje brandt. Gebruik alleen de speciale Philips SENSEO® SARISTAwww.senseo.com/sarista/support. Wanneer ontkalken CALC CLEAN-lampje ononderbroken gaat branden. Waarom ontkalken - Het zorgt ervoor dat uw kop volledig wordt gevuld Het voorkomt storingen ontkalkingsprocedure niet correct uitvoert, blijven kalkresten achter in de wordt de reparatie niet door de garantie gedekt. Ontkalker Gebruik alleen de speciale Philips SENSEO® SARISTA-ontkalkoplossing prestaties te garanderen.
Nederlands ,, Het CALC CLEAN-lampje begint snel te knipperen. 2 Verwijder het waterreservoir uit de koffiezetter. 3 Giet de inhoud van een flesje Philips SENSEO® SARISTAontkalkoplossing (250 ml) in het waterreservoir en voeg vervolgens 1 liter kraanwater toe om het waterreservoir te vullen tot de MAXaanduiding. MAX 4 Schuif het waterreservoir terug in de koffiezetter. 5 Haal de afneembare koffietuit of de koffiekan uit de koffiezetter. 6 Zorg ervoor de lekbak leeg is.
NEDERLANDS 53 8 Druk gedurende één seconde tegelijkertijd op de 1-kops knop en de 2-kops knop om de ontkalkingsprocedure te beginnen. , Het activiteitslampje en het CALC CLEAN-lampje knipperen beide langzaam om aan te geven dat de ontkalkingscyclus is begonnen. De waterontkalkoplossing stroomt met tussenpozen uit de , de ontkalkoplossing te laten inwerken. Wanneer het waterreservoir leeg is, is de ontkalkingscyclus beëindigd.
NEDERLANDS 5 Druk gedurende één seconde tegelijkertijd op de 1-kops knop en de 2-kops knop om de spoelcyclus te beginnen. , , Het activiteitslampje en het CALC CLEAN-lampje knipperen langzaam. Tijdens het doorspoelen stroomt ononderbroken water uit de 6 Wanneer het activiteitslampje uit gaat, het ‘waterreservoir leeg’lampje gaat branden en het CALC CLEAN-lampje snel begint te knipperen, leegt u de kom en spoelt en vult u het waterreservoir.
NEDERLANDS 55 Accessoires bestellen Ga naar onze Online Shop op www.shop.philips.com/service om of een Philips-servicecentrum als de Online Shop niet beschikbaar is in uw land. Als u problemen hebt met het vinden van accessoires voor uw in uw land. U vindt de contactgegevens in het ‘worldwide guarantee’vouwblad. Extra kan voor HD8010 U kunt een kan kopen als accessoire voor HD8010 onder nummer CA6501.
NEDERLANDS Betekenis van lampjes Lampjes Betekenis Handeling Het ‘waterreservoir leeg’-lampje brandt ononderbroken. Er zit niet genoeg water in het waterreservoir. Vul het waterreservoir (zie hoofdstuk ‘Klaarmaken voor gebruik’). Het waterreservoir is niet correct geplaatst. Plaats het waterreservoir correct in de vol’-lampje brandt ononderbroken. en leeg en reinig deze. correct geplaatst. Het ‘bean-funnel leeg’-lampje brandt ononderbroken. Het activiteitslampje knippert snel.
NEDERLANDS 57 Problemen oplossen voorkomen. Als u het probleem niet kunt oplossen met de onderstaande informatie, gaat u naar www.senseo.com/sarista/support voor een lijst met veelgestelde vragen of neemt u contact op met het bekijken over hoe u uw Philips SENSEO® schoonmaakt en ontkalkt. Probleem Mogelijke oplossing niet. met de plaatselijke netspanning. Vul het waterreservoir met water.
NEDERLANDS Probleem Mogelijke oplossing Controleer of het ‘waterreservoir leeg’-lampje, het ‘bean-funnel leeg’-lampje voordat de kan is gevuld. brandt, vult u het waterreservoir opnieuw. Als het ‘bean-funnel leeg’-lampje brandt, vervangt u de lege bean-funnel met een volle bean-funnel. Als het Ik krijg de zetgroep niet zijn uitgangspositie terugkeren. Ik kan de zetgroep niet terugschuiven in de Controleer of de referentietekens op de zijkant van de zetgroep bij elkaar De servicedeur opent niet.
NEDERLANDS Probleem Het ‘waterreservoir leeg’-lampje, het lampje, het ‘bean-funnel leeg’-lampje en het CALC CLEAN-lampje knipperen gelijktijdig. 59 Mogelijke oplossing deze dan uit en haal de stekker uit het stopcontact. Verwijder de zetgroep, funnel u deze handeling 2-3 keer herhalen voordat alle lampjes uit gaan. Als het probleem zich blijft voordoen, gaat u naar www.senseo.com/sarista/support of neemt u contact op met het Consumer Care Centre.
FRANÇAIS Table des matières Introduction 60 Description générale 61 Important 61 Danger 61 Avertissement 62 Attention 62 Conformité aux normes 63 Avant la première utilisation 63 Installation de la machine à café 63 Installation et retrait des recharges de café en grain 64 Avant l’utilisation 65 Remplissage du réservoir 65 Cycle de rinçage automatique 65 Utilisation de la machine à café 66 Préparation d’une ou de deux tasses de café 66 Préparation d’une verseuse entière de café 68 Sélection de l’intensi
FRANÇAIS 61 Pour en savoir plus sur la machine à café Philips SENSEO® SARISTA bean-funnel (à recharge de café en grain) et pour visionner des vidéos comprenant des instructions sur la façon d’utiliser la machine à café et les recharges de café en grain, allez sur www.philips.com/senseo-sarista. Pour obtenir de l’aide ou pour accéder à des vidéos sur le nettoyage, l’entretien et le détartrage de la machine à café ou le réglage du moulin à café, accédez à www.senseo.com/sarista/support.
FRANÇAIS Avertissement - - - sur l’appareil correspond à la tension du secteur. Cette machine à café n’est pas destinée à être utilisée par des personnes (notamment des enfants) dont les capacités physiques, sensorielles ou intellectuelles sont réduites, ou par des personnes manquant d’expérience ou de connaissances, à moins que celles-ci ne soient sous surveillance ou qu’elles n’aient reçu des instructions quant à l’utilisation de la machine à café par une personne responsable de leur sécurité.
FRANÇAIS 63 - Veillez à ne pas faire tomber la verseuse. Si la verseuse tombe alors qu’elle est pleine, ne versez pas son contenu pour éviter toute blessure ou tout dommage. La paroi intérieure de la verseuse risque d’être cassée suite à la chute. Pour éviter toute brûlure, versez toujours le contenu dans une tasse et ne buvez pas directement à la verseuse. Cette machine à café est uniquement destinée à un usage domestique normal.
Français Installation et retrait des recharges de café en grain Pour en savoir plus sur les recharges de café en grain et pour visionner des vidéos sur la façon de les placer dans la machine à café, rendez vous sur www.philips.com/senseo-sarista. 1 Tirez sur la bande déchirable vers le bas afin de retirer la pochette de protection de la recharge de café en grain. 2 Retirez l’anneau AROMA LOCK® de la recharge de café en grain.
FRANÇAIS 65 Avant l’utilisation Remplissage du réservoir Remplissez le réservoir d’eau fraîche avant chaque utilisation. Remarque : Le voyant « Réservoir d’eau vide » s’allume lorsqu’il n’y a pas assez d’eau dans le réservoir pour préparer une tasse de café. 1 Retirez le réservoir d’eau de la machine à café. 2 Rincez le réservoir d’eau sous le robinet. 3 Remplissez le réservoir avec de l’eau froide du robinet, jusqu’au niveau maximal (MAX).
Français 3 Placez une tasse sur la grille du plateau égouttoir. 4 Mettez la machine à café en marche en appuyant sur le bouton marche/arrêt. ,, Le voyant de fonctionnement commence à clignoter. ,, Après un bref temps de chauffe, l’eau s’écoule dans la tasse.Videz l’eau dans l’évier. ,, Lorsque le voyant de fonctionnement s’allume de manière continue, le cycle de rinçage est terminé et la machine à café est prête à être utilisée.
Français 67 3 Videz le plateau égouttoir si le voyant « Plateau égouttoir plein » est allumé. Remarque : Si vous ne tenez pas compte de cet indicateur, le plateau égouttoir risque de déborder pendant la préparation. 4 Faites glisser le bec verseur amovible dans la machine à café. 5 Placez une ou deux tasses sur la grille du plateau égouttoir. 6 Appuyez sur le bouton pour 1 tasse ou pour 2 tasses.
Français Remarque : Si la machine à café s’arrête lors de la préparation du café, le réservoir d’eau ou la recharge de café en grain est probablement vide ou le bac à marcs de café est plein. Remplissez le réservoir d’eau, remplacez la recharge de café en grain ou videz le bac à marcs de café et réappuyez sur le bouton pour 1 tasse ou 2 tasses pour terminer le cycle de préparation.
Français 69 5 Faites tourner le couvercle de la verseuse par son levier jusqu’à la position « Fermé/Préparation ». Dans cette position, la flèche située sur la poignée de la verseuse pointe vers le symbole « Fermé/ Préparation » sur le couvercle de la verseuse. 6 Placez la verseuse sur la grille du plateau égouttoir. Conseil : Pour que le café reste chaud plus longtemps, rincez la verseuse avec de l’eau chaude pour la préchauffer avant de faire du café. 7 Appuyez sur le bouton de la verseuse.
Français 1 Appuyez sur le bouton de sélection de l’intensité du café une fois ou plusieurs fois pour sélectionner l’intensité que vous souhaitez. ,, Le voyant d’intensité du café correspondant s’allume. -- e = café court/fort -- d = café normal -- c= café long/doux Cycle de rinçage manuel Outre le cycle de rinçage automatique, vous pouvez également lancer un cycle de rinçage manuel lorsque vous le souhaitez. Vous pouvez réaliser un cycle de rinçage manuel lorsque vous passez à une autre variété.
Français 71 Réglage du niveau de mouture du café Vous pouvez régler le moulin à café avec l’outil de réglage du niveau de mouture pour définir l’intensité du café selon vos goûts. Lorsque vous réglez le moulin à un niveau de mouture plus fine, votre café sera plus fort. Pour une saveur plus douce, réglez le moulin sur une mouture plus grossière. Remarque : Au fil du temps, le moulin peut passer à une mouture plus grossière.
Français 6 Insérez l’extrémité la plus large de l’outil de réglage du niveau de mouture à côté du capuchon de la zone de réglage de niveau de mouture et appuyez légèrement. Cette action entraîne l’ouverture automatique du capuchon. 7 Insérez l’extrémité étroite de l’outil de réglage du degré de mouture dans le trou de réglage du degré de mouture de sorte que l’ouverture au niveau de l’outil corresponde à la broche située en bas du trou. Appuyez sur le bouton pour 1 tasse.
FRANÇAIS 73 1 Retirez le réservoir d’eau de la machine à café. 2 sous le robinet. 3 Nettoyez le réservoir d’eau à l’eau chaude savonneuse et rincez-le sous le robinet. 4 l’abaissant doucement. 5 Remplissez le réservoir d’eau avec de l’eau fraîche du robinet, et faites-le glisser dans la machine à café. 6 Enlevez le bac à marcs de café de la machine à café et videz-le. 7 Nettoyez le bac à marcs de café à l’eau chaude savonneuse et rincez-le sous le robinet.
FRANÇAIS 10 Enlevez la grille du plateau égouttoir et videz ce dernier. 11 Nettoyez le plateau égouttoir et la grille du plateau égouttoir à l’eau chaude savonneuse et rincez-les sous le robinet. 12 Nettoyez les rainures du plateau égouttoir au fond de la machine à café avec un chiffon humide. 13 Mettez la grille du plateau égouttoir sur le plateau égouttoir et insérez le plateau égouttoir dans la machine à café. Nettoyage du bec verseur de café amovible 1 Retirez le bec verseur de café amovible.
FRANÇAIS 75 1 Faites tourner le couvercle par son levier jusqu’au symbole « Ôter le couvercle ». Ensuite, retirez le couvercle de la verseuse. 2 Rincez l’intérieur de la verseuse et le couvercle à l’eau chaude. Nettoyez l’extérieur de la verseuse avec un chiffon humide. Remarque : La verseuse ne peut pas être nettoyée au lave-vaisselle. 3 Mettez la verseuse en position verticale sans le couvercle et laissez l’intérieur de la verseuse sécher.
Français 4 Appuyez sur le bouton PUSH (1) et retirez le groupe café en le maintenant (2) pour l’enlever de la machine à café. 5 Rincez l’extérieur du groupe café sous l’eau du robinet. N’utilisez jamais de savon ou tout autre produit de nettoyage pour nettoyer le groupe café. Ne séchez pas le groupe café avec un chiffon pour empêcher que des fibres ne tombent dans le groupe café. Après l’avoir rincé, retirez l’excès d’eau en le secouant.
Français 77 -- Assurez-vous que le levier est en contact avec la base du groupe café. 9 Assurez-vous que le crochet pour le blocage du groupe café est dans la bonne position. Le crochet n’est pas correctement positionné s’il est toujours dans la position la plus basse. -- Pour positionner correctement le crochet, poussez-le vers le haut jusqu’à ce qu’il soit dans la position la plus haute. 10 Faites glisser le groupe café dans la machine à café jusqu’à ce qu’il soit enclenché.
FRANÇAIS 12 Insérez le bac à marcs de café dans la machine à café. café après 400 tasses de café ou une fois par mois. www.senseo.com/sarista/support. Pour obtenir des résultats de mouture optimaux, nous vous conseillons - dans la Boutique Philips sur www.shop.philips.com/service. 1 Arrêtez la machine à café et débranchez-la. 2 Suivez les étapes 2 à 4 de la section « Nettoyage du groupe café » pour retirer le groupe café de la machine à café. 3 4 groupe café.
FRANÇAIS 6 79 café. 7 Suivez les étapes 9 à 11 du chapitre « Nettoyage du groupe café » pour placer le groupe café et le bac à marcs de café dans la machine à café. Détartrage de la machine à café Des résidus de calcaire se déposent dans la machine à café pendant l’utilisation. Il est nécessaire de détartrer la machine à café lorsque le voyant CALC CLEAN s’allume. Utilisez uniquement la solution de détartrage Philips SENSEO® SARISTA (CA6400) pour détartrer la machine.
Français Procédure de détartrage La procédure de détartrage dure 45 mn et est constituée d’un cycle de détartrage et de deux cycles de rinçage. N’interrompez pas le cycle de détartrage et n’éteignez pas la machine à café avant la fin des deux cycles de rinçage. Remarque : Une fois que vous avez lancé le cycle de détartrage, vous ne pouvez pas l’arrêter avant qu’il soit entièrement terminé. Même si vous débranchez la prise, la machine restera en mode de détartrage.
Français 81 7 Placez un bol d’une capacité de 1,5 litre sur la grille du plateau égouttoir. 8 Appuyez sur le bouton pour 1 tasse et sur le bouton pour 2 tasses simultanément pendant 1 seconde pour démarrer la procédure de détartrage. ,, Le voyant de fonctionnement et le voyant CALC CLEAN clignotent tous les deux lentement pour indiquer que le cycle de détartrage a démarré. ,, De l’eau mélangée à la solution de détartrage s’écoulent par intermittence.
Français 4 Videz le bol (1) et placez-le sur la grille du plateau égouttoir (2). 5 Appuyez sur le bouton pour 1 tasse et sur le bouton pour 2 tasses simultanément pendant 1 seconde pour démarrer le cycle de rinçage. ,, Le voyant de fonctionnement et le voyant CALC CLEAN clignotent lentement. ,, Pendant le cycle de rinçage, l’eau sort de la machine à café de façon continue.
FRANÇAIS 83 Commande d’accessoires Pour acheter des accessoires pour cette machine à café, rendez-vous sur notre boutique en ligne à l’adresse www.shop.philips.com/service. Si la boutique en ligne n’est pas disponible dans votre pays, contactez votre revendeur Philips ou un Centre Service Agréé Philips. Si vous rencontrez des problèmes pour vous procurer des accessoires pour votre machine, contactez le Service Consommateurs Philips de votre pays.
Français Signification des voyants Voyant lumineux Signification Action Le voyant « Réservoir d’eau vide » reste allumé de manière continue. Il n’y a pas assez d’eau dans Remplissez le réservoir d’eau (voir le le réservoir d’eau. chapitre « Avant utilisation »). Le réservoir d’eau n’est pas Insérez-le correctement dans la machine à correctement inséré. café. Le voyant « Bac à marcs Le bac à marcs de café est de café plein » reste allumé plein. de manière continue.
FRANÇAIS Voyant lumineux 85 Action Le voyant de fonctionnement clignote lentement. La machine à café est en train de chauffer ou en cours de rinçage. Patientez jusqu’à ce que le voyant de fonctionnement s’allume de manière continue. Le voyant de fonctionnement clignote pendant la mouture. Ceci indique que la tasse de café en cours de préparation. Le voyant de fonctionnement clignote une ou deux fois lorsque vous préparez une ou deux tasses.
FRANÇAIS Problème Solution possible La machine à café ne fonctionne pas. Branchez la machine à café et mettez-la en marche. Assurez-vous que la tension indiquée sur la machine à café correspond bien à la tension du secteur. Remplissez le réservoir d’eau. Si le voyant de fonctionnement clignote rapidement, assurez-vous que le groupe café est correctement inséré et que la porte d’accès au groupe café de l’appareil est correctement fermée (voir le chapitre « Nettoyage du ».
FRANÇAIS Problème Il est impossible de réinsérer le groupe café dans la machine à café. 87 Solution possible vous au chapitre « Nettoyage et entretien » ou regardez les vidéos d’instructions sur le nettoyage du groupe café sur www.senseo.com/sarista/support. La porte d’accès au Peut-être avez-vous tenté d’ouvrir la porte d’accès au groupe café de la groupe café de l’appareil machine à café pour retirer le groupe café alors que le bac à marcs de café ne s’ouvre pas. était dans la machine à café.
Français Spécificités techniques Fonction Valeur / emplacement Tension nominale Intérieur de la porte d’accès au groupe café Puissance nominale Intérieur de la porte d’accès au groupe café Matériau Plastique Longueur du cordon 1,5 m Capacité du réservoir d’eau 1 250 ml Capacité du bac à marcs de café 10 galettes Capacité de la verseuse 6 tasses 4203_000_7242_1_DFU Booklet_Lux_A5_v2.
4203_000_7242_1_DFU Booklet_Lux_A5_v2.
4203_000_7242_1_DFU Booklet_Lux_A5_v2.
4203_000_7242_1_DFU Booklet_Lux_A5_v2.
15002966 - Rev00 4203.000.7242.1 4203_000_7242_1_DFU Booklet_Lux_A5_v2.