
User's Manual
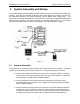
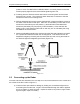

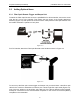
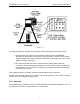
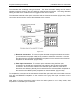


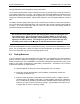
Table Of Contents

2-System Assembly and Startup pulseEKKO PRO TLF Transmitter
4
quarter of a turn. DO NOT APPLY UNDUE FORCE. It is usually best to have all the
screws properly aligned in their socket before tightening each one.
d) Carefully place the electronic boxes down onto the mounting block such that both
brass pins fully connect. Then use the 2 plastic draw latch connectors to hold the
electronics boxes on the mounting block.
e) With the transmitter and receiver power switched OFF, unlatch the 2 battery covers on
the sides of the electronics and open. Place one 12-volt battery on each side on the
electronics boxes making sure the positive (+) terminal faces inward toward the
electronics (the battery only fits properly in this orientation). Close and latch the
battery covers. Note that the system will run with only one 12 volt battery but using
two batteries is recommended.
f) Attach the adjustable handle to the antenna using the flat head screwdriver to tighten
the 4 quarter-turn fasteners as with the mounting block. This handle can then be
adjusted for height by loosening the 2 knurled knobs by hand, moving the handle to
the desired height and retightening the knobs (Figure 2-2).
Figure: 2-2
2.2 Connecting up the Radar
Once the antennas are assembled, the next step is to connect the antennas to the console and
the console to the DVL. Refer to Figure 2-1.
a) Check the fiber optic cables for damage by holding one end towards a light source
and looking into the other end. If light is not transmitted through the cable or appears
dim, then replace or repair the cable. Inspect the cable for any kinks or signs of dam-
age and, again, repair if necessary.