
User's Manual


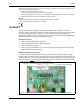

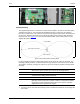

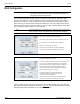
Table Of Contents

Installation Rev A
Page 4 FlexZone Wireless Gate Sensor
Installing the receiver on the FlexZone processor
1. Remove and retain the mounting hardware from the 2 standoffs on the FlexZone processor
(flat washer, lock washer, machine screw).
2. Align the 20-pin header on the bottom of the receiver with the expansion header on the
FlexZone processor and align the 2 mounting holes on the receiver with the 2 standoffs.
Carefully, insert the receiver into the expansion header. Use the retained mounting hardware
to secure the receiver to the FlexZone processor.
3. Connect the antenna to the receiver (see Figure 2
).
Installing the receiver on an NIC
1. Remove and retain the mounting hardware securing the NIC to the processor (flat washer,
lock washer, machine screw).
2. Secure the NIC to the FlexZone processor with the 2 supplied standoffs.
3. Align the 20-pin header on the bottom of the receiver with the expansion header on the NIC
and align the 2 mounting holes on the receiver with the 2 standoffs on the NIC. Carefully, insert
the receiver into the expansion header. Use the retained mounting hardware to secure the
receiver to the NIC.
4. Connect the antenna to the receiver (see Figure 2
).
CAUTION The FlexZone processor, network interface card and receiver all contain
static sensitive components. Follow proper ESD handling procedures when
working on the cards.
Disconnect all sources of power to the FlexZone processor before installing
the receiver.
Figure 3 Mounting the receiver on the FlexZone processor
Figure 4 Mounting the receiver on the NIC (steps 1 & 2)