
User's Manual


Rev S-00001-20051010-1 Page 8 of 15
assure proper adhesion.
v. If moisture is noticed, use heat-gun and or propane torch to dry the inside or the
cored hole.
vi. Using Section 4, prepare SmartStud Adhesive for application. If another epoxy or
adhesive is used, the preparation procedure should be completed.
vii. Fill the hole ¼ full of the adhesive.
viii. Determine Sensor orientation (See Sensor Location and Orientation section), and
place sensor in the hole. The Epoxy should still have work time, so the sensor can be
rotated for perfect alignment, and pushed down so it lays flat on the holes floor.
ix. Fill in the remaining empty space of the hole with the adhesive.
x. Depending on ambient temperature and humidity, the SmartStud adhesive can take
from 5 to 25 minutes to harden. Verify hardness before completion.
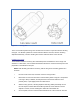
3.3 VSN240-S Install
Figure 3 VSN240-S Surface Mount Sensor
Required Equipment
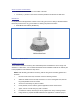
i. VSN240-S Sensor
ii. Gloves and safety glasses.
iii. At least 150ml or 1/2 of a SmartStud Adhesive tube.
iv. SmartStud applicator.
v. Chisel and hammer.
vi. Drill based metal wire brush, or any industrial grade metal wire brush for removing
dirt, grime, and oil,
vii. Drill that supports metal brush.
viii. Shop Vacuum or brush.
ix. Heat gun or propane torch. * When installing in moist environments.