
User's Manual


090203A-1 9
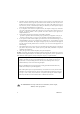
POWER CONNECTION
CAUTION: You must use a Class II, 120 Volt AC/9 Volt DC adaptor that delivers at least 200mA.
The center tip must be positive and the plug must correctly fit the unit’s DC 9V jack.
1. Plug the AC adaptor into a standard AC outlet.
2. Insert the small plug inot the DC 9V jack on the rear of the base unit as shown in Figure 6.
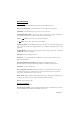
HEADSET CONNECTION
One of the special features of your phone is that your handset could utilize a headset(not included) for
hands-free communication. Insert the small plug at the end of your headset cord to the headset jack at the
side of the handset as shown in Figure 7. Follow the procedures discussed in “Placing a Call” when to
place and receive a call.
Note: The headset jack of your cordless telephone is compatible with 2.5mm headset plugs only. When
you plug in the headset into the headset jack, it automatically mutes the microphone and speaker of the
handset. Unplug the headset to return the handset to normal use.
INITIAL SETUP
Please follow these steps before using the cordless telephone for the first time.
1. Ensure that the handset battery pack is installed and charged fully for at least 14 hours.
2. Ensure that all connections(line cord and adaptor cord) are properly inserted into rear of the base
unit.
SETTING THE TONE/PULSE MODE
Select the appropriate dialing service by moving the TONE/PULSE switch at the rear of the base unit:
· TONE for Tone service , or
· PULSE for Rotary service.
9VDC200mA
LINE
TONE PULSE
AC Outlet
AC Adaptor
DC 9V Jack
AC Adaptor
Plug
(Figure 6)
Tone/Pulse
Switch
Handset Jack
(Figure 7)
Telephone Line Jack