
User's Manual


090203A-1 7
IN USE/CHARGE LED Indicator -Lights up steadily when the phone is in talk mode and turns off
when the handset is not in use. Also lights up steadily when paging the handset. Lights up steadily when
the handset is being charged on the base and turns off when the handset is removed from its cradle.
Visual Ringer Indicator - Flashes to indicate the phone is ringing, as a signal to the user, when the ringer
is off.
PAGE Button - Allows you to locate the handset when it is not on the base, or to alert the person near the
handset.
TONE/PULSE Switch - A switch located on the rear of the base unit, which allows you to set the dialing
mode to either Tone dialing or Pulse(rotary) dialing.
DC 9V jack - A jack located on the rear side of the base unit used for connecting the AC adaptor to the
base unit.
TEL LINE jack – Accepts line cord to make connection with modular type telephone outlet.
INSTALLATION
CAUTION: USE ONLY THE NICKEL CADMIUM(Ni-Cd) BATTERY TYPE INCLUDED
WITH THIS UNIT. USE OF OTHER BATTERY TYPES MAY CAUSE INJURIES OR DAMAGE.
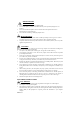
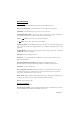
1. Remove the battery compartment cover of the handset by pressing the top of the cover and sliding it
down.
2. Connect the Ni-Cd battery pack plug along the slot into the handset’s battery connector as shown
below.
3. Insert the Ni-Cd battery into the battery compartment.
4. Replace the battery compartment cover by sliding it up towards the handset.
NOTE: Use the type and size of Ni-Cd battery pack, 3.6V, 450mAh. It is recommended that the Ni-Cd
battery pack should be fully charged overnight prior to initial use.
Belt Clip Installation
With the back of handset facing up, insert one side of the belt clip hook into the matching slots at the top
side of handset as shown in Figure2. Slide the other hook until it locks into place from the opposite side
of the handset.
Handset
Battery
C
ompartment
Ni
-Cd Battery
Pack
Red
wire
Black
Wire
Battery
Connector
(Figure 1)