
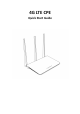
Quick Start Guide

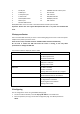

1
1*LAN port
8
4G&WIFI external antenna ports
2
1*WAN port
9
SYS indicator
3
1*Telephone port
10
ETH indicator
4
1* Micro USB
11
WiFi/WPS indicator
5
1*Reset/WPS button
12
WAN(4G) indicator
6
Power Input
13
NET indicator
7
Standard SIM card slot
Reset/WPS button: Press more than 3 seconds for Reset and Short press for WPS
Important: Router does not support Micro/Nano SIM card or any other non-standard SIM
cards.
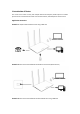
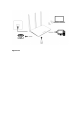
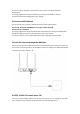
2 Setup your Router
Inset a standard SIM card firstly as shown in the following diagram and then connect the power
adapter to the power input of the router.
Power on the router, and it will search for available mobile networks automatically.
Do not inset or remove the SIM card when the router is running, as this may affect
performance or damage the SIM card.
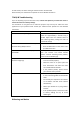
The intuitive indicators display the router’s status
Indicator
Status
SYS
Power indicator
On: Device powered on
Off: Device Powered off
ETH
On: Connected to the Ethernet network via
WAN port or LAN port
Blinking: Data transfer
WIFI/WPS
On: WiFi is enabled
Off: WiFi is disabled
Blinking: WPS connection set up in progress
WAN
On: Connected to the 4G network
Off: Connected to the non-4G network.
NET
Wireless Dialing indicator
On: Registered to a Network
Off: No register to the Network
Blinking: Data transfer
3 Configuring
You can configure the router using the WebUI Settings page.
1. Launch the Internet browser, and enter http://192.168.1.1 in the address bar.
2. Enter the password, and log in to the web management page. The default password is
admin.