frpFiberglass Reinforced Panels INSTALLATION GUIDE for corrugated roofing panel installation SEQUENTIA SUPER600® | SEQUENTIA WEATHERGLAZE®
installation guide for corrugated roofing panel installation DISCLAIMER PLEASE READ ALL INSTRUCTIONS BEFORE BEGINNING INSTALLATION These guidelines are provided in good faith to help prevent installation problems caused by common errors. The manufacturer and/or distributor of the product bears no responsibility for installation actions taken or not taken.
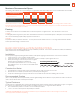
Maximum Recommended Spans The following data is based upon uniform loading of corrugated FRP panels with a safety factory of 2.5, and fastened as recommended. 10 psf 20 psf 30 psf 40 psf WeatherGlaze Panel 38” 31” 27” 24” Super 600 Panel 38” 32” 30” 24” Corrugated Panels NOTE: Table is based on a section properties or actual load test. Design loads are governed by local building codes. Conduct code authorities for specific load and stresses.
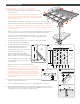
installation guide for corrugated roofing panel installation 12 BUILDING A PATIO COVER 1. 11 Install concrete slab and footings in accordance with local building code requirements. 2 NOTE: Building code requirements and available hardware styles will vary depending on where you live and the size of your plan. Make necessary adjustments accordingly. Follow manufacturer’s instructions for installing anchor brackets. 2.
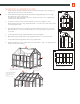
BUILDING A GREENHOUSE 1. Choose a good building site, preferably: level ground with good drainage, sunny area away from large trees, and close access to water and electric Dia. 1 BACK Leave 1-1/2” gap for 2x6 ridge board. Cut Rafter ends at 45º. 3. Gable Rafter 59 ” 2. Choose desired footings/flooring materials and install accordingly. Make gravel floors 3’ larger than greenhouse footprint, make poured concrete floors 8” larger.
9. Determine necessary cuts for horizontal cross strips. 12 9 Prevailing Wind Direction 8 NOTE: Cut crown profiles to match-up with vertical edge strips. Test-fit the first cut strip, using a short piece of corrugated panel. When satisfied, use the test piece as a pattern for marking and cutting additional horizontal strips. Cut strips 1/4” shorter than needed to allow shifting. Tack horizontal strips to all horizontal framing members, using 1” galvanized nails in recesses between crowns.