
Installation Guide


BUILDING A PATIO COVER
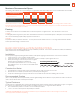
1. Install concrete slab and footings in accordance with local building
code requirements.
NOTE: Building code requirements and available hardware styles
will vary depending on where you live and the size of your plan. Make
necessary adjustments accordingly. Follow manufacturer’s instructions
for installing anchor brackets.
2. Assemble ledger board and fasten to existing structure using 5” x 1/2” hex head lag
screws. Note: Remove siding from behind ledger board before installing. See diagram 4.
NOTE: Remove siding behind ledger board before mounting ledger to wall. Lag screws must
be installed into framing. Use appropriate wall anchors on masonry walls. Space fasteners 16”
on center as required.
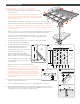
3. Fasten 4” x 4” posts to concrete slab/footings using approved steel anchor brackets. Use a
4’ level and temporary wood bracing to hold posts in an upright level position. (dia 1)
4. Have someone help lift and hold beam for this step. With 4” x 4” posts braced
securely, fasten the 4” x 6” beam header to top of posts, using approved steel
mounting brackets. See diagram 3.
5. Install permanent knee braces from posts to beam, as building code requires.
Remove temporary bracing. See diagram 4.
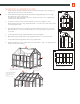
6. Cut and install rafters according to Diagrams
3. Option: approved rafter hangers may
be used (if not required) in conjunction
with ledger board. Rafters must install parallel.
7. For ease of assembly, install 2” x 6”
solid blocking as suggested in Diagram 2.
Option: blocking can be staggered differently
and/or reduced to 2” x 4” to suit personal taste.
8. Nail vertical edge strips to tops of rafters, using
1-1/2” galvanized nails. Hint: drill pilot holes to
prevent splitting.
9. Determine necessary cuts for horizontal cross strips.
NOTE: Cut crown profiles to match-up with vertical edge strips.
(See Diagram 5) Test-fit the first cut strip, using a short piece of
corrugated panel. When satisfied, use test piece as a pattern for
marking and cutting remaining horizontal pieces. Cut strips ¼”
shorter than needed to allow shifting. Tack horizontal strips to tops
of blocking boards using 1” nails in recesses between crowns.
Continue checking alignment of strips, using a small strip of
corrugated panel.
10. For easier, neater finishing, paint or stain patio cover framing before
installing corrugated panels onto roof.
11. Follow corrugated panel installation instructions for fastening panels to roof framing.
12. Install corrugated end wall flashing: Place flashing behind existing siding where possible.
Use approved mastic to bond flashing to masonry walls. WARNING: Do not step or kneel on
corrugated panels without using planks to distribute weight.
1
5
4
6
2
12
9
7
8
3
11
Install
Temporary
Bracing
Level Post
to Vertical
Position
Dia. 1
2x6 Rafter Details
4
"
x 6
"
Header
Beam
14
"
4
"
Steel
Bracket*
4
"
x 4
"
Post
2
"
x 6
"
Ledger
Board
2
"
x 2
"
Ledger
5
"
x 1/2
"
Lag Screws (Spaced 16
"
O.C.)
* Follow manufacturer’s instructions for installing
Dia. 3
Knee Brace Details
32-1/2
"
3-1/2
"
2-
1
/8
"
2-1/8
"
3-1/2
"
18
"
18
"
45
Angle cuts at
ends of Braces
Dia. 4
5
"
x 1/2
"
Lag Screws
Vertical StripHorizontal Strip
2
"
x 6
"
Solid Blocking2
"
x 6
"
Solid Blocking
Screw-Type
Fastener
Panel Fasteners
Nail-Type
Fastener
2
"
x 6
"
Rafter
Sequentia Panel
Dia. 5
= Clear Sealer
5-Panel Coverage
Existing
Structure
Existing
Structure
10
'
x 10
'
Roof Plan Shown
Top View
Ledger Board
3
'
1
'
-6
"
3
'
3
'
3
'
3
'
1
'
-6
"
1
'
1
'
24
"
O.C.
24
"
O.C.
24
"
O.C.
24
"
O.C.
24
"
O.C.
1
"
Min. Panel
Overhang
on 3 Sides
2
"
x 6
"
Rafters
Cut to: 9
'
-9-1/2
"
Header
Beam
Blocking
9
'
to Centerline of Post
10
'
Panel Length
C
L
Dia. 2
installation guide for corrugated roofing panel installation